๐Ÿงถ Beautiful โœจ Detailed ๐Ÿ’ Adorable

Yip Yip Aliens Crochet Pattern

Yip Yip Aliens Crochet Pattern
4.7โ˜… Rating
8-10 Hours Time Needed
2.0K Made This
โœ‚๏ธ

Intermediate Level

Ideal for those with basic knitting experience, featuring slightly more advanced stitches and techniques to expand your skills.

โฑ๏ธ

All-Day Adventure

Requires 8-10 hours, ideal for a full day of immersive knitting.

๐Ÿงธ

Cute Companion

An adorable friend to cherish, handcrafted with love to bring comfort and joy for years to come.

About This Yip Yip Aliens Crochet Pattern

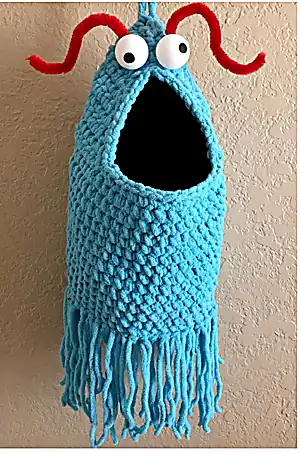
This delightful Yip Yip pattern brings those beloved Sesame Street aliens to life in functional form. The pattern includes both crochet and knit versions, allowing you to choose your preferred technique. With detailed instructions for creating the body, tentacles, eyes, and fabric lining, you'll craft a sturdy storage solution that's as charming as it is practical.

Yip Yip Aliens Crochet Pattern crochet pattern - detailed view of completed project

The finished piece measures 25 inches in circumference and 14 inches in height, making it perfect for storing toys, laundry, or holiday treats. The characteristic ping pong ball eyes and pipe cleaner antennae give each Yip Yip that unmistakable wobbly personality.

Why You'll Love This Yip Yip Aliens Crochet Pattern

I absolutely love how this pattern combines nostalgia with functionality! There's something so satisfying about creating these iconic characters that instantly transport you back to childhood memories of Sesame Street. I find the process of attaching the tentacles particularly meditative, and watching the personality emerge as you add the googly eyes is pure magic. The versatility is fantastic too - I've made these as storage for my craft room and as unique gift bags for special occasions.

Yip Yip Aliens Crochet Pattern step 1 - construction progress Yip Yip Aliens Crochet Pattern step 2 - assembly progress Yip Yip Aliens Crochet Pattern step 3 - details and accessories Yip Yip Aliens Crochet Pattern step 4 - final assembly and finishing

Switch Things Up

I love experimenting with different color combinations to create unique Yip Yip personalities! Try making a rainbow version using multiple colors in stripes, or go bold with neon shades for a modern twist.

For added functionality, I sometimes create smaller versions as gift bags for parties or holidays - just scale down the measurements proportionally.

Consider making themed versions too - imagine Halloween Yip Yips in orange and black, or Christmas ones in red and green with metallic antennae!

You could also vary the tentacle technique by using ribbon or fabric strips instead of yarn for a completely different texture.

For kids' rooms, I like to add internal pockets to the lining for better organization of small toys and treasures.

Common Mistakes & How to Fix Them

โœ— Forgetting to place stitch markers when working in continuous rounds - this leads to uneven shaping โœ— Making tentacles too uniform in length - embrace the wonky asymmetrical look for authentic character โœ— Stuffing the body too tightly which makes it difficult to use as functional storage โœ— Not securing pipe cleaner antennae properly resulting in loose wobbly eyes that fall off

Yip Yip Aliens Crochet Pattern

Create these iconic lovable aliens from late 20th century children's television! These adorable Yip Yips can serve multiple purposes - use them as festive holiday stockings, convenient toy storage, or even kids' laundry bags. With their characteristic tentacles and googly eyes, they'll bring that delightful 'yip yip yip yip uh-huh uh-huh' charm to any space. Perfect for Sesame Street fans of all ages, this versatile pattern offers both crochet and knit versions to suit your preferred crafting style.

Intermediate 8-10 Hours

Materials Needed for Yip Yip Aliens Crochet Pattern

โ€” Main Fabric

  • 01
    Bernat Blanket/Blanket Brights/Baby Blanket yarn (100% polyester, 220yds/201m per 300g skein)
  • 02
    Available colors: Royal Blue, Pixie Pink, Pow Purple, Baby Teal, Crimson, Baby Lilac

โ€” Tools Required

  • 01
    L/8mm crochet hook
  • 02
    US10.5/6.5mm circular needle (24 inches long)
  • 03
    Stitch marker
  • 04
    Tapestry needle
  • 05
    2 ping pong balls
  • 06
    Black paint pen or permanent marker
  • 07
    2 pipe cleaners (12 inches long)
  • 08
    Awl, ice pick, or corn pick
  • 09
    Black flannel fabric (16 inches by 24 inches)
  • 10
    Scissors
  • 11
    Sewing needle
  • 12
    Black thread

Progress Tracker

0% Complete

โ€” Crochet Body :

Setup :

Make a slip knot

Round 1 :

6 sc into slip knot. Place stitch marker on first st. Move marker up to first st of each new round as you work

Round 2 :

2 sc into each st. โ€“ 12 sts

Round 3 :

[Sc in next st, 2 sc in following st] to end. โ€“ 18 sts

Round 4 :

[Sc in each of next 2 sts, 2 sc in following st] to end. โ€“ 24 sts

Round 5 :

[Sc in each of next 3 sts, 2 sc in following st] to end. โ€“ 30 sts

Round 6 :

[Sc in each of next 4 sts, 2 sc in following st] to end. โ€“ 36 sts

Round 7 :

[Sc in each of next 5 sts, 2 sc in following st] to end. โ€“ 42 sts

Round 8 :

[Sc in each of next 6 sts, 2 sc in following st] to end. โ€“ 48 sts

Round 9 :

Sc into back loop of each st. (The tentacles will be attached to the front loops of this round.)

Round 10 :

Sc in each st

Info :

Repeat Round 10 an additional 11 times, or until body measures 8 inches from front loops of Round 9

Row 22 [RS] :

Sc in each of next 16 sts, turn

Row 23 [WS] :

Ch1, sc dec in next 2 sts, sc in each of next 27 sts, sc dec in next 2 sts, turn. โ€“ 29 sts

Row 24 :

Ch1, sc dec in next 2 sts, sc in each of next 25 sts, sc dec in next 2 sts, turn. โ€“ 27 sts

Row 25 :

Ch1, sc dec in next 2 sts, sc in each of next 23 sts, sc dec in next 2 sts, turn. โ€“ 25 sts

Row 26 :

Ch1, sc dec in next 2 sts, sc in each of next 21 sts, sc dec in next 2 sts, turn. โ€“ 23 sts

Row 27 :

Ch1, sc dec in next 2 sts, sc in each of next 19 sts, sc dec in next 2 sts, turn. โ€“ 21 sts

Row 28 :

Ch1, sc dec in next 2 sts, sc in each of next 17 sts, sc dec in next 2 sts, turn. โ€“ 19 sts

Row 29 :

Ch1, sc dec in next 2 sts, sc in each of next 15 sts, sc dec in next 2 sts, turn. โ€“ 17 sts

Round 30 :

Ch1, sc dec in next 2 sts (move marker to this st), sc in each of next 7 sts, ch12 (this will be the hanging loop so feel free to chain more or fewer for your desired loop length), sc in each of next 6 sts, sc dec in next 2 sts, do not turn. โ€“ 15 sts (do not count hanging loop chain)

Round 31 :

Sc in first st of previous round (with the marker in it), [sc dec in next 2 sts, sc in following st] twice, sc dec in next st and first st after hanging loop chain, [sc in next st, sc dec in following 2 sts] twice. โ€“ 10 sts

Round 32 :

[Sc dec in next 2 sts] 5 times. โ€“ 5 sts

Finishing :

Cut yarn and tie off. Using tapestry needle, thread tail in and out of final sts and cinch closed. Join yarn at top point of mouth opening. Work 13 sc down first side of mouth, 17 sc along bottom edge of mouth, 12 sc up second side of mouth, slip st in first st of this round. Cut yarn and tie off. Weave in ends.

โ€” Tentacles :

Step 1 :

Cut 48 strands of yarn roughly 8-12 inches long. There's no need to be precise. In fact, variable length for the tentacles is better.

Step 2 :

Insert crochet hook upward through one of the front loops not used in Round 9 (crochet version) or the purl bumps of Round 14 (knit version).

Step 3 :

Fold a strand in half roughly (again, no need to be precise). Grab the middle with your hook and pull it through.

Step 4 :

Grab both tails with hook and pull through loop.

Step 5 :

Gently pull to tighten. Repeat Steps 2-5 with each strand and each front loop or purl bump around the body.

โ€” Eyes & Antennae :

Step 1 :

Using a sharp implement, carefully poke a small hole in a ping pong ball. Wiggle it around to widen the hole a bit.

Step 2 :

Poke a second hole about 1/2 inch away from the first. Widen this hole as well until you can stick the tool in one hole and out the other.

Step 3 :

Feed one end of a pipe cleaner through the holes. You may have to bend the end slightly.

Step 4 :

Pull about an inch of pipe cleaner out the other side.

Step 5 :

Repeat Steps 1-4 with a second ping pong ball and pipe cleaner.

Step 6 :

Poke the short end of both pipe cleaners through the fabric on either side of the top of the head.

Step 7 :

Twist the ends of the pipe cleaners together on the underside of the fabric.

Step 8 :

Feed the long end of both pipe cleaners through the fabric near where you poked through the short ends in Step 6, but not in the exact same place.

Step 9 :

Twist the ends of the pipe cleaners together a couple times on the underside of the fabric. Then feed them back up through the same holes as in Step 8.

Step 10 :

Bend antennae into desired shape.

Step 11 :

Using a paint pen or permanent marker, draw pupils on each ping pong ball. Once again, there is no need to be precise as a little asymmetry will give your Yip Yip that delightfully wacky expression.

โ€” Lining :

Step 1 :

Fold lining fabric in half widthwise.

Step 2 :

With the folded edge to the left, cut a 3-inch square from each of the bottom corners, cutting through both layers of fabric.

Step 3 :

Measure 4 inches down from the top right corner and cut inward 4 inches through both layers. Then measure 7 inches across from the top right corner and cut downward at an angle to meet the stopping point of your previous cut.

Step 4 :

Either by hand or with a sewing machine, sew across the top flat edge, the right edge, and the bottom edge.

Step 5 :

Pinch the fabric of each bottom corner so that the bottom seam meets the side seam on the right side and the bottom seam meets the original fold on the left side. Sew both corners closed.

Step 6 :

Insert the lining, with seams facing outward, into the body. There is no need to fold over the top edge of the lining fabric if you used flannel or another non-fraying fabric. Hand-sew around the mouth opening using short, straight stitches.

Step 7 :

Hang your finished Yip Yip in a place of honor for all to admire.

Assembly Instructions

  • Complete the main body using either crochet or knit instructions, ensuring proper stitch count throughout
  • Attach tentacles by threading yarn strands through the designated front loops or purl bumps around the body base
  • Create eyes by threading pipe cleaners through ping pong balls and securing them to the top of the head
  • Twist pipe cleaner ends together on the underside of fabric to secure antennae in place
  • Draw pupils on ping pong balls with paint pen for that characteristic Yip Yip expression
  • Prepare fabric lining by cutting and sewing according to pattern measurements
  • Insert completed lining into body with seams facing outward and hand-sew around mouth opening

Important Notes

  • ๐Ÿ’กUse stitch markers consistently when working in continuous rounds to maintain proper shape
  • ๐Ÿ’กEmbrace imperfection in tentacle lengths and eye placement for authentic Yip Yip character
  • ๐Ÿ’กChoose appropriate yarn weight and maintain consistent gauge for structural integrity
  • ๐Ÿ’กSecure pipe cleaner antennae properly to prevent eyes from becoming loose over time
  • ๐Ÿ’กUse non-fraying fabric like flannel for lining to eliminate need for hemming edges

This charming Yip Yip pattern brings beloved Sesame Street nostalgia into your home with practical functionality. Whether you choose the crochet or knit version, you'll create a delightful storage solution that captures the whimsical spirit of these iconic aliens. The combination of soft yarn texture, bouncy tentacles, and googly eyes makes each finished piece a conversation starter that's sure to bring smiles to faces of all ages. ๐Ÿงถ Happy crafting! ๐Ÿงตโœจ

You ask,

we answer.

FAQs

Can I use different yarn weights for this pattern?

While the pattern is designed for chunky Bernat Blanket yarn, you can substitute with other chunky weight yarns. Just be sure to maintain the same gauge of 8 stitches = 4 inches to achieve the proper size.

How do I prevent the tentacles from tangling during use?

The beauty of Yip Yips is their messy, wild appearance! If tangling becomes an issue, you can gently separate them by hand or trim some tentacles shorter for easier management.

Can I make this without the fabric lining?

Yes, but the lining provides structure and prevents items from showing through the stitches. Without it, your Yip Yip will be more decorative than functional for storage.

What if I can't find ping pong balls for the eyes?

You can substitute with any lightweight round objects like foam balls, or even crochet your own spherical eyes using white yarn and stuff them firmly.

Is this pattern suitable for beginners?

This pattern requires knowledge of basic crochet or knitting techniques, including working in the round and following stitch counts. Complete beginners might want to practice these skills first on simpler projects.