🧢 Beautiful ✨ Detailed πŸ’ Adorable

Christmas Tree Cat Amigurumi Pattern

Christmas Tree Cat Amigurumi Pattern
4.4β˜… Rating
3-4 Hours Time Needed
3.6K Made This
βœ‚οΈ

Beginner Friendly Level

Perfect for those just starting their sewing journey, with clear instructions and simple techniques

⏱️

Bite-Sized Project

Complete in under 2 hoursβ€”quick, fun, and perfect for a little creative escape.

πŸŽ„

Holiday Cheer

Festive fun for the season, bringing handmade magic to celebrations and creating new family traditions.

About This Christmas Tree Cat Amigurumi Pattern

This delightful Christmas Tree Cat pattern combines the sweetness of an amigurumi cat with festive holiday spirit. The unique design features a white cat head with adorable pink inner ears and a special Christmas tree-inspired body created with alternating green and white layers. The pattern includes a charming green Christmas hat with decorative pompom to complete the seasonal look.

Christmas Tree Cat Amigurumi Pattern crochet pattern - detailed view of completed project

Perfect for beginners, this pattern uses basic crochet stitches and includes detailed step-by-step instructions with helpful photos. The finished cat stands beautifully and makes an excellent holiday decoration or gift.

Why You'll Love This Christmas Tree Cat Amigurumi Pattern

I absolutely love how this pattern brings together the cozy comfort of amigurumi with the magic of Christmas! The unique tree-like body design is so creative and eye-catching, while the sweet cat face adds that irresistible charm. What I find most rewarding is how quickly this little guy comes together - perfect for last-minute holiday gifts or when you want that instant gratification of completing something beautiful.

Christmas Tree Cat Amigurumi Pattern step 1 - construction progress Christmas Tree Cat Amigurumi Pattern step 2 - assembly progress Christmas Tree Cat Amigurumi Pattern step 3 - details and accessories Christmas Tree Cat Amigurumi Pattern step 4 - final assembly and finishing

Switch Things Up

I love experimenting with color combinations for this pattern! Instead of the traditional green and white, I've tried making autumn versions with orange and brown layers that look like a pumpkin cat, or spring versions with pink and yellow for a flower-inspired look. You could also create a rainbow version using different bright colors for each layer - kids absolutely love these colorful variations!

For a more elegant approach, I sometimes use metallic threads mixed with the white yarn to add subtle sparkle, especially beautiful for Christmas gifts. Another fun variation I enjoy is making the cat slightly larger by using worsted weight yarn with a bigger hook - this creates a wonderful huggable size perfect for children.

I've also discovered that adding small jingle bells inside the body (safely enclosed in stuffing) creates a delightful sound when the cat is moved, making it extra special for little ones. The pattern works beautifully as a series too - I often make multiple cats in different holiday themes to create a seasonal collection throughout the year.

Common Mistakes & How to Fix Them

βœ— Forgetting to change to back loops only (BLO) can affect the layered tree texture βœ— Not stuffing firmly enough before closing sections can result in a floppy finished product βœ— Placing eyes too close together ruins the sweet expression - maintain 9 stitches between them βœ— Skipping the wire in the tail makes it difficult to pose and less stable

Christmas Tree Cat Amigurumi Pattern

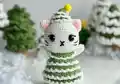
Create your own adorable Christmas Tree Cat amigurumi with this detailed pattern! This charming white cat features a festive green tree-like body with decorative white layers, pink inner ears, and a cute Christmas hat topped with a pompom. Perfect for holiday crafting, this sweet companion combines simple amigurumi techniques with seasonal charm to bring festive joy to your crochet collection.

Beginner Friendly 3-4 Hours

Materials Needed for Christmas Tree Cat Amigurumi Pattern

β€” Main Fabric

  • 01
    Sport weight yarn in white, green, and pink colors
  • 02
    Any fine weight (2) yarn suitable for amigurumi work

β€” Tools Required

  • 01
    2.5mm (C) crochet hook
  • 02
    Safety eyes 12-15mm
  • 03
    Pompom 10mm
  • 04
    Stitch markers
  • 05
    Sewing needle
  • 06
    Scissors
  • 07
    Hot glue gun
  • 08
    Fiberfill stuffing
  • 09
    Wire for tail

Progress Tracker

0% Complete

β€” HEAD :

Row 1 :

8 SC in an MR (8)

Row 2 :

8 INC (16)

Row 3 :

(SC, INC) 8 times (24)

Row 4 :

(2 SC, INC) 8 times (32)

Row 5 :

32 SC (32)

Row 6 :

(7 SC, INC) 4 times (36)

Row 7 :

(5 SC, INC) 6 times (42)

Row 8 :

(6 SC, INC) 6 times (48)

Row 9-17 :

48 SC (48)

Row 18 :

(4 SC, DEC) 8 times (40)

Row 19 :

(3 SC, DEC) 8 times (32)

Row 20 :

(2 SC, DEC) 8 times (24)

Info :

Cut the yarn, leaving a long tail for sewing. Stuff before closing.

β€” EARS (MAKE 2) :

Row 1 :

Begin with White Yarn - 6 SC in an MR (6)

Row 2 :

(SC, INC) 3 times (9)

Row 3 :

Change to pink yarn - 2 SC, INC, 2 SC, INC, 2 SC, INC (12)

Row 4 :

3 SC, INC, 3 SC, INC, 3 SC, INC (15)

Row 5 :

4 SC, INC, 4 SC, INC, 4 SC, INC (18)

Info :

Cut the yarn, leaving a long tail for sewing.

β€” HAT :

Row 1 :

Begin with Green yarn - 6 SC in an MR (6)

Row 2 :

(SC, INC) 3 times (9)

Row 3 :

(2 SC, INC) 3 times (12)

Row 4 :

(3 SC, INC) 3 times (15)

Row 5 :

BLO, (4 SC, INC) 3 times (18)

Row 6 :

(5 SC, INC) 3 times (21)

Row 7 :

BLO, (6 SC, INC) 3 times (24)

Row 8 :

(7 SC, INC) 3 times (27)

Info :

Cut the yarn, leaving a long tail for sewing.

Hat Decoration :

Begin with White yarn - Back to row 4 and crochet FLO: (3 CH, Sk, Slst) 7 times, 3 Ch, Slst.

Row 6 FLO :

(3 CH, Sk, Slst) 10 times, 3 Ch, Slst.

Row 8 FLO :

(3 CH, Sk, Slst) 13 times, 3 Ch, Slst.

β€” BODY :

Row 1 :

Begin with Green yarn - 8 SC in an MR (8)

Row 2 :

8 INC (16)

Row 3 :

(SC, INC) 8 times (24)

Row 4 :

(2 SC, INC) 8 times (32)

Row 5 :

(3 SC, INC) 8 times (40)

Row 6 :

(4 SC, INC) 8 times (48)

Row 7 :

BLO, 48 SC (48)

Row 8 :

(10 SC, DEC) 4 times (44)

Row 9 :

44 SC (44)

Row 10 :

BLO, (9 SC, DEC) 4 times (40)

Row 11 :

40 SC (40)

Row 12 :

(8 SC, DEC) 4 times (36)

Row 13 :

BLO, 36 SC (36)

Row 14 :

(7 SC, DEC) 4 times (32)

Row 15 :

32 SC (32)

Row 16 :

BLO, (6 SC, DEC) 4 times (28)

Row 17 :

28 SC (28)

Row 18 :

(5 SC, DEC) 4 times (24)

Row 19 :

BLO, 24 SC (24)

Info :

Cut the yarn, leaving a long tail for sewing.

Body Decorations :

Row 18 crochet FLO: Row 1: 2 Ch, 24 DC, Slst (green) Row 2: (3 Ch, Sk, Slst) 12 times (white)

Row 15 FLO :

Row 1: 2 Ch, 32 DC, Slst (green) Row 2: (3 Ch, Sk, Slst) 16 times (white)

Row 12 FLO :

Row 1: 2 CH, 36 DC, Slst (green) Row 2: (3 Ch, Sk, Slst) 18 times (white)

Row 9 FLO :

Row 1: 2 CH, 44 DC, Slst (green) Row 2: (3 Ch, Sk, Slst) 22 times (white)

Row 6 FLO :

Row 1: 2 CH, 48 DC, Slst (green) Row 2: (3 Ch, Sk, Slst) 24 times (white)

Info :

Stuff body before completing.

β€” HANDS (MAKE 2) :

Row 1 :

Begin with White yarn - 6 SC in an MR (6)

Row 2 :

(SC, INC) 3 times (9)

Row 3-8 :

9 SC (9)

Info :

Cut the yarn, leaving a long tail for sewing.

β€” LEGS (MAKE 2) :

Row 1 :

Begin with White yarn - 6 SC in an MR (6)

Row 2 :

6 INC (12)

Row 3 :

(3 SC, INC) 3 times (15)

Row 4-5 :

15 SC (15)

Info :

Cut the yarn, leaving a long tail for sewing.

β€” TAIL :

Row 1 :

Begin with White yarn - 6 SC in an MR (6)

Row 2-15 :

6 SC (6)

Info :

Cut the yarn, leaving a long tail for sewing. Use a long piece of wire, equal to the tail length, and thread it through.

Assembly Instructions

  • Sew BLO of hat between R3 and R4 of the head, stuff hat before sewing closed
  • Sew the ears onto the head from R4 to R10 of the head
  • Attach safety eyes between R9 and R10, with a distance of 9 stitches between them
  • Use black yarn to embroider the nose, eyelid, and whiskers
  • Use yellow yarn to sew the eyebags for cute sleepy expression
  • Sew the body to the head securely
  • Attach arms to the body between R19 and R20
  • Sew legs and tail to the bottom of the body
  • Attach a yarn pompom to the top of the hat to complete

Important Notes

  • πŸ’‘Use stitch markers to keep track of BLO and FLO sections for proper tree layer effect
  • πŸ’‘Stuff each section firmly but not too tightly for best shape and structure
  • πŸ’‘Thread wire through tail before closing to make it posable and more stable
  • πŸ’‘Pin all parts in place before final sewing to ensure correct positioning
  • πŸ’‘Work decorative chains loosely to create the fluffy tree layer appearance

This adorable Christmas Tree Cat pattern brings festive magic to your crochet collection! The unique design combines a sweet cat face with a creative tree-inspired body featuring layered green and white decorative elements. Perfect for holiday decorating or gift-giving, this charming amigurumi captures the spirit of Christmas in every stitch. The detailed pattern includes helpful photos and clear instructions to guide you through each step. Happy crocheting and have a wonderful holiday season!

You ask,

we answer.

FAQs

Can I use different yarn weights for this pattern?

This pattern is designed for sport/fine weight yarn. Using different weights will change the finished size significantly and may affect the proportions of the decorative layers.

Is the wire necessary for the tail?

The wire helps the tail hold its shape and makes it posable, but it's optional. Without wire, the tail will be softer but may flop around more.

How do I create the tree layer effect?

The layered effect comes from working in back loops only (BLO) on certain rounds, then going back to add decorative chains in the front loops only (FLO) with contrasting colors.

What size will the finished cat be?

With sport weight yarn and a 2.5mm hook, the finished cat will be approximately 4-5 inches tall, perfect for display or as a small gift.

Can I make this without the Christmas theme?

Absolutely! You can use any colors you like and skip the hat to create a regular striped cat. The tree pattern would work beautifully in other color combinations too.