🧢 Beautiful ✨ Detailed πŸ’ Adorable

Chubby Milky Cow Amigurumi Pattern

Chubby Milky Cow Amigurumi Pattern
4.6β˜… Rating
4-6 Hours Time Needed
3.5K Made This
βœ‚οΈ

Beginner Friendly Level

Perfect for those just starting their sewing journey, with clear instructions and simple techniques

⏱️

Weekend Treat

Takes 5-7 hours, making it an enjoyable project to finish over a couple of days.

🧸

Cute Companion

An adorable friend to cherish, handcrafted with love to bring comfort and joy for years to come.

About This Chubby Milky Cow Amigurumi Pattern

This charming cow pattern brings farmyard sweetness right into your hands! With its chubby proportions and gentle expression, this little bovine buddy is designed to melt hearts. The pattern uses simple stitches and chunky yarn, making it perfect for creating a soft, huggable texture that both kids and adults will love. You can choose between a sitting or standing version, and even add delightful accessories to make your cow extra special.

Chubby Milky Cow Amigurumi Pattern crochet pattern - detailed view of completed project

The pattern includes detailed instructions for both body variations, plus adorable extras like a tiny strawberry, cookie bag, and ice cream cone. Each step is clearly explained with helpful tips to ensure your cow turns out perfectly chubby and cuddly.

Why You'll Love This Chubby Milky Cow Amigurumi Pattern

I absolutely love how this pattern combines simplicity with incredible charm! The chunky yarn creates such a satisfying texture to work with, and watching your cow take shape round by round is pure joy. What makes me smile most is how the simple color changes create those classic cow markings without any complicated techniques. The optional accessories are my favorite touch - you can customize your cow's personality with sweet treats and props that make each one unique and special.

Chubby Milky Cow Amigurumi Pattern step 1 - construction progress Chubby Milky Cow Amigurumi Pattern step 2 - assembly progress Chubby Milky Cow Amigurumi Pattern step 3 - details and accessories Chubby Milky Cow Amigurumi Pattern step 4 - final assembly and finishing

Switch Things Up

I love how versatile this cow pattern can be with just a few creative tweaks! Sometimes I switch up the color scheme completely - imagine a pink strawberry cow or a purple fantasy version that would make any unicorn jealous. I've also experimented with adding a bell around the neck using tiny beads or embroidered flowers on the ears for a more feminine touch.

One of my favorite modifications is making the cow slightly larger by going up a hook size and adding extra rounds to the body for an even chubbier effect. I've also tried making mini versions using worsted weight yarn and a smaller hook - they turn out absolutely precious as keychains or bag charms!

For special occasions, I love adding seasonal accessories like a tiny Santa hat for Christmas or a flower crown for spring. The beauty of this pattern is that it's so adaptable to your personal style and the recipient's preferences.

Common Mistakes & How to Fix Them

βœ— Forgetting to stuff the head firmly enough which results in a flat, shapeless appearance instead of chubby roundness βœ— Placing safety eyes too close together or too far apart, affecting the cow's sweet facial expression significantly βœ— Not maintaining consistent tension throughout rounds, creating uneven stitches that distort the overall cow shape βœ— Skipping stitch markers during color changes, leading to misaligned brown patches and confused pattern placement

Chubby Milky Cow Amigurumi Pattern

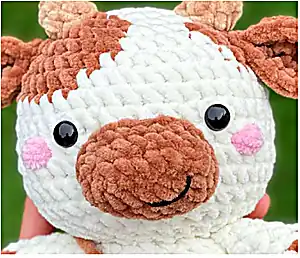
Create your own adorable chubby cow friend with this delightful amigurumi pattern! This sweet bovine companion features a plump, cuddly body in cream and brown colors, complete with charming details like tiny horns, floppy ears, and an endearing smile. Perfect for beginners and experienced crocheters alike, this pattern includes both sitting and standing variations, plus cute accessories like a tiny heart, cookie bag, and ice cream cone. Your finished cow will be approximately 6-8 inches tall and ready to bring joy to anyone who meets this lovable farm friend.

Beginner Friendly 4-6 Hours

Materials Needed for Chubby Milky Cow Amigurumi Pattern

β€” Main Fabric

  • 01
    Himalaya Dolphin Baby chunky yarn in cream/white and brown colors
  • 02
    Alternative chunky yarns: Yarn Art Dolce, Premier Parfait, or similar plush chunky weight yarns

β€” Tools Required

  • 01
    Crochet hook 4-5mm
  • 02
    Safety eyes 10mm or 12mm
  • 03
    Stitch markers
  • 04
    Yarn needle
  • 05
    Scissors
  • 06
    Fiberfill stuffing
  • 07
    Pink felt or yarn for cheeks
  • 08
    Black embroidery thread for mouth
  • 09
    Green yarn for strawberry leaves
  • 10
    Red yarn for strawberry and heart

Progress Tracker

0% Complete

β€” Head - cream :

Round 1 :

Mr 6sc (6)

Round 2 :

6inc (12)

Round 3 :

Sc, inc, Brown [sc, inc, sc], inc, (sc, inc)*3 (18)

Round 4 :

Sc, inc, sc, [sc, inc, 2sc, inc], 2sc, inc, [2sc, inc], 2sc, inc, sc (24)

Round 5 :

3sc, inc, [3sc, inc, 3sc], inc, 2sc [sc, inc, 3sc], inc, 3sc, inc (30)

Round 6 :

2sc, inc, 3sc, [sc, inc, 4sc, inc] 4sc, inc, [4sc] inc, 4sc, inc, 2sc(36)

Round 7 :

5sc, inc, 2sc, [3sc, inc, 3sc] 2sc, inc, 5sc [inc, sc] 4sc, inc, 5sc, inc (42)

Round 8 :

10sc, [6sc], 26sc (42)

Round 9-13 :

42sc (42)

Round 14 :

(5sc, dec)*6 (36)

Round 15 :

2sc, dec (4sc, dec)*5, 2sc (30)

Round 16 :

(3sc, dec)*6 (24)

Round 17 :

sc, dec (2sc, dec)*5, sc (18)

Info :

Fasten off & cut the yarn. Try to stuff the head enough with filling to get a chubby head. Insert the eyes between r.10-11, 6-7 stitches between

β€” Ears - brown :

Round 1 :

Mr 8sc (8)

Round 2 :

8inc (16)

Round 3 :

16sc (16)

Info :

Fasten off & leave a long tail to sew them between r.6-7 of the head

β€” Horn - light brown :

Round 1 :

Mr 4sc (4)

Round 2 :

4inc (8)

Round 3 :

8sc (8)

Info :

Fasten off & leave a long tail for sewing. Sew them between r.3-4 of the head

β€” Nose - brown :

Round 1 :

Ch 8, 2nd ch from hook, crochet 6sc, inc, on the other side of ch 5sc, inc (15)

Round 2 :

inc, 5sc, 3inc, 5sc, inc (20)

Round 3 :

20sc (20)

Info :

Fasten off and leave a long tail for sewing. Stuff it a little bit, and sew it between r.11-14 of the head

β€” Arms - brown :

Round 1 :

Mr 8sc (8)

Round 2 :

8sc (8)

Round 3-7 :

cream 8sc (8)

Info :

Fasten off & leave a long tail for sewing on the body r.16

β€” Body - sitting - cream :

Round 1 :

Mr 8sc (8)

Round 2 :

8inc (16)

Round 3 :

(sc, inc)*8 (24)

Round 4 :

(3sc, inc)*6 (30)

Round 5-10 :

30sc (30)

Round 11 :

(3sc, dec)*6 (24)

Round 12 :

24sc (24)

Round 13 :

(2sc, dec)*6 (18)

Info :

Fasten off & leave a long tail for sewing. Stuff filling while crochet

β€” Legs - sitting - brown :

Round 1 :

Mr 6sc (6)

Round 2 :

6inc (12)

Round 3-4 :

12sc (12)

Info :

Fasten off & leave a long tail for sewing. Stuff the legs & sew them between r.4-6 of the body - sitting

β€” Accessories :

Tiny Heart :

Make ch 3, crochet everything into the first ch: 2 dc, 2 hdc, 1 dc, 2 hdc, 2 dc, ch 2 and slst. Leave a long tail of yarn. Sew it on the body

Tail :

Start with brown yarn: mr 5sc (5), 5inc (10), 3-4. 10sc (10), 5. 5dec (5). Start with white/cream yarn: Make a long 6 chains. Sew one tail to brown part, other to body between r.8-9
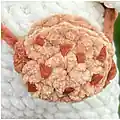
Cookie bag :

Mr 8sc (8), 8 hdc inc (16). Make 2 pieces and sew them together but let it open. Use darker felt or yarn for chocolate on cookie

Ice cream bag :

Start from cone - light brown: Mr 4sc (4), 4inc (8), 8sc (8), (sc, inc)*4 (12), Change color 12sc (12), BLO (2sc, inc)*4 (16), 16sc (16), (2sc, dec)*4 (12), (sc, dec)*4 (8), 4dec (4)

Assembly Instructions

  • Attach the head to the body by sewing the opening of the head (round 17) to the top opening of the body
  • Sew the ears to the head between rounds 6-7, positioning them slightly angled outward for a natural look
  • Attach the horns between rounds 3-4 of the head, spacing them evenly between the ears
  • Position and sew the nose between rounds 11-14 of the head, stuffing lightly before closing
  • Sew the arms to the body at round 16, ensuring they're positioned symmetrically on both sides
  • For sitting version: attach the legs between rounds 4-6 of the body, positioning them for stable sitting
  • Add the tail by sewing the brown part to the cream chain, then attach to the body between rounds 8-9

Important Notes

  • πŸ’‘Use chunky yarn and appropriate hook size (4-5mm) to achieve the proper chubby texture and proportions
  • πŸ’‘Stuff the head firmly to maintain the round, chubby shape that gives this cow its adorable character
  • πŸ’‘Place safety eyes carefully between rounds 10-11 with 6-7 stitches between them for the sweetest expression
  • πŸ’‘Use stitch markers consistently, especially during color changes for the brown cow patches
  • πŸ’‘Stuff as you go, especially for the body, to ensure proper shaping and prevent difficulty later
  • πŸ’‘The pattern includes both sitting and standing body options - choose based on your preference

This delightful Chubby Milky Cow pattern brings farmyard charm to your crochet collection! With its perfectly plump proportions and sweet expression, this little bovine buddy captures hearts instantly. The chunky yarn creates an irresistibly soft texture that's perfect for cuddling, while the simple color changes add authentic cow markings without complicated techniques. Complete with adorable accessories like tiny treats and a swishy tail, your finished cow will be a treasured companion ready to moo its way into someone's heart. πŸ„ Happy crocheting! 🧢✨

You ask,

we answer.

FAQs

What size will my finished cow be?

Using 4-5mm hook with chunky yarn, your cow will be approximately 6-8 inches tall depending on whether you choose the sitting or standing version.

Can I use different yarn weights for this pattern?

Yes! Use a bigger hook and yarn to make a larger cow, or smaller hook and yarn for a mini version. Just adjust your hook size accordingly.

Are safety eyes necessary or can I embroider them?

You can use either 10mm or 12mm safety eyes as suggested, or embroider the eyes with black yarn if making for small children under 3 years old.

What's the difference between the sitting and standing versions?

The sitting version has a simpler body construction with separate legs, while the standing version connects the legs during body construction for a more stable standing pose.

Do I need to make all the accessories?

No, the accessories like the cookie bag, ice cream cone, and heart are optional extras to customize your cow's personality and make it extra special.