🧢 Beautiful ✨ Detailed πŸ’ Adorable

Crochet Coaster and Coaster Holder Pattern

Crochet Coaster and Coaster Holder Pattern
4.0β˜… Rating
3-4 Hours Time Needed
4.0K Made This
βœ‚οΈ

Beginner Friendly Level

Perfect for those just starting their sewing journey, with clear instructions and simple techniques

⏱️

Bite-Sized Project

Complete in under 2 hoursβ€”quick, fun, and perfect for a little creative escape.

🏑

Cozy Accent

A warm touch for your space that transforms ordinary corners into inviting nooks filled with handmade charm.

About This Crochet Coaster and Coaster Holder Pattern

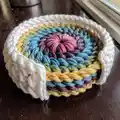
This coaster set pattern is designed for practicality and charm! You'll create six colorful round coasters that protect your surfaces while adding a pop of personality to your home. The matching holder keeps everything organized with a convenient side opening. Using basic double crochet and single crochet stitches, this pattern is perfect for using up yarn scraps or creating coordinated sets in your favorite colors.

Crochet Coaster and Coaster Holder Pattern crochet pattern - detailed view of completed project

The holder is worked in rounds with a smart back loop only technique that creates the perfect pocket for stacking your coasters. It's sturdy, functional, and looks beautiful on any table or countertop.

Why You'll Love This Crochet Coaster and Coaster Holder Pattern

I absolutely love this pattern because it's so practical and rewarding! There's something magical about making items you'll actually use every single day. I enjoy how quickly the coasters work up, which means you can make a whole set in one sitting and still have time for coffee. The color possibilities are endless, and I love using up leftover yarn from other projects to create unique, mismatched sets. The holder is such a clever addition that elevates the whole project from simple coasters to a complete gift-worthy set. Plus, watching the circle grow with each round is oddly satisfying, and the final slip stitch border on the holder gives it such a polished, professional finish!

Crochet Coaster and Coaster Holder Pattern step 1 - construction progress Crochet Coaster and Coaster Holder Pattern step 2 - assembly progress Crochet Coaster and Coaster Holder Pattern step 3 - details and accessories Crochet Coaster and Coaster Holder Pattern step 4 - final assembly and finishing

Switch Things Up

I love experimenting with this pattern because it's so versatile! One of my favorite variations is making each coaster in a different color from the rainbow, then using a neutral white or cream for the holder. It creates such a cheerful pop when guests peek inside. Sometimes I'll add a contrasting color stripe on one row of each coaster for extra visual interest.

For a more elegant look, I've worked this pattern in a beautiful ombrΓ© effect, starting with dark colors and gradually lightening each coaster. The holder can match the darkest shade to tie everything together. You could also try variegated yarn for a completely unique look where no two coasters are identical.

I've even made seasonal sets! Think warm autumn colors in burnt orange, deep red, and golden yellow for fall, or cool blues and silvers for winter. Around the holidays, I make red and green sets that double as festive dΓ©cor. For spring and summer, I go bright with coral, turquoise, and sunny yellow.

If you want to add texture, try using a different stitch for the final row of each coaster, like a round of single crochet or even a shell stitch border. I've also experimented with making the holder in a contrasting texture by using front loop only instead of back loop only, which creates a different ridge effect.

For a modern minimalist vibe, stick to monochromatic colors in different shades of the same hue. Gray scales look incredibly sophisticated, and all-white sets have a clean, spa-like quality. Don't be afraid to play with the pattern and make it your own!

Common Mistakes & How to Fix Them

βœ— F βœ— o βœ— r βœ— g βœ— e βœ— t βœ— t βœ— i βœ— n βœ— g βœ— βœ— t βœ— o βœ— βœ— c βœ— o βœ— u βœ— n βœ— t βœ— βœ— t βœ— h βœ— e βœ— βœ— c βœ— h βœ— a βœ— i βœ— n βœ— βœ— s βœ— t βœ— i βœ— t βœ— c βœ— h βœ— e βœ— s βœ— βœ— a βœ— s βœ— βœ— t βœ— h βœ— e βœ— βœ— f βœ— i βœ— r βœ— s βœ— t βœ— βœ— s βœ— t βœ— i βœ— t βœ— c βœ— h βœ— βœ— c βœ— a βœ— n βœ— βœ— t βœ— h βœ— r βœ— o βœ— w βœ— βœ— o βœ— f βœ— f βœ— βœ— y βœ— o βœ— u βœ— r βœ— βœ— s βœ— t βœ— i βœ— t βœ— c βœ— h βœ— βœ— c βœ— o βœ— u βœ— n βœ— t βœ— βœ— a βœ— n βœ— d βœ— βœ— c βœ— r βœ— e βœ— a βœ— t βœ— e βœ— βœ— u βœ— n βœ— e βœ— v βœ— e βœ— n βœ— βœ— e βœ— d βœ— g βœ— e βœ— s βœ— βœ— t βœ— h βœ— r βœ— o βœ— u βœ— g βœ— h βœ— o βœ— u βœ— t βœ— βœ— t βœ— h βœ— e βœ— βœ— p βœ— a βœ— t βœ— t βœ— e βœ— r βœ— n βœ— . βœ— βœ— M βœ— i βœ— s βœ— s βœ— i βœ— n βœ— g βœ— βœ— t βœ— h βœ— e βœ— βœ— s βœ— l βœ— i βœ— p βœ— βœ— s βœ— t βœ— i βœ— t βœ— c βœ— h βœ— βœ— j βœ— o βœ— i βœ— n βœ— βœ— a βœ— t βœ— βœ— t βœ— h βœ— e βœ— βœ— e βœ— n βœ— d βœ— βœ— o βœ— f βœ— βœ— e βœ— a βœ— c βœ— h βœ— βœ— r βœ— o βœ— w βœ— βœ— w βœ— i βœ— l βœ— l βœ— βœ— p βœ— r βœ— e βœ— v βœ— e βœ— n βœ— t βœ— βœ— y βœ— o βœ— u βœ— r βœ— βœ— c βœ— i βœ— r βœ— c βœ— l βœ— e βœ— βœ— f βœ— r βœ— o βœ— m βœ— βœ— c βœ— l βœ— o βœ— s βœ— i βœ— n βœ— g βœ— βœ— p βœ— r βœ— o βœ— p βœ— e βœ— r βœ— l βœ— y βœ— βœ— a βœ— n βœ— d βœ— βœ— c βœ— r βœ— e βœ— a βœ— t βœ— e βœ— βœ— a βœ— βœ— s βœ— p βœ— i βœ— r βœ— a βœ— l βœ— βœ— i βœ— n βœ— s βœ— t βœ— e βœ— a βœ— d βœ— βœ— o βœ— f βœ— βœ— d βœ— e βœ— f βœ— i βœ— n βœ— e βœ— d βœ— βœ— r βœ— o βœ— u βœ— n βœ— d βœ— s βœ— . βœ— βœ— N βœ— o βœ— t βœ— βœ— l βœ— e βœ— a βœ— v βœ— i βœ— n βœ— g βœ— βœ— e βœ— x βœ— a βœ— c βœ— t βœ— l βœ— y βœ— βœ— f βœ— i βœ— v βœ— e βœ— βœ— s βœ— t βœ— i βœ— t βœ— c βœ— h βœ— e βœ— s βœ— βœ— o βœ— p βœ— e βœ— n βœ— βœ— f βœ— o βœ— r βœ— βœ— t βœ— h βœ— e βœ— βœ— h βœ— o βœ— l βœ— d βœ— e βœ— r βœ— βœ— o βœ— p βœ— e βœ— n βœ— i βœ— n βœ— g βœ— βœ— w βœ— i βœ— l βœ— l βœ— βœ— m βœ— a βœ— k βœ— e βœ— βœ— i βœ— t βœ— βœ— t βœ— o βœ— o βœ— βœ— s βœ— m βœ— a βœ— l βœ— l βœ— βœ— o βœ— r βœ— βœ— t βœ— o βœ— o βœ— βœ— l βœ— a βœ— r βœ— g βœ— e βœ— βœ— f βœ— o βœ— r βœ— βœ— t βœ— h βœ— e βœ— βœ— c βœ— o βœ— a βœ— s βœ— t βœ— e βœ— r βœ— s βœ— βœ— t βœ— o βœ— βœ— f βœ— i βœ— t βœ— βœ— p βœ— r βœ— o βœ— p βœ— e βœ— r βœ— l βœ— y βœ— . βœ— βœ— P βœ— u βœ— l βœ— l βœ— i βœ— n βœ— g βœ— βœ— y βœ— o βœ— u βœ— r βœ— βœ— s βœ— t βœ— i βœ— t βœ— c βœ— h βœ— e βœ— s βœ— βœ— t βœ— o βœ— o βœ— βœ— t βœ— i βœ— g βœ— h βœ— t βœ— βœ— d βœ— u βœ— r βœ— i βœ— n βœ— g βœ— βœ— t βœ— h βœ— e βœ— βœ— b βœ— a βœ— c βœ— k βœ— βœ— l βœ— o βœ— o βœ— p βœ— βœ— o βœ— n βœ— l βœ— y βœ— βœ— r βœ— o βœ— w βœ— βœ— c βœ— a βœ— n βœ— βœ— m βœ— a βœ— k βœ— e βœ— βœ— t βœ— h βœ— e βœ— βœ— h βœ— o βœ— l βœ— d βœ— e βœ— r βœ— βœ— s βœ— t βœ— i βœ— f βœ— f βœ— βœ— a βœ— n βœ— d βœ— βœ— d βœ— i βœ— f βœ— f βœ— i βœ— c βœ— u βœ— l βœ— t βœ— βœ— t βœ— o βœ— βœ— i βœ— n βœ— s βœ— e βœ— r βœ— t βœ— βœ— c βœ— o βœ— a βœ— s βœ— t βœ— e βœ— r βœ— s βœ— βœ— i βœ— n βœ— t βœ— o βœ— βœ— t βœ— h βœ— e βœ— βœ— p βœ— o βœ— c βœ— k βœ— e βœ— t βœ— .

Crochet Coaster and Coaster Holder Pattern

Transform your coffee table with this charming coaster set! This pattern guides you through creating six beautiful round coasters plus a matching holder that keeps them organized and ready to use. Perfect for protecting your surfaces in style, this project uses simple stitches to create a functional piece that adds a handmade touch to your home. Whether you're making them for yourself or as a thoughtful gift, these coasters work up quickly and let you play with any colors you love. The holder features a clever opening design that makes accessing your coasters easy while keeping them neatly stacked.

Beginner Friendly 3-4 Hours

Materials Needed for Crochet Coaster and Coaster Holder Pattern

β€” Main Fabric

  • 01
    Medium weight cotton yarn (size 4) in any colors of your choice
  • 02
    Approximately 50-75 yards per coaster
  • 03
    Approximately 100-150 yards for the holder

β€” Tools Required

  • 01
    Crochet hook size H (5.0mm)
  • 02
    Tapestry needle for weaving in ends
  • 03
    Scissors
  • 04
    Stitch markers (optional but helpful for tracking rounds)

Progress Tracker

0% Complete

β€” Pattern for Coasters (Make 6):

Info:

All chain stitches count as first stitch

Starting Round:

Chain 3, slst into first ch

Row 1:

ch 2, 11 dc into center of chain, slst to join to top of ch 2 space (12)

Row 2:

ch 2, 2dc in each st around, dc in same st as ch 2, slst to join to top of ch 2 space (24)

Row 3:

ch 2, 2dc in next st, *dc, 2dc* *Repeat around*, slst to join to top of ch 2 space (36)

Row 4:

ch 2, dc in next st, 2dc, *dc, dc, 2dc* *Repeat around*, slst to join to top of ch 2 space (48)

Finishing:

Cut yarn and weave in ends

β€” Pattern for Holder:

Starting Round:

Chain 3, slst into first ch

Row 1:

ch 2, 11 dc into center of chain, slst to join to top of ch 2 space (12)

Row 2:

ch 2, 2dc in each st around, dc in same st as ch 2, slst to join to top of ch 2 space (24)

Row 3:

ch 2, 2dc in next st, *dc, 2dc* *Repeat around*, slst to join to top of ch 2 space (36)

Row 4:

ch 2, dc in next st, 2dc, *dc, dc, 2dc* *Repeat around*, slst to join to top of ch 2 space (48)

Row 5:

ch 1, sc, sc, 2sc, *sc, sc, sc, 2sc* *Repeat around*, slst to join to top of ch 1 space (60)

Row 6:

ch 1, scblo in the next 54 stitches. You will leave 5 stitches open

Row 7:

ch 1, turn, sc in each st around

Row 8-13:

*Repeat row 7*

Row 14:

slst in each st around the perimeter of the holder, including the 5 stitches at the bottom of the opening. This makes the holder a bit more sturdy and less likely to fold in or out, but if your holder is already sturdy after row 13, then it may not be necessary for you

Finishing:

Cut yarn and weave in ends. Insert coasters into holder, and enjoy!

Assembly Instructions

  • Complete all six coasters first, making sure to weave in all loose ends securely
  • Work the holder pattern through row 14, ensuring the opening is positioned where you want it
  • Test the fit by inserting your completed coasters into the holder opening to ensure they slide in and out smoothly
  • If the holder feels floppy, complete the optional row 14 slip stitch border around the entire perimeter for added structure
  • Stack your finished coasters inside the holder with the most colorful ones facing outward for visual appeal

Important Notes

  • πŸ’‘The chain 2 or chain 1 at the beginning of each round counts as your first stitch, so don't skip this step
  • πŸ’‘Use stitch markers to mark the beginning of each round to help keep track of where you are in the pattern
  • πŸ’‘For the holder opening, make sure to leave exactly 5 stitches unworked in row 6 or the coasters won't fit properly
  • πŸ’‘The back loop only stitches in row 6 create the ridge that forms the base of the holder pocket
  • πŸ’‘Feel free to customize the colors for each coaster or make them all matching for a coordinated look
  • πŸ’‘Cotton yarn works best for coasters as it's absorbent and machine washable
  • πŸ’‘The optional row 14 on the holder adds stability but isn't required if your piece is already sturdy

This practical coaster and holder set is the perfect blend of function and style! Designed for beginners and experienced crocheters alike, this pattern lets you create a complete home accessory set that you'll reach for every day. The round coasters work up quickly using simple increase techniques, while the clever holder keeps everything organized with a convenient side opening. Mix and match your favorite colors, use up those yarn scraps, or create coordinated sets that match your decor. Happy crocheting! 🧢✨

You ask,

we answer.

FAQs

How many coasters should I make?

The pattern suggests making 6 coasters, but you can make as many or as few as you'd like! Just ensure they all fit comfortably in the holder if you're making the complete set.

Can I use different yarn weight for this pattern?

Yes! While the pattern calls for medium weight (size 4) cotton yarn, you can use any yarn weight. Just adjust your hook size accordingly and note that your finished size will vary depending on the yarn you choose.

Why do I need to leave 5 stitches open in row 6 of the holder?

Those 5 stitches create the opening where you'll insert and remove your coasters. Leaving them open allows you to build up the sides of the holder while maintaining easy access to your coaster stack.

Is row 14 of the holder really necessary?

Row 14 is optional! It adds a slip stitch border around the entire perimeter for extra stability and a polished finish. If your holder already feels sturdy after row 13, you can skip this step.

What does 'scblo' mean and why is it used?

SCBLO stands for Single Crochet Back Loop Only. This technique creates a ridge by working only in the back loop of each stitch, which forms the base structure of the holder pocket and gives it a more defined shape.

Can I make the coasters bigger or smaller?

Absolutely! To make larger coasters, continue the increase pattern (adding one more dc between increases each row). For smaller coasters, stop after row 3. Just make sure they'll fit in the holder if you're making both pieces.