🧢 Beautiful ✨ Detailed πŸ’ Adorable

Crochet Donut Pillow Pattern

Crochet Donut Pillow Pattern
4.5β˜… Rating
8-10 Hours Time Needed
3.5K Made This
βœ‚οΈ

Beginner Friendly Level

Perfect for those just starting their sewing journey, with clear instructions and simple techniques

⏱️

All-Day Adventure

Requires 8-10 hours, ideal for a full day of immersive knitting.

🏑

Cozy Accent

A warm touch for your space that transforms ordinary corners into inviting nooks filled with handmade charm.

About This Crochet Donut Pillow Pattern

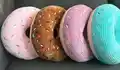
This charming donut pillow pattern guides you through creating a fun and functional home decor piece that's sure to bring smiles. Starting with a foundation chain and working in continuous rounds, you'll gradually shape the classic donut form using simple increases and decreases. The pattern includes detailed instructions for creating the distinctive donut shape with its characteristic center hole, plus a clever color-change technique to add the 'frosting' layer. The finishing touch comes with embroidered sprinkles in various colors, creating that irresistible bakery-fresh look.

Crochet Donut Pillow Pattern crochet pattern - detailed view of completed project

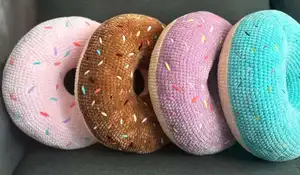
Using plush Himalaya Dolphin Baby yarn, this pattern creates a soft, huggable pillow that's both decorative and practical. The step-by-step assembly instructions ensure your donut maintains its perfect shape, while the sprinkle decoration technique lets you customize colors to match any room or preference.

Why You'll Love This Crochet Donut Pillow Pattern

I absolutely love this pattern because it brings such joy and whimsy to any space! There's something incredibly satisfying about watching a simple ball of yarn transform into something that looks like a delicious treat. The pattern is straightforward enough that you won't feel overwhelmed, but creative enough to keep you engaged throughout the process. I especially enjoy the decoration stage where you get to play with different colored yarns to create unique sprinkle patternsβ€”no two donuts ever look exactly the same! It's also wonderfully versatile; I've made these as gifts for friends, comfort pillows for kids, and even as quirky decor pieces for my own home. The compliments and smiles this pillow generates make every stitch worthwhile.

Crochet Donut Pillow Pattern step 1 - construction progress Crochet Donut Pillow Pattern step 2 - assembly progress Crochet Donut Pillow Pattern step 3 - details and accessories Crochet Donut Pillow Pattern step 4 - final assembly and finishing

Switch Things Up

I love experimenting with different color combinations to create unique donut varieties! Instead of traditional pink frosting, I've tried chocolate brown with rainbow sprinkles, mint green with white and pink accents, and even a glamorous purple with gold details. You could also create seasonal versionsβ€”imagine a red and green Christmas donut or pastel spring colors for Easter.

For an extra-special touch, I sometimes add small embroidered details like a cute face to give the donut personality. You could also experiment with the sprinkle technique by using thicker yarn for chunky sprinkles or metallic thread for sparkly decorations. I've even tried adding a small ribbon loop to the back so the donut can double as a quirky wall hanging.

If you're making these as gifts, consider creating a whole bakery set with different flavors and sizes. I've made mini versions using thinner yarn and smaller hooks that work perfectly as pincushions or small decorative accents. The possibilities are truly endless, and each variation teaches you something new about color theory and texture in crochet!

Common Mistakes & How to Fix Them

βœ— Not stuffing evenly throughout the assembly process can result in lumpy or misshapen donuts; stuff gradually as you sew to maintain consistent firmness and shape. βœ— Forgetting to work in the back loops only during Round 24 will prevent the proper frosting ridge from forming; mark this round clearly before starting. βœ— Pulling the decorative sprinkle yarn too tightly can distort the pillow's shape and create puckering; keep tension gentle and consistent for best results. βœ— Skipping stitch markers during color changes can cause you to lose your place in the pattern; always use markers to track round beginnings.

Crochet Donut Pillow Pattern

Create your own adorable donut pillow with this delightful crochet pattern! This sweet project combines cozy comfort with playful design, making it perfect for brightening up any room or as a unique handmade gift. Using soft polyester yarn and simple stitches, you'll craft a plush donut complete with colorful sprinkles that look good enough to eat. Whether you're decorating a child's bedroom, adding charm to your living space, or making a fun gift for a friend, this donut pillow brings joy and personality to any setting. The finished pillow measures approximately 12 inches in diameter, making it the perfect size for cuddling or display.

Beginner Friendly 8-10 Hours

Materials Needed for Crochet Donut Pillow Pattern

β€” Main Fabric

  • 01
    Himalaya Dolphin Baby yarn in peach color (80333) - 100% Polyester
  • 02
    Himalaya Dolphin Baby yarn in pink color (80303) - 100% Polyester
  • 03
    Polyester, cotton, or acrylic yarn can be substituted in various colors for customization

β€” Tools Required

  • 01
    Crochet hook size 3.5mm
  • 02
    Long needle for assembly
  • 03
    Scissors
  • 04
    Fiberfill stuffing (150 grams)
  • 05
    Polyester or cotton yarns in various colors for sprinkle decoration
  • 06
    Stitch markers

Progress Tracker

0% Complete

β€” Donut Base :

Round 1 :

Start crochet the bottom of donut pillow with peach color. 36 CH then connect in a ring (36)

Round 2 :

36 SC (36)

Round 3 :

(2 SC, 1 INC) *12 (48)

Round 4 :

48 SC (48)

Round 5 :

(3 SC, 1 INC) *12 (60)

Round 6 :

(4 SC, 1 INC) *12 (72)

Round 7 :

72 SC (72)

Round 8 :

(5 SC, 1 INC) *12 (84)

Round 9 :

(6 SC, 1 INC) *12 (96)

Round 10 :

96 SC (96)

Round 11 :

(7 SC, 1 INC) *12 (108)

Round 12 :

108 SC (108)

Round 13 :

(8 SC, 1 INC) *12 (120)

Round 14 :

120 SC (120)

Round 15 :

(9 SC, 1 INC) *12 (132)

Round 16 :

132 SC (132)

Round 17 :

(10 SC, 1 INC) *12 (144)

Round 18 :

144 SC (144)

Round 19 :

(11 SC, 1 INC) *12 (156)

Round 20-23 :

4 Rows 156 SC (156)

Round 24 :

CC and crochet this row with a hook only for the back loops

Round 25-30 :

6 Rows 156 SC (156)

Round 31 :

(11 SC, 1 DEC) *12 (144)

Round 32 :

144 SC (144)

Round 33 :

(10 SC, 1 DEC) *12 (132)

Round 34 :

132 SC (132)

Round 35 :

(9 SC, 1 DEC) (120)

Round 36 :

120 SC (120)

Round 37 :

(8 SC, 1 DEC) *12 (108)

Round 38 :

108 SC (108)

Round 39 :

(7 SC, 1 DEC) *12 (96)

Round 40 :

96 SC (96)

Round 41 :

(6 SC, 1 DEC) *12 (84)

Round 42 :

(5 SC, 1 DEC) *12 (72)

Round 43 :

72 SC (72)

Round 44 :

(4 SC, 1 DEC) *12 (60)

Round 45 :

(3 SC, 1 DEC) *12 (48)

Round 46 :

48 SC (48)

Round 47 :

(2 SC, 1 DEC) *12 (36)

Round 48 :

36 SC (36)

β€” Assembly & Stuffing :

Info :

Pass the long end of the yarn through the last loop of the stitch. Fold the donut as shown and start sewing up the hole. Sew a little and stuff the donut with fiberfill, then continue sewing and stuffing alternately until complete.

β€” Decoration (Sprinkles) :

Step 1 :

Insert a needle with yarn from the bottom of donut

Step 2 :

After pulling out the needle, insert it nearby, stepping back two centimeters

Step 3 :

Repeat this with different colors of yarn until you decorate the donut

Step 4 :

At the end, stick the yarn back from where you started to insert the needle

Step 5 :

Tie 2 ends of the yarn and hide inside

Assembly Instructions

  • Complete all 48 rounds of crocheting before beginning the assembly process to ensure proper donut shape.
  • Pass the long end of yarn through the final loop and prepare to close the center hole by folding the donut.
  • Begin sewing the center hole closed, working gradually and pausing frequently to add fiberfill stuffing.
  • Stuff firmly but not too tightly as you sew, alternating between sewing small sections and adding more filling to maintain even distribution.
  • Continue the sew-and-stuff process all the way around until the center hole is completely closed and the donut is fully stuffed.
  • Secure the final stitches firmly and weave in any loose yarn ends to complete the base donut structure.
  • Add decorative sprinkles by threading a needle with colorful yarn and creating short stitches across the frosting section, varying colors for a realistic effect.

Important Notes

  • πŸ’‘Use stitch markers to track the beginning of each round, especially during the decrease rounds to maintain accurate stitch counts
  • πŸ’‘The back loops only technique in Round 24 creates the distinctive ridge that separates the donut base from the frosting layer
  • πŸ’‘Stuff the donut gradually as you close it rather than waiting until the end to prevent lumps and ensure even distribution
  • πŸ’‘Keep consistent tension throughout your work to maintain the circular donut shape without warping or twisting
  • πŸ’‘The size of your finished donut will vary based on your chosen yarn weight and hook size, so adjust accordingly
  • πŸ’‘When adding sprinkle decorations, insert the needle from the bottom to hide knots and loose ends inside the pillow

This delightful crochet donut pillow pattern brings sweetness and comfort together in one adorable project! Perfect for home decor, gifts, or just adding a touch of whimsy to your space, this pattern uses simple techniques to create a realistic-looking treat. The combination of soft yarn, playful colors, and charming sprinkle details makes this pillow irresistible to makers and recipients alike. Whether you're a beginner looking for a fun challenge or an experienced crocheter wanting a quick, satisfying project, this donut pillow will become a favorite in your pattern collection. Happy crocheting! 🍩✨

You ask,

we answer.

FAQs

Can I use different yarn types for this pattern?

Absolutely! While the pattern recommends Himalaya Dolphin Baby polyester yarn, you can substitute with any bulky weight cotton or acrylic yarn. Just keep in mind that different yarn types will affect the final size and texture of your donut pillow.

How much fiberfill stuffing do I need?

The pattern recommends approximately 150 grams of fiberfill for one donut pillow. However, you may need slightly more or less depending on how firm you prefer your pillow and how tightly you crochet.

What does 'back loops only' mean in Round 24?

Back loops only (BLO) means you insert your hook through only the back loop of each stitch rather than under both loops. This creates a ridge that gives the donut its distinctive layered frosting appearance.

How do I keep track of my rounds?

Use a stitch marker or a small piece of contrasting yarn to mark the beginning of each round. This is especially important during the increase and decrease rounds to maintain accurate stitch counts.

Can I make the donut pillow larger or smaller?

Yes! To make it larger, use a bigger hook and thicker yarn, or add more increase rounds before starting the straight sections. For a smaller version, use thinner yarn with a smaller hook or work fewer increase rounds.

What's the best way to add the sprinkle decorations?

Thread a long needle with your chosen sprinkle color, insert from the bottom of the donut, pull through to the top, then reinsert about 2cm away. Continue this pattern with various colors, then tie off ends and hide them inside the pillow for a clean finish.