🧢 Beautiful ✨ Detailed πŸ’ Adorable

Cuddle Me Cow Amigurumi Pattern

Cuddle Me Cow Amigurumi Pattern
4.5β˜… Rating
8-10 Hours Time Needed
2.4K Made This
βœ‚οΈ

Intermediate Level

Ideal for those with basic knitting experience, featuring slightly more advanced stitches and techniques to expand your skills.

⏱️

All-Day Adventure

Requires 8-10 hours, ideal for a full day of immersive knitting.

🧸

Cute Companion

An adorable friend to cherish, handcrafted with love to bring comfort and joy for years to come.

About This Cuddle Me Cow Amigurumi Pattern

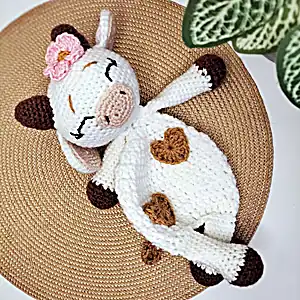
This enchanting cow pattern combines traditional amigurumi techniques with charming farmyard details. The head and body are worked as one continuous piece, making assembly easier while creating a sturdy, huggable structure. Each component from the expressive ears to the delicate flower accessory is carefully designed to capture the gentle, sweet nature of a beloved farm animal. The pattern includes optional heart spots and safety eye placement for a truly personalized creation.

Cuddle Me Cow Amigurumi Pattern crochet pattern - detailed view of completed project

Working primarily in single crochet with double crochet body sections, this pattern offers variety in stitching techniques. The detailed facial features and optional decorative elements allow crafters to customize their cow's personality and charm.

Why You'll Love This Cuddle Me Cow Amigurumi Pattern

I absolutely love how this pattern brings together classic amigurumi skills with such endearing details! The way the cow's personality emerges as you work through each section is truly magical. I find the combination of simple stitches and thoughtful construction creates a project that's both relaxing and rewarding. The optional elements like heart spots and the flower crown let you make each cow uniquely yours, and seeing that sweet face come together with the embroidered features never fails to make me smile.

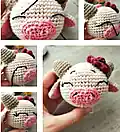
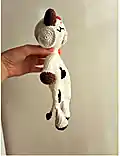
Cuddle Me Cow Amigurumi Pattern step 1 - construction progress Cuddle Me Cow Amigurumi Pattern step 2 - assembly progress Cuddle Me Cow Amigurumi Pattern step 3 - details and accessories Cuddle Me Cow Amigurumi Pattern step 4 - final assembly and finishing

Switch Things Up

I love how versatile this cow pattern can be with just a few creative tweaks! You could easily transform this into different farm animals by changing the colors and small details. Try making it in black and white for a classic Holstein look, or go wild with rainbow colors for a fantasy cow. I've experimented with adding a bell around the neck using a small crocheted strap, which gives it that authentic farm feel.

For a more rustic look, I sometimes use a slightly fuzzy yarn that gives the cow a softer, more textured appearance. You could also modify the heart spots into different shapes - stars, flowers, or even initials for a personalized touch. I've made versions with longer legs for a more realistic proportion, or kept them shorter for an extra cute, chibi-style appearance.

The flower crown opens up so many possibilities too - try different flower types, multiple smaller blooms, or even seasonal decorations like tiny pumpkins for fall. I've found that changing just the accessory can completely transform the cow's personality and make each one unique for different recipients or occasions.

Common Mistakes & How to Fix Them

βœ— Forgetting to stuff the head firmly before continuing to decrease rounds, causing a floppy appearance βœ— Not maintaining consistent tension when switching between single crochet and double crochet sections βœ— Placing safety eyes too close together or too far apart from the specified positioning βœ— Overstuffing the limbs making them too rigid instead of maintaining the soft, cuddly texture

Cuddle Me Cow Amigurumi Pattern

Create your own adorable cuddly cow companion with this delightful amigurumi pattern! This charming white cow features brown hooves, horns, and inner ears, complete with a sweet pink nose and optional heart spots. Perfect for gifting or adding a farmyard friend to your collection, this pattern includes detailed instructions for the head, body, limbs, and all the precious details that make this cow irresistibly huggable. The finished cow sits beautifully and makes a wonderful decorative piece or beloved toy.

Intermediate 8-10 Hours

Materials Needed for Cuddle Me Cow Amigurumi Pattern

β€” Main Fabric

  • 01
    Double knit/light worsted yarn in white (Color A) - 50g for head and legs
  • 02
    Double knit/light worsted yarn in brown (Color B) - 20g for hooves, horns and tail
  • 03
    Double knit/light worsted yarn in pink (Color C) - 15g for nose and inner ears
  • 04
    Double knit/light worsted yarn in black (Color D) - 15g for heart spots
  • 05
    Double knit/light worsted yarn in yellow (Color E) - 10g for flower center
  • 06
    Double knit/light worsted yarn in red (Color F) - 10g for flower petals
  • 07
    Brown and black embroidery floss for facial details

β€” Tools Required

  • 01
    3.50mm crochet hook (4mm for body if tight tension)
  • 02
    10/12mm safety eyes (optional)
  • 03
    Scissors
  • 04
    Stuffing
  • 05
    Stitch marker
  • 06
    Tapestry needle

Progress Tracker

0% Complete

β€” Head :

Round 1 :

MC, 6 SC [6]

Round 2 :

INC x 6 [12]

Round 3 :

(SC, INC) x 6 [18]

Round 4 :

(2 SC, INC) x 6 [24]

Round 5 :

(3 SC, INC) x 6 [30]

Round 6 :

(4 SC, INC) x 6 [36]

Round 7 :

(5 SC, INC) x 6 [42]

Round 8 :

(6 SC, INC) x 6 [48]

Round 9 :

(7 SC, INC) x 6 [54]

Round 10-16 :

SC in each stitch around [54] *7 Rounds*

Info :

If using safety eyes: Place eyes between round 10/11, 6 stitches apart. Use white cotton thread to embroider a white stitch under each eye

Round 17 :

(7 SC, DEC) x 6 [48]

Round 18 :

(6 SC, DEC) x 6 [42]

Round 19 :

(5 SC, DEC) x 6 [36]

Round 20 :

(4 SC, DEC) x 6 [30]

Round 21 :

(3 SC, DEC) x 6 [24]

Round 22 :

SC in each stitch around [24] stuff head

Round 23 :

(2 SC, DEC) x 6 [18]

Round 24 :

(1 SC, DEC) x 6 [12]

Round 25 :

(DEC) x 6 [6]

β€” Body :

Info :

The body requires no stuffing, working in DC stitches. CH 2 at the beginning of each round doesn't count as a stitch

Round 26 :

CH 2, (INC x 6), SLP st at the top of CH 2 [12]

Round 27 :

CH 2, (1 DC, INC) x 6, SLP st at the top of CH 2 [18]

Round 28 :

CH 2, (2 DC, INC) x 6, SLP st at the top of CH 2 [24]

Round 29 :

CH 2, (3 DC, INC) x 6, SLP st at the top of CH 2 [30]

Round 30 :

CH 2, (4 DC, INC) x 6, SLP st at the top of CH 2 [36]

Round 31 :

CH 2, (5 DC, INC) x 6, SLP st at the top of CH 2 [42]

Round 32-34 :

CH 2, DC in each stitch around, SLP st at the top of CH 2 [42] *3 Rounds*

Round 35 :

CH 2, (5 DC, DEC) x 6, SLP st at the top of ch 2 [36]

Round 36 :

CH 2, DC in each stitch around, SLP st at the top of ch 2 [36]

Round 37 :

CH 2, (4 DC, DEC) x 6, SLP st at the top of ch 2 [30]

Round 38 :

CH 2, DC in each stitch around, SLP st at the top of ch 2 [30]

Info :

Fold the bottom of the body in half and sc 15 stitches across the edge to close the body

β€” Ears :

Info :

Make two of each colour (4 pieces in total). Make the inner ear first

Inner ears (Pink) Round 1 :

MC, 6 SC [6]

Round 2 :

INC x 6 [12]

Round 3 :

(SC, INC) x 6 [18]

Round 4 :

(2 SC, INC) x 6 [24]

Info :

End off with a slip stitch and weave in the ends

Outer ears (White) Round 1 :

MC, 6 SC [6]

Round 2 :

INC x 6 [12]

Round 3 :

(SC, INC) x 6 [18]

Round 4 :

(2 SC, INC) x 6 [24]

Info :

Don't cut the yarn, place Colour C (inner ear) on top of Colour A (Outer ear). SC 24 stitches around the ear attaching the inner ear to the outer ear by inserting the hook through all four loops

Round 5 :

CH 1, SC in next 6 stitches [6]

Round 6 :

TYW, CH 1, SC in next 6 stitches [6]

Info :

End off with a slip stitch, Leaving a strand of yarn to sew the ear to the head. Sew the little ear flap (rounds 5-6) onto the head in line with round 11 counting from the top of the head

β€” Nose :

Round 1 :

CH 5, (2 SC in 2nd chain from hook), SC in next 2 stitches, 4 SC in the last stitch. Now working on the opposite side of the chain 5, SC in the next 2 stitches, 2 SC in the last stitch [12]

Round 2 :

(1 SC, INC) x 6 [18]

Round 3 :

(2 SC, INC) x 6 [24]

Info :

End off with a slip stitch, leaving a strand of yarn to sew the nose onto the face. Attach the nose between rounds 14-21 counting from the top of the head down

β€” Horns :

Info :

Make two

Round 1 :

MC, 6 SC [6]

Round 2 :

INC x 6 [12]

Round 3-4 :

SC in each stitch around [12] *2 Rounds*

Round 5 :

(SC, INC) x 6 [18]

Round 6-8 :

SC in each stitch around [18] *3 Rounds*

Info :

stuff the horns. End off with a slip stitch, leaving a strand of yarn to sew the horns onto the head. Attach the horns between rounds 5-10 counting from the top of the head

β€” Arms :

Info :

Make two

Round 1 :

MC, 6 SC [6]

Round 2 :

INC x 6 [12]

Round 3 :

(SC, INC) x 6 [18]

Round 4 :

(2 SC, INC) x 6 [24]

Round 5 :

SC in each stitch around [24]

Round 6 :

(2 SC, DEC) x 6 [18] - Stuff the hoof

Info :

Change to colour A: (White)

Round 7 :

(SC, DEC) x 6 [12]

Round 8-22 :

SC in each stitch around [12] *15 Rounds*

Info :

Stuff the arm lightly. End off with a slip stitch, Pinch the opening of the arm between your fingers and slip stitch or SC 6 across to close the arm. Leave a strand of yarn to sew the arms to the body one DC round under the head

β€” Legs :

Info :

Make two

Round 1 :

MC, 6 SC [6]

Round 2 :

INC x 6 [12]

Round 3 :

(SC, INC) x 6 [18]

Round 4 :

(2 SC, INC) x 6 [24]

Round 5 :

SC in each stitch around [24] - Stuff the hoof

Info :

Change to colour A: (White)

Round 6 :

(2 SC, DEC) x 6 [18]

Round 7 :

(SC, DEC) x 6 [12]

Round 8-17 :

SC in each stitch around [12] *10 Rounds*

Info :

Stuff the leg lightly. End off with a slip stitch, Pinch the opening of the leg between your fingers and slip stitch or SC 6 across to close the leg. Leave a strand of yarn to attach the legs to the bottom of the body. Attach each leg from the outer corner of the body

β€” Heart Spots :

Info :

Making two or more is optional

Round 1 :

MC, CH 3, TC x 3, DC x 3, CH 1, TC x 1, CH 1, DC x 3, TC x 3 CH 3, slip stitch into the MC and pull the MC tail yarn tight to form the heart

Info :

End off with a slip stitch, leaving a strand of yarn to attach the heart to the body of the cow

β€” Tail :

Round 1 :

Chain 15, HDC in the third chain from the hook, HDC in each of the remaining chains [13]

Info :

Leave a strand of yarn to attach the tail to the body in round 9

Round 2 :

Insert your hook at the end of the tail and chain 3, Do 3 x TC in the loop of the tail, chain 3, and end with a slip stitch and weave in the ends

β€” Flower :

Round 1 :

MC, 6 SC [6]

Round 2 :

INC x 6 [12]

Info :

Change to Color B: (Red)

Round 3 :

[CH 2, (DC, TC x 2, DC) in same stitch] SC in the next stitch

Round 4 :

(DC, TC x 2, DC) in the next stitch, SC in the next stitch, REPEAT around the 12 stitches. (Having 6 petals at the end)

Info :

End off with a slip stitch, Leaving a strand of yarn to attach the flower to the side of the horn

Assembly Instructions

  • Attach the ears to the head in line with round 11, sewing the small ear flap portion securely
  • Position and sew the nose between rounds 14-21 from the top of the head down
  • Attach the horns between rounds 5-10 from the top of the head, ensuring they're evenly spaced
  • Sew the arms to the body one DC round under the head attachment point
  • Attach the legs from the outer corners of the bottom body opening
  • Sew the tail to round 9 of the body at the back center
  • Attach optional heart spots to the body in desired positions for decoration

Important Notes

  • πŸ’‘Safety eyes are a choking hazard for children under 5 - inform customers accordingly
  • πŸ’‘Stuff the head firmly but avoid overstuffing the body and limbs for proper shape
  • πŸ’‘Use a 4mm hook for the body section if you have tight tension with the 3.5mm hook
  • πŸ’‘The body requires no stuffing as it's worked in double crochet for structure
  • πŸ’‘When attaching inner and outer ears, insert hook through all four loops for secure connection
  • πŸ’‘Embroider facial features using black embroidery floss with horizontal stitches for eyes

This delightful Cuddle Me Cow pattern captures all the charm of a beloved farmyard friend in soft, huggable form. With its gentle expression, sweet pink nose, and optional decorative touches like heart spots and a flower crown, this cow is destined to become a treasured companion. The thoughtful construction combines head and body as one piece for durability while maintaining that irresistible cuddly appeal. Whether displayed on a shelf or snuggled close, this handcrafted cow brings warmth and joy to any space. πŸ„ Happy crocheting! 🧢✨

You ask,

we answer.

FAQs

Can I use different yarn weights for this pattern?

The pattern is designed for double knit/light worsted yarn. Using different weights will change the finished size - lighter yarns will make a smaller cow, heavier yarns will make it larger. Adjust your hook size accordingly.

Is the flower accessory removable or permanently attached?

The flower is sewn permanently to the horn as designed. If you'd like it removable, you could modify the pattern to create a small loop or use snaps for attachment.

How do I embroider the facial features without safety eyes?

Use black embroidery floss to create horizontal stitches for eyes (at least 4 stitches wide with 7 stitches between them), add small arches above for brows, and V-shapes at outer corners plus small stitches near the nose.

Why doesn't the body require stuffing?

The body is worked in double crochet stitches which create more structure and thickness than single crochet. This gives the cow a sturdy base while maintaining flexibility, and the flat bottom helps it sit properly.

Can I make the cow larger or smaller?

Yes! Use a larger hook and thicker yarn for a bigger cow, or smaller hook with finer yarn for a mini version. Keep the same stitch counts but expect different finished dimensions with yarn weight changes.