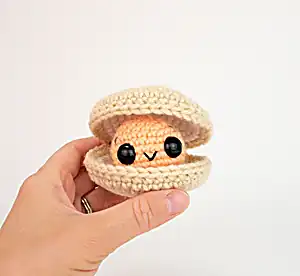
Meet adorable Cleo the Clam, a shy but friendly little character ready to come out of his shell and make new friends! This delightful amigurumi pattern creates a charming clam with his own removable shell home. Perfect for beginners wanting to try something unique, Cleo features a sweet peach-colored body with safety eyes and an embroidered smile that peeks out from his beautifully crafted tan and cream shell. The finished project measures 3 inches wide when complete, making it perfect for display, gifting, or as a cuddly companion.
Progress Tracker
0% Complete
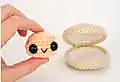
— Outer Shell :
Round 1 :
Ch 2, 6 sc in first ch (6 sts)
Round 2 :
2 sc in each st around (12 sts)
Round 3 :
(Sc 1, 2 sc in next st), 6 times (18 sts)
Round 4 :
(Sc 2, 2 sc in next st), 6 times (24 sts)
Round 5 :
(Sc 3, 2 sc in next st), 6 times (30 sts)
Round 6 :
(Sc 4, 2 sc in next st), 6 times (36 sts)
Round 7 :
(Sc 17, 2 sc in next st), 2 times (38 sts)
Info :
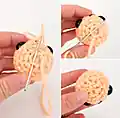
Wait to fasten off until you have made the inner shell pieces
— Inner Shell (make 2) :
Round 1 :
Ch 2, 6 sc in first ch (6 sts)
Round 2 :
2 sc in each st around (12 sts)
Round 3 :
(Sc 1, 2 sc in next st), 6 times (18 sts)
Round 4 :
(Sc 2, 2 sc in next st), 6 times (24 sts)
Round 5 :
(Sc 3, 2 sc in next st), 6 times (30 sts)
Round 6 :
(Sc 4, 2 sc in next st), 6 times (36 sts)
Round 7 :
(Sc 17, 2 sc in next st), 2 times (38 sts)
Info :
Fasten off, leaving a yarn tail for weaving in
— The Clam Option 1 (light worsted yarn) :
Round 1 :
Ch 2, 6 sc in first ch (6 sts)
Round 2 :
2 sc in each st around (12 sts)
Round 3 :
(Sc 3, 2 sc in next st), 3 times (15 sts)
Round 4 :
(Sc 4, 2 sc in next st), 3 times (18 sts)
Round 5 :
(Sc 5, 2 sc in next st), 3 times (21 sts)
Round 6-7 :
Sc 21 (2 total rounds)
Round 8 :
(Sc 6, 2 sc in next st), 3 times (24 sts)
Round 10 :
(Sc 2, dec 1), 6 times (18 sts)
Round 11 :
(Sc 1, dec 1), 6 times (12 sts)
Info :
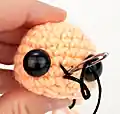
Begin stuffing the clam. Insert safety eyes between R8-9, with 3 sts in between. Add embroidered smile and eyebrows
Round 12 :
Dec 6 times (6 sts)
— The Clam Option 2 (medium worsted yarn) :
Round 1 :
Ch 2, 6 sc in first ch (6 sts)
Round 2 :
2 sc in each st around (12 sts)
Round 3 :
(Sc 3, 2 sc in next st), 3 times (15 sts)
Round 4 :
(Sc 4, 2 sc in next st), 3 times (18 sts)
Round 5-7 :
Sc 18 (3 total rounds)
Round 8 :
(Sc 1, dec 1), 6 times (12 sts)
Info :
Insert eyes between R7-8, with 3 sts in between. Add stuffing and embroidered features
Round 9 :
Dec 6 times (6 sts)
This sweet Cleo the Clam pattern brings underwater magic to life with its unique dual-component design! Creating both the adorable clam character and his cozy shell home makes this project feel extra special and rewarding. The combination of basic amigurumi techniques with thoughtful details like embroidered features makes Cleo a perfect confidence-building project for beginners. Whether displayed on a shelf or given as a heartfelt handmade gift, this charming sea creature is sure to bring smiles wherever he goes! 🐚 Happy crocheting! 🧶✨