๐Ÿงถ Beautiful โœจ Detailed ๐Ÿ’ Adorable

Cute Cat with Donut Amigurumi Pattern

Cute Cat with Donut Amigurumi Pattern
4.6โ˜… Rating
4-5 Hours Time Needed
3.0K Made This
โœ‚๏ธ

Beginner Friendly Level

Perfect for those just starting their sewing journey, with clear instructions and simple techniques

โฑ๏ธ

Weekend Treat

Takes 5-7 hours, making it an enjoyable project to finish over a couple of days.

๐Ÿงธ

Cute Companion

An adorable friend to cherish, handcrafted with love to bring comfort and joy for years to come.

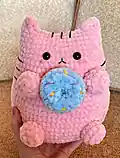
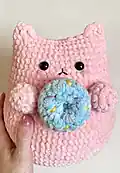
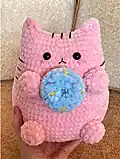
About This Cute Cat with Donut Amigurumi Pattern

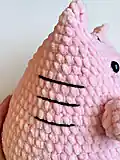
This sweet cat amigurumi pattern combines simple crochet techniques with charming details like embroidered facial features and body stripes. The pattern includes instructions for creating both the cat and its matching donut, making it a complete set that's perfect for display or cuddles. Using plush Himalaya Dolphin Baby yarn gives the finished piece a soft, huggable texture that both children and adults will love.

Cute Cat with Donut Amigurumi Pattern crochet pattern - detailed view of completed project

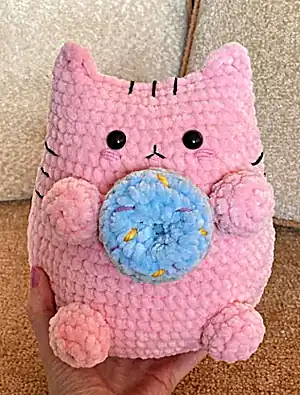
The pattern works up quickly using basic stitches and includes helpful photos to guide you through each step. Safety eyes and embroidered details bring personality to your finished cat.

Why You'll Love This Cute Cat with Donut Amigurumi Pattern

I absolutely love how this pattern brings together two of my favorite things - cats and donuts! The combination is irresistibly cute and always brings a smile to my face. What I find most rewarding is watching this little character come to life as you add each detail, from the safety eyes to the embroidered cheeks and stripes. The plush yarn makes it incredibly soft and cuddly, and the size is perfect for both display and snuggling.

Cute Cat with Donut Amigurumi Pattern step 1 - construction progress Cute Cat with Donut Amigurumi Pattern step 2 - assembly progress Cute Cat with Donut Amigurumi Pattern step 3 - details and accessories Cute Cat with Donut Amigurumi Pattern step 4 - final assembly and finishing

Switch Things Up

I love experimenting with different color combinations for this adorable cat pattern! Instead of the traditional pink, I've tried making versions in soft gray, cream, and even a bold turquoise that turned out absolutely stunning. The donut offers another fantastic opportunity for creativity - I've made rainbow donuts, chocolate brown with colorful sprinkles, and even seasonal versions like orange for Halloween or red and green for Christmas.

What I find most exciting is how changing the embroidery details can completely alter the cat's personality. I've created sleepy cats with curved lines for closed eyes, surprised cats with wider eye placement, and even grumpy cats with downturned mouths. The beauty of this pattern lies in its versatility - each cat you make becomes a unique character with its own story to tell!

Common Mistakes & How to Fix Them

โœ— Forgetting to stuff the body firmly before closing can result in a floppy, shapeless cat โœ— Placing safety eyes too close together or too far apart changes the cat's expression significantly โœ— Not counting stitches carefully during increases and decreases can throw off the entire shape โœ— Embroidering facial features too early before stuffing can cause them to become distorted or uneven

Cute Cat with Donut Amigurumi Pattern

Create your own adorable pink cat amigurumi that holds a sweet blue donut! This charming pattern features a chubby cat with embroidered facial details, cute cheeks, and striped markings. Perfect for cat lovers and donut enthusiasts alike, this delightful amigurumi makes a wonderful gift or desk companion. The finished toy measures 21-23 cm and includes detailed instructions for both the cat and its colorful donut accessory.

Beginner Friendly 4-5 Hours

Materials Needed for Cute Cat with Donut Amigurumi Pattern

โ€” Main Fabric

  • 01
    Himalaya Dolphin Baby yarn - main color for cat (1-1.5 skeins)
  • 02
    Himalaya Dolphin Baby yarn - 2 additional colors for donut
  • 03
    YarnArt Jeans or similar yarn for embroidery lines on donut

โ€” Tools Required

  • 01
    Crochet hook 4mm
  • 02
    Black safety eyes 10mm
  • 03
    Glue for eyes (glue gun recommended)
  • 04
    Black yarn for body lines (YarnArt Jeans recommended)
  • 05
    Embroidery thread for nose
  • 06
    Stuffing material
  • 07
    Scissors
  • 08
    Yarn needle
  • 09
    Stitch markers

Progress Tracker

0% Complete

โ€” Body :

R1 :

make ch2, in the second ch from the hook: 6 sc (6)

R2 :

6inc (12)

R3 :

(1sc, inc )*6 (18)

R4 :

(2sc, inc)*6 (24)

R5 :

(3 sc, inc)*6 (30)

R6 :

(4sc, inc)*6 (36)

R7 :

(5sc, inc)*6 (42)

R8 :

(6sc, inc)*6 (48)

R9 :

(3sc, inc)*12 (60)

R10 :

(4sc, inc)*12 (72)

R11-16 :

(6 rounds) without changes (72)

R17 :

(4sc, dec)*12(60)

R18-21 :

(4 rounds): without changes (60)

R22 :

(8sc, dec)*6 (54)

R23-24 :

(2 rounds): without changes (54)

R25 :

(7sc, dec)*6 (48)

R26-27 :

(2 rounds): without changes (48)

R28 :

(6sc, dec)*6 (42)

R29-33 :

(5 rounds): without changes (42)

โ€” Crochet ears :

Info :

Fold the body in half and work, joining 2 sides

R34 :

3 dc, 14 sl st, 3 dc

Info :

Cut off the yarn and hide the end

โ€” Arms and legs (make 4) :

R1 :

Make ch2, in the second ch from the hook: 6sc (6)

R2 :

6inc (12)

R3-4 :

(2 rounds): without changes (12)

Info :

Leave a long end for sewing

โ€” Tail :

R1 :

Make ch2, in the second ch from the hook: 6sc (6)

R2 :

6inc (12)

R3-4 :

(2 rounds): without changes (12)

R5 :

(1sc, dec)*4 (8)

R6-13 :

(8 rounds): without changes (8)

Info :

Leave a long end for sewing

โ€” Donut :

R1 :

Make ch12, close in a ring, 12sc in a ring

R2 :

(1sc, inc)*6 (18)

R3 :

18sc

R4 BLO :

18sc

R5 :

1sc, dec (12)

R6 :

without changes (12)

Info :

Leave the end for sewing, sew the first and the last rounds, stuff as you go

Assembly Instructions

  • Glue safety eyes between rounds 5 and 6, with 5 stitches distance between them
  • Embroider mouth and cheeks using embroidery thread as shown in pictures
  • Sew tail at level of rounds 10-11 of the body
  • Attach arms 8 rounds down from ears with 8 stitches distance between them, stuff lightly
  • Sew legs at rounds 11-12 of body with 8 stitches distance between them, stuff lightly
  • Embroider colored spots on the donut using various colored yarns
  • Attach donut to the cat's arms by sewing to the side stitches
  • Embroider 2cm lines on the head and body stripes as shown in pattern photos

Important Notes

  • ๐Ÿ’กUse stitch markers to keep track of rounds, especially during shaping sections
  • ๐Ÿ’กStuff body firmly but not too tightly to maintain the proper cat shape
  • ๐Ÿ’กPlace safety eyes carefully before final stuffing as they cannot be repositioned easily
  • ๐Ÿ’กEmbroider facial features after stuffing to ensure proper placement and tension
  • ๐Ÿ’กUse plush yarn for the softest finish, but adjust eye and feature placement if using different yarn weights

This delightful cat with donut pattern creates the perfect combination of cute and quirky! The plush yarn gives your finished amigurumi an irresistibly soft texture, while the embroidered details add so much personality. Whether you're making it as a gift for a cat lover or treating yourself to some creative relaxation, this pattern delivers both charm and satisfaction. The donut accessory adds an extra touch of whimsy that makes this project truly special. ๐Ÿงถ Happy crocheting! ๐Ÿฑโœจ

You ask,

we answer.

FAQs

Can I use a different yarn weight for this pattern?

Yes, but keep in mind that using thinner yarn may create larger spaces between stitches, and thicker yarn will make a larger finished product. You may need to adjust hook size and eye placement accordingly.

What if I can't find Himalaya Dolphin Baby yarn?

Any plush or chenille yarn of similar weight will work beautifully. Look for yarns labeled as 'baby' or 'plush' for the softest texture.

How do I make the facial features look even?

Use the stitch count guidelines provided and take your time with placement. Pin everything in place before sewing, and refer to the pattern photos for guidance.

Can I make the donut in different colors?

Absolutely! The pattern mentions using 2 additional colors for the donut, so feel free to get creative with your color combinations to match your preferences.

Is this pattern suitable for beginners?

Yes! This pattern uses basic crochet stitches and includes helpful photos. Take your time with counting stitches and don't be afraid to start over if needed.