🧢 Beautiful ✨ Detailed πŸ’ Adorable

Daisy Pocket Crochet Phone Bag Pattern

Daisy Pocket Crochet Phone Bag Pattern
3.9β˜… Rating
5-7 Hours Time Needed
3.7K Made This
βœ‚οΈ

Intermediate Level

Ideal for those with basic knitting experience, featuring slightly more advanced stitches and techniques to expand your skills.

⏱️

Weekend Treat

Takes 5-7 hours, making it an enjoyable project to finish over a couple of days.

✨

Stylish Touch

An elegant detail to elevate any look, combining traditional techniques with contemporary design sensibilities.

About This Daisy Pocket Crochet Phone Bag Pattern

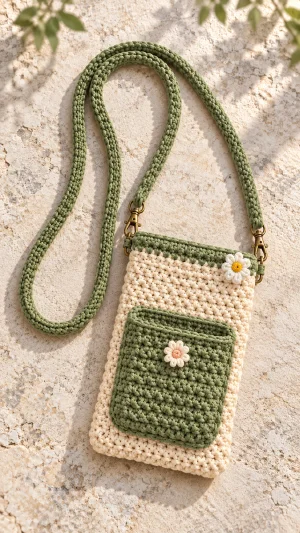
This original, photo-inspired crochet phone bag combines a cream rectangular body with a sage front pocket, matching top trim, and a rounded strap attached with swivel clasps. The panels and pocket use alternating single and double crochet stitches, creating a compact, pebbled texture without complicated clusters or separate raised motifs. Working the components flat makes it easier to compare their sizes before sewing, while the green pocket edging gives its opening a defined outline. Smooth cotton helps the stitches hold their shape, and the finishing introduces practical skills such as securing folded hardware tabs and sewing a pocket without catching the back panel.

Daisy Pocket Crochet Phone Bag Pattern crochet pattern - detailed view of completed project

At the suggested gauge, the bag is intended to finish approximately 12.5 cm wide and 20 cm tall before allowing for seam take-up; these are planning dimensions, so check your own fabric. The open top and unfastened front pocket suit light everyday essentials, with the detachable strap allowing an easy change between carrying and storage.

Why You'll Love This Daisy Pocket Crochet Phone Bag Pattern

I love how the cream body gives the sage pocket and tiny daisies room to stand out without making the construction complicated. I can work on the two matching panels first, then enjoy the smaller pocket and flower pieces as separate, manageable stages. The alternating stitches give me texture with an easy rhythm, and the plain green trim creates a tidy place to attach the hardware tabs. I also appreciate being able to remove the strap before washing or tuck the finished bag into a larger tote. Before calling it finished, I would spend a little extra time reinforcing the tabs and checking the pocket opening, because those details affect everyday use. For me, the appeal is a cheerful accessory with useful compartments and finishing choices I can understand.

Daisy Pocket Crochet Phone Bag Pattern step 1 - construction progress Daisy Pocket Crochet Phone Bag Pattern step 2 - assembly progress Daisy Pocket Crochet Phone Bag Pattern step 3 - details and accessories Daisy Pocket Crochet Phone Bag Pattern step 4 - final assembly and finishing

Switch Things Up

I would keep the cream body and change the sage accents to dusty blue, terracotta, or charcoal when I want the same floral layout to work with a different wardrobe. For a quieter version, I would use one color throughout and let the alternating stitches define the pocket, keeping every stitch count and attachment position unchanged. I could also reverse the cream and green placement, reserving enough of the new accent color for both top borders, the pocket edging, the tabs, and the complete strap. When using leftovers, I would choose yarns of matching thickness and fiber behavior, since a noticeably softer pocket can stretch away from a firmer body.

If I need a taller bag, I would add the same number of textured rows to both body panels before the green trim, measuring against my phone rather than relying on a universal row total. To make the body wider, I would increase each panel by an even number of stitches, then retain the single-crochet, double-crochet sequence and check that the pocket still leaves space beside both seams. I would adjust pocket height independently by adding or removing complete rows, but keep its finished top comfortably below the bag opening so reaching the phone remains easy.

For a shorter shoulder strap, I would reduce the starting chain to the length I actually need, record the resulting stitch count, and use that same count in all four strap rows. If I wanted a lined version, I would sew a separate fabric pouch to fit the assembled interior and attach it beneath the green trim, leaving the hardware-tab stitches accessible for inspection. I would finish either variation with the two small daisies or just one, securing each flower through the intended panel only so the pocket and main compartment remain usable.

Common Mistakes & How to Fix Them

βœ— A panel that narrows usually means the last stitch has been missed. Count 20 stitches after every body row and mark both edge stitches; undo the first short row and restore the missing stitch before continuing.βœ— A striped texture can appear when single crochet stitches repeatedly sit above single crochet stitches. Start every textured row with single crochet and finish with double crochet; check that each single crochet sits above a double crochet.βœ— A phone that catches at the opening may indicate insufficient room after seaming. Pin or baste the panels together before permanent sewing and insert your phone with its case; widen both panels equally if the fit feels tight.βœ— A pocket that pulls diagonally often has uneven sewing tension or mismatched positioning. Pin its corners first, sew with small relaxed stitches, and lay the front panel flat periodically to check that neither side puckers.βœ— A sealed main compartment means pocket stitches have passed through both body panels. Attach the pocket before joining the body, or place a firm barrier inside; check that your hand can reach the bottom afterward.βœ— Loose hardware tabs can develop when their ends are attached only to the topmost loops. Sew both tab ends through several rows of panel fabric and repeat the stitching; check for movement with a gentle downward pull.βœ— A twisted strap usually starts with a twisted foundation chain or uneven seam. Lay the completed strip flat before folding, align its long edges, and check the cord remains untwisted before fastening the second clasp.βœ— Petals that bunch together may have been worked into too few center stitches. Give each of the eight center stitches one complete petal, count eight finished petals, and spread them evenly before sewing the flower in place.

Daisy Pocket Crochet Phone Bag Pattern

Make a cream and sage crochet phone bag with a roomy front pocket, little white daisies, and a detachable crossbody strap that brings the whole design together. You will crochet two textured panels, add a separate pocket, and finish the opening with a neat green border before attaching the hardware. This Hook Vibes pattern walks you through each component so you can check your phone’s fit as you work and create a useful everyday accessory.

Intermediate 5-7 Hours

Materials Needed for Daisy Pocket Crochet Phone Bag Pattern

β€” Main Fabric

  • 01
    Smooth worsted-weight cotton yarn in cream: approximately 100-130 m for two body panels.
  • 02
    Matching worsted-weight cotton yarn in sage green: approximately 140-180 m for the pocket, trim, tabs, strap, and sewing.
  • 03
    DK-weight cotton yarn in white: approximately 8 m for two small daisies.
  • 04
    DK-weight cotton yarn in golden yellow: approximately 2 m for one flower center.
  • 05
    DK-weight cotton yarn in peach: approximately 2 m for the second flower center.
  • 06
    Yarn quantities are planning estimates and will vary with gauge, strap length, and size adjustments.

β€” Tools Required

  • 01
    4 mm crochet hook, or the size needed to obtain the body gauge.
  • 02
    2.75 mm crochet hook for the daisies.
  • 03
    Two swivel lobster clasps with closed attachment eyes approximately 12-15 mm wide.
  • 04
    Two closed metal rings or D-rings approximately 12-15 mm wide for the bag tabs.
  • 05
    Tapestry needle suitable for the main cotton yarn.
  • 06
    Small yarn needle for attaching the daisies.
  • 07
    Scissors.
  • 08
    Stitch markers.
  • 09
    Sewing pins or removable clips.
  • 10
    Measuring tape.
  • 11
    Your phone with its everyday protective case for fitting.
  • 12
    Blocking mat or clean towel for shaping the flat pieces.

Progress Tracker

0% Complete

β€” Before You Begin :

Design :

This is an original pattern inspired by the pictured cream and sage phone bag. Make two matching body panels, one front pocket, two ring tabs, one strap, and two daisies.

Gauge :

Using the main yarn and larger hook, aim for 16 sts and 16 textured rows per 10 cm after gently washing and drying a swatch. For a swatch, ch 21 and follow Body Rows 1-12, then measure the central fabric. Adjust your hook before making the bag.

Fit :

The planned exterior size is approximately 12.5 cm wide by 20 cm tall, with some width lost to seams. Check against your phone in its case. The joined interior should be at least 1 cm wider and 1 cm taller than the phone, and the opening should allow easy removal.

Turning Chains :

The ch 1 at the start of a row does not count as a stitch. Work the first stitch into the first stitch of the previous row.

Texture :

Each textured row begins with sc and ends with dc. After turning, each sc is worked above a dc and each dc above a sc. Work through both loops throughout unless directed otherwise.

β€” Cream Body Panels :

Make Two :

Use cream yarn and the larger hook. Work both panels with matching tension.

Foundation :

Ch 21 loosely.

Row 1 :

Sc in the second ch from the hook, dc in the next ch; repeat sc in the next ch, dc in the next ch across. Turn. (20 sts)

Row 2 :

Ch 1, (sc in the next st, dc in the next st) 10 times. Turn. (20 sts)

Row 3 :

Ch 1, (sc in the next st, dc in the next st) 10 times. Turn. (20 sts)

Row 4 :

Ch 1, (sc in the next st, dc in the next st) 10 times. Turn. (20 sts)

Row 5 :

Ch 1, (sc in the next st, dc in the next st) 10 times. Turn. (20 sts)

Row 6 :

Ch 1, (sc in the next st, dc in the next st) 10 times. Turn. (20 sts)

Row 7 :

Ch 1, (sc in the next st, dc in the next st) 10 times. Turn. (20 sts)

Row 8 :

Ch 1, (sc in the next st, dc in the next st) 10 times. Turn. (20 sts)

Row 9 :

Ch 1, (sc in the next st, dc in the next st) 10 times. Turn. (20 sts)

Row 10 :

Ch 1, (sc in the next st, dc in the next st) 10 times. Turn. (20 sts)

Row 11 :

Ch 1, (sc in the next st, dc in the next st) 10 times. Turn. (20 sts)

Row 12 :

Ch 1, (sc in the next st, dc in the next st) 10 times. Turn. (20 sts)

Row 13 :

Ch 1, (sc in the next st, dc in the next st) 10 times. Turn. (20 sts)

Row 14 :

Ch 1, (sc in the next st, dc in the next st) 10 times. Turn. (20 sts)

Row 15 :

Ch 1, (sc in the next st, dc in the next st) 10 times. Turn. (20 sts)

Row 16 :

Ch 1, (sc in the next st, dc in the next st) 10 times. Turn. (20 sts)

Row 17 :

Ch 1, (sc in the next st, dc in the next st) 10 times. Turn. (20 sts)

Row 18 :

Ch 1, (sc in the next st, dc in the next st) 10 times. Turn. (20 sts)

Row 19 :

Ch 1, (sc in the next st, dc in the next st) 10 times. Turn. (20 sts)

Row 20 :

Ch 1, (sc in the next st, dc in the next st) 10 times. Turn. (20 sts)

Row 21 :

Ch 1, (sc in the next st, dc in the next st) 10 times. Turn. (20 sts)

Row 22 :

Ch 1, (sc in the next st, dc in the next st) 10 times. Turn. (20 sts)

Row 23 :

Ch 1, (sc in the next st, dc in the next st) 10 times. Turn. (20 sts)

Row 24 :

Ch 1, (sc in the next st, dc in the next st) 10 times. Turn. (20 sts)

Row 25 :

Ch 1, (sc in the next st, dc in the next st) 10 times. Turn. (20 sts)

Row 26 :

Ch 1, (sc in the next st, dc in the next st) 10 times. Turn. (20 sts)

Row 27 :

Ch 1, (sc in the next st, dc in the next st) 10 times. Turn. (20 sts)

Row 28 :

Ch 1, (sc in the next st, dc in the next st) 10 times. Turn. (20 sts)

Row 29 :

Ch 1, (sc in the next st, dc in the next st) 10 times. Turn. (20 sts)

Row 30 :

Ch 1, (sc in the next st, dc in the next st) 10 times, changing to sage on the final yarn-over of the last dc. Turn. (20 sts)

Row 31 :

With sage, ch 1, sc in each st across. Turn. (20 sc)

Row 32 :

Ch 1, sc in each st across. (20 sc)

Panel Finishing :

Fasten off. Leave a 25 cm sage tail for sewing the green section of the side seam. Choose and mark the outward-facing surface of each panel as the RS.

β€” Sage Front Pocket :

Foundation :

With sage and the larger hook, ch 17 loosely.

Row 1 :

Sc in the second ch from the hook, dc in the next ch; repeat sc in the next ch, dc in the next ch across. Turn. (16 sts)

Row 2 :

Ch 1, (sc in the next st, dc in the next st) 8 times. Turn. (16 sts)

Row 3 :

Ch 1, (sc in the next st, dc in the next st) 8 times. Turn. (16 sts)

Row 4 :

Ch 1, (sc in the next st, dc in the next st) 8 times. Turn. (16 sts)

Row 5 :

Ch 1, (sc in the next st, dc in the next st) 8 times. Turn. (16 sts)

Row 6 :

Ch 1, (sc in the next st, dc in the next st) 8 times. Turn. (16 sts)

Row 7 :

Ch 1, (sc in the next st, dc in the next st) 8 times. Turn. (16 sts)

Row 8 :

Ch 1, (sc in the next st, dc in the next st) 8 times. Turn. (16 sts)

Row 9 :

Ch 1, (sc in the next st, dc in the next st) 8 times. Turn. (16 sts)

Row 10 :

Ch 1, (sc in the next st, dc in the next st) 8 times. Turn. (16 sts)

Row 11 :

Ch 1, (sc in the next st, dc in the next st) 8 times. Turn. (16 sts)

Row 12 :

Ch 1, (sc in the next st, dc in the next st) 8 times. Turn. (16 sts)

Row 13 :

Ch 1, (sc in the next st, dc in the next st) 8 times. Turn. (16 sts)

Row 14 :

Ch 1, (sc in the next st, dc in the next st) 8 times. Turn. (16 sts)

Row 15 :

Ch 1, (sc in the next st, dc in the next st) 8 times. Turn. (16 sts)

Row 16 :

Ch 1, (sc in the next st, dc in the next st) 8 times. Turn. (16 sts)

Row 17 :

Ch 1, (sc in the next st, dc in the next st) 8 times. Turn. (16 sts)

Row 18 :

Ch 1, (sc in the next st, dc in the next st) 8 times. Turn. (16 sts)

Row 19 :

Ch 1, (sc in the next st, dc in the next st) 8 times. Turn. (16 sts)

Row 20 :

Ch 1, (sc in the next st, dc in the next st) 8 times. Turn. (16 sts)

Edging Round 1 :

Ch 1. Top: sc in each of the 16 sts, then ch 1 for the corner. First side: work 1 sc into each of the 20 row ends, then ch 1. Bottom: work 1 sc into each of the 16 unused foundation-chain positions, then ch 1. Second side: work 1 sc into each of the 20 row ends, then ch 1. Sl st to the first sc. (72 sc and four ch-1 corner spaces)

Pocket Finishing :

Fasten off, leaving approximately 1 m of sage yarn for attachment. Mark the upper edge so it remains open during assembly.

β€” Hardware Ring Tabs :

Make Two :

Use sage and the larger hook. Each tab folds around one closed ring.

Foundation :

Ch 4.

Row 1 :

Sc in the second ch from the hook and in each remaining ch. Turn. (3 sc)

Row 2 :

Ch 1, sc in each st. Turn. (3 sc)

Row 3 :

Ch 1, sc in each st. Turn. (3 sc)

Row 4 :

Ch 1, sc in each st. Turn. (3 sc)

Row 5 :

Ch 1, sc in each st. Turn. (3 sc)

Row 6 :

Ch 1, sc in each st. (3 sc)

Tab Finishing :

Fasten off each tab, leaving a 45 cm sewing tail. Thread one ring onto each tab and fold the tab in half with its short ends aligned.

β€” Rounded Crossbody Strap :

Length Check :

The strap is a narrow flat strip folded lengthwise and sewn into a cord. Aim for approximately 100-110 cm of finished cord before attaching the clasps, or choose a length that suits your body. Cotton can lengthen under load.

Foundation :

With sage and the larger hook, ch 201 loosely. Measure the relaxed chain without stretching it. If needed, add or remove chains to approach your preferred length; the number of stitches in every strap row will equal the chain count minus one.

Row 1 :

Sc in the second ch from the hook and in each ch across. Turn. (200 sc for the stated foundation)

Row 2 :

Ch 1, sc in each st across. Turn. (200 sc, or your adjusted count)

Row 3 :

Ch 1, sc in each st across. Turn. (200 sc, or your adjusted count)

Row 4 :

Ch 1, sc in each st across. (200 sc, or your adjusted count)

Strap Preparation :

Fasten off and weave in the starting tail. Lay the strip flat and check that it has no twists.

Lengthwise Seam :

Fold the strip lengthwise with the preferred surface outward. With a separate length of sage yarn, whipstitch the foundation edge to the final-row edge, matching one position on each edge at a time. Keep the seam flexible and secure the yarn ends inside the resulting cord. No stuffing is needed.

First Clasp :

Pass one cord end through the closed attachment eye of a swivel clasp. Fold approximately 3 cm back against the cord and sew the folded section firmly to the standing strap along both sides and across its end.

Second Clasp :

Check the strap length and remove any twist. Attach the second clasp in the same way, folding approximately 3 cm back and stitching securely along both sides and across the end.

β€” Small Daisies :

Make Two :

Use DK cotton and the smaller hook. Make one yellow-centered flower for the bag trim and one peach-centered flower for the pocket.

Round 1 :

With the chosen center color, work 8 sc into a MR. Tighten the ring and sl st to the first sc. Fasten off the center color. (8 sc)

Round 2 :

Join white with a sl st in any center sc. In that same st, work ch 2, 2 dc, ch 2, sl st to complete the first petal. Sl st into the next center sc and work ch 2, 2 dc, ch 2, sl st in that same st. Continue in this way until every center sc holds one petal. Sl st into the base of the first petal to close. (8 petals)

Flower Finishing :

Fasten off, leaving a 30 cm white sewing tail. Secure the center tails behind the flower and gently spread all eight petals.

β€” Assembly and Finishing :

Shape the Pieces :

Gently dampen the body panels and pocket according to the yarn care instructions. Lay them flat, align the matching panels without stretching, and allow them to dry fully.

Attach the Pocket Daisy :

Place the peach-centered daisy near the upper center of the pocket, approximately 1.5 cm below its opening. Sew around the flower center and take a small anchoring stitch at each petal base, keeping the upper pocket edge free.

Position the Pocket :

Lay the front panel RS up. Center the pocket side to side, with its lower edging approximately 2 cm above the panel foundation edge. Pin the lower corners and upper corners, checking that the green body trim remains clear.

Sew the Pocket :

Use the long sage tail to sew the pocket edging to the front panel down one side, across the bottom, and up the other side. Leave the entire top edge open. Add several small reinforcing stitches at both upper corners and secure the tail on the WS.

Attach the Trim Daisy :

Sew the yellow-centered daisy near the upper-right corner of the front panel, overlapping the sage trim and cream fabric. Keep its stitches clear of the panel edge reserved for the side seam.

Baste and Check Fit :

Place the panels together with their WS facing each other and their top edges aligned. Temporarily baste the sides and bottom with a shallow seam. Insert your phone in its case; if it binds or projects above the opening, adjust both panels before making permanent seams.

Join the Body :

Whipstitch the cream portions of both sides and the bottom with cream yarn, matching corresponding row ends and foundation positions. Use sage yarn for the two green rows at each upper side. Keep the seams close to the edges and leave the entire top open. Remove the basting and secure all seam tails.

Attach the Ring Tabs :

Center one folded tab over each upper side seam, with its ring above the opening and one short tab end on the front and the other on the back. Sew both ends to the bag through the green trim and into the cream fabric below. Reinforce each attachment with a second pass of stitching, keeping the opening clear.

Connect the Strap :

Clip one swivel clasp onto each bag ring. Check that both gates close fully and that the strap lies without a twist.

Final Check :

Weave in all remaining ends on the inside, trim them neatly, and smooth the daisies. Place your phone inside and apply a gentle pull to each tab and strap attachment. Reinforce any moving stitches before carrying the bag.

Assembly Instructions

  • Shape the body panels and pocket flat, following the yarn care instructions, and allow every piece to dry completely.
  • Sew the peach-centered daisy near the pocket’s upper center, anchoring the center and petal bases without obstructing the opening.
  • Center the pocket on the front panel with its bottom approximately 2 cm above the foundation edge; sew both sides and the bottom, leaving the top open.
  • Attach the yellow-centered daisy near the front panel’s upper-right corner, keeping the side-seam area clear.
  • Baste the body panels with wrong sides together and check phone fit; then sew both sides and the bottom with matching yarn, leaving the top open.
  • Fold each tab around a ring and reinforce its ends over an upper side seam, attaching one end to the front and the other to the back.
  • Fold and seam the strap lengthwise, secure its ends around the clasp eyes, clip it onto the rings, and finish with a check of all seams, tails, and attachments.

Important Notes

  • πŸ’‘This is an original image-inspired pattern; the photographs contain no readable written pattern instructions.
  • πŸ’‘All stitch names use US crochet terminology, and turning chains do not count as stitches.
  • πŸ’‘The dimensions and yarn quantities are estimates based on the stated gauge, rather than measurements taken from the photographed bag.
  • πŸ’‘The 5-7 hour completion time is an estimate and depends on crocheting speed, fitting changes, and finishing.
  • πŸ’‘Keep an even number of stitches when changing the body or pocket width so every textured row can begin with sc and end with dc.
  • πŸ’‘Make both body panels the same size, and check the phone with its protective case before completing the seams.
  • πŸ’‘Attach the front pocket before joining the body panels so its sewing cannot accidentally close the main compartment.
  • πŸ’‘The main compartment and front pocket have open tops; check their contents when bending or placing the bag down.
  • πŸ’‘Use the bag for light essentials and inspect the cotton strap, folded ends, and ring tabs regularly for stretching or loose stitching.
  • πŸ’‘Remove the detachable strap before washing, follow the yarn label, and dry the bag flat.

Your daisy phone bag comes together through a few thoughtful finishing steps: a square pocket, an even top edge, and securely sewn hardware tabs. Before adding your phone, check that the pocket stitching has left the main compartment clear and that both clasps close completely. Give the strap a gentle stretch, then decide whether its length suits you. I would finish by smoothing the petals and checking every yarn tail, leaving a cheerful cream and sage accessory ready for light everyday use.
You ask,

we answer.

FAQs

How do I make sure the bag fits my phone?

Measure your phone with its protective case, then compare it with the panels after checking gauge. Baste the sides and bottom before permanent sewing so you can assess the actual interior. Aim for at least 1 cm of extra interior width and height. Add an even number of stitches to both panels if you need more width.

Can I use acrylic yarn instead of cotton?

You can use a smooth acrylic of similar thickness, but make a swatch first because the fabric may stretch and drape differently. Check that the pocket keeps its shape and that the phone does not pull the body noticeably longer. Use the same yarn for matching structural pieces, and reinforce the hardware tabs carefully.

Why does every textured row start with single crochet?

Each row has an even number of stitches and finishes with double crochet. Once you turn the work, that final double crochet becomes the first stitch facing you, so starting with single crochet places the two stitch types above one another. Keep repeating single crochet followed by double crochet, and count the row before turning.

Can I shorten the crossbody strap?

Yes. Shorten the foundation chain, then work one single crochet per chain position in the first row and maintain that count for the next three rows. Allow approximately 6 cm of the finished cord for the two folded clasp attachments. Check the length against your body before securing the second clasp, remembering that cotton can stretch.

How do I stop the pocket from sagging?

Check that the pocket fabric matches the body’s firmness, and avoid stretching it during shaping or attachment. Sew the sides and bottom evenly, then reinforce both upper corners with several small stitches. Keep heavier items in the main compartment; the open front pocket works best for small, light essentials that do not pull its edge outward.

Do I need to block the pieces?

Gentle wet shaping helps the two panels match and makes pocket placement easier. Follow the yarn label, press out excess water without wringing, and lay the pieces flat on a towel or mat. Smooth the edges rather than pulling them to a larger size. Let everything dry completely before sewing the pocket and body together.

How should I wash the finished phone bag?

Remove the strap and empty both compartments before washing. Follow the care instructions for all yarns used; gentle hand washing is a practical choice when the yarn permits it. Avoid twisting the bag or soaking metal hardware unnecessarily. Reshape it flat, let it dry fully, and inspect the tab stitching before reattaching the strap.