🧢 Beautiful ✨ Detailed πŸ’ Adorable

Dino's Family Amigurumi Pattern

Dino's Family Amigurumi Pattern
4.1β˜… Rating
3-4 Hours Time Needed
4.1K Made This
βœ‚οΈ

Intermediate Level

Ideal for those with basic knitting experience, featuring slightly more advanced stitches and techniques to expand your skills.

⏱️

Bite-Sized Project

Complete in under 2 hoursβ€”quick, fun, and perfect for a little creative escape.

🧸

Cute Companion

An adorable friend to cherish, handcrafted with love to bring comfort and joy for years to come.

About This Dino's Family Amigurumi Pattern

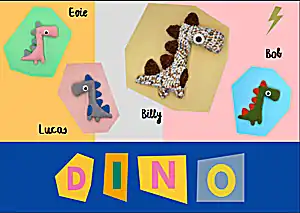
This delightful dinosaur family pattern brings prehistoric charm to your crochet collection with four unique characters, each sporting their own colorful personality. The pattern includes detailed instructions for creating miniature dinosaur keychains featuring distinctive spikes, adorable eyes, and belly details. Perfect for beginners ready to tackle intermediate techniques, this pattern combines simple stitches with creative assembly.

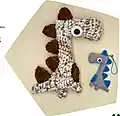
Dino's Family Amigurumi Pattern crochet pattern - detailed view of completed project

Each dinosaur measures approximately 10cm (4 inches) in length, making them ideal as keychains, bag charms, or desk companions. The pattern includes both regular and plush versions for different yarn weights.

Why You'll Love This Dino's Family Amigurumi Pattern

I absolutely love this pattern because it transforms simple crochet techniques into the most adorable prehistoric companions! Each dinosaur has its own unique personality through color combinations and spike arrangements, making every piece feel special. The satisfaction of seeing these tiny creatures come to life stitch by stitch is incredibly rewarding, and they make perfect gifts that bring smiles to faces of all ages.

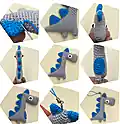
Dino's Family Amigurumi Pattern step 1 - construction progress Dino's Family Amigurumi Pattern step 2 - assembly progress Dino's Family Amigurumi Pattern step 3 - details and accessories Dino's Family Amigurumi Pattern step 4 - final assembly and finishing

Switch Things Up

I love experimenting with this dinosaur pattern by switching up the color combinations to create entirely new personalities for each little dino. Sometimes I'll make a rainbow dinosaur with gradient spikes, or try metallic yarns for a more modern twist that catches the light beautifully. The beauty of this pattern lies in how versatile it is - you can easily adjust the spike colors, add stripes to the body, or even create seasonal themes like autumn leaves or ocean blues.

One of my favorite modifications is making the spikes in variegated yarn while keeping the body solid, which creates this amazing textured effect that makes each dinosaur unique. I've also experimented with adding small embroidered details like spots or scales using embroidery floss, which gives them even more character and charm.

For gifts, I love creating themed sets - like making all four dinosaurs in someone's favorite colors, or creating a pastel version for baby gifts. The pattern works beautifully with cotton for durability or soft acrylics for that extra cuddly feel.

Common Mistakes & How to Fix Them

βœ— Forgetting to stuff the body firmly before closing can result in a floppy, misshapen dinosaur βœ— Not maintaining consistent tension throughout rounds can create uneven body proportions and awkward shaping βœ— Placing spikes unevenly along the back creates an asymmetrical appearance that detracts from the design βœ— Rushing through the assembly process without pinning pieces first often leads to crooked eyes and misaligned features

Dino's Family Amigurumi Pattern

Create adorable miniature dinosaur keychains with this charming crochet pattern featuring four unique characters: Evie, Billy, Lucas, and Bob. Each dinosaur showcases its own personality with colorful spikes and distinctive features, making them perfect as keychains, bag charms, or collectible toys. This intermediate-level pattern guides you through creating these prehistoric friends using basic crochet techniques with detailed photo instructions.

Intermediate 3-4 Hours

Materials Needed for Dino's Family Amigurumi Pattern

β€” Main Fabric

  • 01
    Fingering/2ply yarn Alize Bella (50g/180m, 100% cotton) in main color for dinosaur body
  • 02
    Additional color yarn for spikes and contrasting details
  • 03
    White yarn for eye circles and highlights
  • 04
    Small amounts of each color needed per dinosaur

β€” Tools Required

  • 01
    Crochet hook 1.25mm
  • 02
    Any toy filling/fiberfill
  • 03
    6mm half beads for eyes
  • 04
    Transparent glue
  • 05
    Scissors
  • 06
    Sewing needle
  • 07
    Stitch markers
  • 08
    Keychain fastener (loop, carabiner, or cord)

Progress Tracker

0% Complete

β€” Tail :

Round 1 :

4 sc in MR (4)

Round 2 :

(inc, sc)*2 (6)

Round 3 :

6 sc (6)

Round 4 :

inc, 4 sc, inc (8)

Round 5 :

8 sc (8)

Round 6 :

inc, 6 sc, inc (10)

Round 7 :

10 sc (10)

Round 8 :

inc, 8 sc, inc (12)

Round 9 :

inc, 4 sc, inc, 5 sc, inc (15), sl st

Info :

Cut the yarn, fasten off. Add fiberfill.

β€” Head :

Round 1 :

ch8, from the second chain on the hook: inc, 5 sc, inc, on the other side of the chain: inc, 5 sc, inc (18)

Round 2 :

(sc, inc, 5 sc, inc, sc)*2 (22)

Round 3-5 :

3 rounds of 22 sc (22)

Info :

Further decreases should go from one side - this will be the bottom.

Round 6 :

dec, 20 sc (21)

Round 7 :

21 sc (21)

Round 8 :

dec, 19 sc (20)

Round 9 :

20 sc (20)

Round 10 :

dec, 18 sc (19)

Round 11 :

19 sc (19)

Round 12 :

dec, 17 sc (18)

Round 13-14 :

2 rounds of 18 sc (18), sl st

Info :

Cut the yarn, fasten off. Add fiberfill.

β€” Legs :

Info :

Make 2. Stuff if desired.

Round 1 :

6 sc in MR (6)

Round 2-3 :

2 rounds of 6 sc (6)

Info :

On the first leg make sl st. Fasten off and cut the yarn. Continue crocheting the body from the second leg, join the first leg and tail.

β€” Body :

Round 1 :

ch4, (from the next sc mark the new beginning of the round), on the first leg 3 sc, starting from any stitch, on the tail, starting from sl st on it: 7 sc, inc, 7 sc, on the first leg 3 sc, along the chain 4 sc, on the second leg 6 sc, on the other side of the chain 4 sc (36)

Info :

Further, the increases should be centered on the back, and the decreases on the sides and from round 12 in the front in the center. If you have a strong shifting, move the marker of the beginning of the round. Stuff as you go.

Round 2 :

2 sc, dec, 14 sc, dec, 16 sc (34)

Round 3 :

2 sc, dec, 6 sc, inc, 5 sc, dec, 16 sc (33)

Round 4 :

dec*2, 5 sc, inc, 5 sc, dec*2, 14 sc (30)

Round 5 :

dec, 6 sc, inc, 5 sc, dec, 14 sc (29)

Round 6 :

dec, 5 sc, inc, 5 sc, dec*2, 10 sc, dec (26)

Round 7 :

dec, 5 sc, inc, 4 sc, dec*2, 8 sc, dec (23)

Round 8 :

dec, 4 sc, inc, 4 sc, dec, 10 sc (22)

Round 9 :

dec, 4 sc, inc, 3 sc, dec, 10 sc (21)

Round 10 :

dec, 3 sc, inc*2, 2 sc, dec*2, 6 sc, dec (19)

Round 11 :

dec, 3 sc, inc*2, 3 sc, dec, 7 sc (19)

Round 12 :

dec, 4 sc, inc, 3 sc, dec, 3 sc, dec, 2 sc (17)

Round 13 :

5 sc, inc, 6 sc, dec*2, sc (16)

Round 14 :

6 sc, inc, 6 sc, dec, sc (16)

Round 15 :

7 sc, inc, 6 sc, dec (16)

Round 16 :

dec, 5 sc, inc*2, 5 sc, dec (16)

Round 17 :

16 sc (16)

Round 18 :

dec, 5 sc, inc*2, 5 sc, dec (16)

Round 19 :

dec, 6 sc, inc, 5 sc, dec (15)

Round 20 :

15 sc (15)

Round 21 :

dec, 5 sc, inc*2, 3 sc, short round

Info :

Finish the round so that when you fold your neck in half, there are 3 sc left to the front fold, since we will crochet the head in front in the center (markers mark six central stitches in front). We also fold the head in half and mark 3 stitches to the sides from the bottom fold (where the end of the round is).

Round 22 :

6 sc with the head (starting from the stitch with the blue marker), next mark the beginning of the round from the first dec - on the neck: dec, 6 sc, dec, on the head 12 sc (20)

Round 23 :

dec, 2 sc, inc, sc, dec*2, 8 sc, dec (17)

Round 24 :

dec, 3 sc, dec, 10 sc (15)

Round 25 :

(3 sc, dec)*3 (12)

Round 26 :

dec*6 (6)

Info :

Tighten the hole through front loops. Fasten off, weave in the ends.

β€” Eyes :

Info :

Make 2 circles in white color.

Round 1 :

9 sc in MR (9), fasten off with sl st

Info :

Leave the yarn tail for sewing.

β€” Spikes :

Info :

Make 4 spikes of smaller size and 1 tail spike larger.

Bigger Spikes (1 pcs.) :

Round 1: 4 sc in MR (4)

Round 2 :

(inc, sc)*2 (6)

Round 3 :

(inc, 2 sc)*2 (8)

Round 4 :

(inc, 3 sc)*2 (10)

Round 5 :

(inc, 4 sc)*2 (12)

Round 6 :

(inc, 5 sc)*2 (14), sl st

Smaller Spikes (4 pcs.) :

Round 1: 4 sc in MR (4)

Round 2 :

(inc, sc)*2 (6)

Round 3 :

(inc, 2 sc)*2 (8)

Round 4 :

(inc, 3 sc)*2 (10)

Round 5 :

(inc, 4 sc)*2 (12), sl st

Info :

Leave the yarn tail for sewing.

β€” Tummy :

Round 1 :

6 sc in MR (6)

Round 2 :

((3 sc inc)*2, sc)*2 (14)

Round 3 :

(2 sc, inc*2, 3 sc)*2 (18), sl st

Info :

Leave the yarn tail for sewing. To make the end of the round less noticeable, bring the thread to the wrong side under the loops of the next stitch.

Assembly Instructions

  • Sew the eyes on the sides slightly shifting down - on one side after round 7, on the other side after round 8 to maintain symmetry
  • Insert the needle under both loops, then grab the thread on the head and again under both loops of the same stitch in the opposite direction, sewing in a circle
  • Glue the pupils (6mm half beads) in the center of the white eye circles
  • Sew the spikes through the front loops with over the edge stitches - largest spike on tail after round 4
  • Attach 3 spikes along the back after round 1 and the last one on top of the head at the very edge
  • Sew the tummy immediately above the front leg in the center using the same technique as the eyes
  • Attach a keychain fastener (loop, carabiner, or cord) between the upper spikes to complete your dinosaur

Important Notes

  • πŸ’‘Use stitch markers to keep track of your rounds, especially during the complex body shaping sections
  • πŸ’‘Stuff firmly as you go, particularly during the body construction to maintain proper shape
  • πŸ’‘When working decreases, ensure they follow the pattern guidance for proper dinosaur proportions
  • πŸ’‘Pin all parts in place before sewing to ensure correct positioning and symmetry
  • πŸ’‘For the plush version, use Super Bulky yarn with a 3.5mm hook and 14mm half beads for eyes
  • πŸ’‘Take photos during assembly to reference proper spike and feature placement for future projects

This adorable Dino's Family pattern brings four unique prehistoric personalities to life in miniature form, perfect as keychains or collectible companions. Each dinosaur showcases its own character through colorful spikes and charming details, combining simple crochet techniques with creative assembly for a truly rewarding project. Whether you're making one favorite or the entire family, these little dinosaurs are sure to bring smiles and spark conversations wherever they go! πŸ¦• Happy crocheting! 🧢✨

You ask,

we answer.

FAQs

Can I use different yarn weights for this pattern?

Yes! The pattern includes instructions for both fingering weight yarn (using 1.25mm hook) for 10cm dinosaurs and Super Bulky yarn (using 3.5mm hook) for 21cm plush versions. Just adjust your hook size accordingly.

How do I prevent the spikes from looking uneven?

The key is to sew spikes through the front loops only and follow the pattern placement guide: largest spike on tail after round 4, three spikes along the back after round 1, and one on top of the head at the edge.

What's the best way to attach the keychain hardware?

Attach the keychain fastener (loop, carabiner, or cord) between the upper spikes on the dinosaur's back. This provides the strongest attachment point and maintains the design's balance.

Can beginners attempt this pattern?

This is an intermediate pattern requiring basic crochet skills including magic ring, single crochet, increases, and decreases. Beginners should be comfortable with these techniques before attempting the complex body shaping.

How do I ensure the eyes are placed symmetrically?

Sew one eye after round 7 and the other after round 8 to maintain symmetry. Always pin in place first and check from multiple angles before final sewing.