🧶 Beautiful ✨ Detailed 💝 Adorable

Vinyl Record Coasters Crochet Pattern

Vinyl Record Coasters Crochet Pattern
4.3★ Rating
2-3 Hours Time Needed
2.4K Made This
✂️

Beginner Friendly Level

Perfect for those just starting their sewing journey, with clear instructions and simple techniques

⏱️

Bite-Sized Project

Complete in under 2 hours—quick, fun, and perfect for a little creative escape.

🏡

Cozy Accent

A warm touch for your space that transforms ordinary corners into inviting nooks filled with handmade charm.

About This Vinyl Record Coasters Crochet Pattern

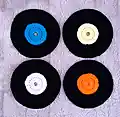
This vinyl record coaster pattern combines nostalgia with functionality, creating perfect replicas of classic vinyl records in miniature form. The two-part construction features a colorful contrast insert that represents the record label, surrounded by a black vinyl outer section. The pattern uses simple stitches and techniques, making it perfect for beginners while still being engaging for experienced crocheters. Each coaster is worked in continuous rounds with clear stitch counts provided throughout.

Vinyl Record Coasters Crochet Pattern crochet pattern - detailed view of completed project

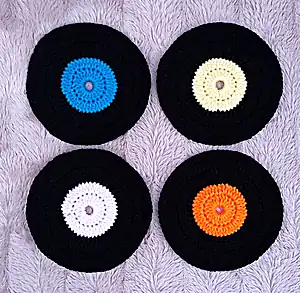
The finished coasters measure 13cm/5.5 inches in diameter, making them the perfect size for mugs, glasses, and small plates. The pattern includes detailed instructions for both the contrast insert and the black vinyl section, with helpful notes about the slight waviness that occurs during construction before flattening out beautifully in the final round.

Why You'll Love This Vinyl Record Coasters Crochet Pattern

I absolutely love how this pattern brings back memories of browsing through record stores and the excitement of finding a new favorite album. The satisfaction of creating something that's both practical and nostalgic makes this pattern incredibly rewarding. These coasters work up quickly, making them perfect for gift-giving or adding a personal touch to your own home. I find the repetitive nature of the rounds quite meditative, and the color possibilities are endless - you can create different 'record labels' to match your décor or favorite music genres.

Vinyl Record Coasters Crochet Pattern step 1 - construction progress Vinyl Record Coasters Crochet Pattern step 2 - assembly progress Vinyl Record Coasters Crochet Pattern step 3 - details and accessories Vinyl Record Coasters Crochet Pattern step 4 - final assembly and finishing

Switch Things Up

I love experimenting with different color combinations for these vinyl record coasters - you can create authentic-looking records by using traditional colors like red, blue, or yellow for the center labels. For a modern twist, try metallic yarns or variegated colors that create stunning gradient effects.

Sometimes I add a small embroidered detail in the center using contrasting thread to mimic actual record label text or logos. You could even work the center in a different stitch pattern like a spiral or star design to make each coaster unique.

I've also discovered that these make fantastic gifts when presented in a small wooden crate or vintage-style box, complete with a little card explaining the inspiration behind each 'record.' The possibilities are truly endless when you let your creativity flow!

Common Mistakes & How to Fix Them

✗ Not using stitch markers can lead to losing track of rounds and uneven stitch counts ✗ Working too tightly in the early rounds can cause the center to pucker and distort the final shape ✗ Skipping the front post stitches in Row 4 will result in a flat appearance instead of the vinyl record texture ✗ Not leaving long enough tails for weaving in can cause ends to work loose over time with use

Vinyl Record Coasters Crochet Pattern

Create your own retro-inspired vinyl record coasters with this fun and functional crochet pattern! These nostalgic coasters feature a black vinyl base with colorful center inserts that perfectly mimic classic records. Each coaster measures 13cm/5.5 inches and makes the perfect conversation starter for music lovers. The pattern includes both UK and US terminology, making it accessible for crocheters worldwide. These coasters are not only practical for protecting your furniture but also add a vintage charm to any home décor.

Beginner Friendly 2-3 Hours

Materials Needed for Vinyl Record Coasters Crochet Pattern

— Main Fabric

  • 01
    Hayfield Bonus Black 0965 - 15g for the vinyl outer section
  • 02
    Hayfield Bonus Contrast color - 2g for the center record label insert

— Tools Required

  • 01
    3mm Crochet Hook
  • 02
    Wool Needle (for sewing)
  • 03
    Stitch markers
  • 04
    Scissors

Progress Tracker

0% Complete

— Contrast Insert :

Row 1 :

leaving a 10cm end, ch8, sl st to join (8)

Row 2 :

ch2, dc x21 into centre circle, sl st to join at top of ch2 (22, ch2 counts as 1st st)

Row 3 :

ch2, dcinc into base of same st, dcinc) x21, sl st to join at top of ch2 (44, ch2 counts as 1st st)

Info :

F/O leaving a 10cm end. Secure ends with a couple of small sts before weaving through back of nearest dc sts and cutting flush to finish.

— Vinyl :

Row 4 :

leaving a 10cm end, FP(hdc) into top of any of the dc sts in previous row, FP(hdc) into next 43 sts, sl st to join at top of 1st FP(hdc) (44)

Row 5 :

ch2, dcinc into next st, (dc into next st, dcinc) x21, sl st to join at top of ch2 (66, ch2 counts as 1st st)

Row 6 :

ch2, dc into next st, dcinc, (dc into next 2sts, dcinc) x21, sl st to join at top of ch2 (88, ch2 counts as 1st st)

Info :

THE COASTER WILL BE SLIGHTLY WAVY AT THIS STAGE BUT THE LAST ROW WILL FLATTEN IT BACK OUT.

Row 7 :

ch1, hdc into next 87sts, sl st to join at top of ch1 (88, ch1 counts as 1st st)

Info :

F/O leaving a 10cm end. Secure ends with a couple of small sts before weaving through back of nearest hdc sts and cutting flush to finish.

Assembly Instructions

  • Complete the contrast insert first, securing all ends by weaving through the back of stitches
  • Work the black vinyl section directly onto the completed contrast insert using front post stitches
  • Ensure all yarn tails are securely woven in and trimmed flush to prevent unraveling
  • The coaster will naturally flatten as you complete the final round of half double crochet stitches

Important Notes

  • 💡Use stitch markers to keep track of your rounds, especially when working the increases
  • 💡Work in continuous rounds unless otherwise specified, marking the last stitch of each round
  • 💡The coaster may appear wavy during construction but will flatten beautifully in the final round
  • 💡Leave 10cm tails at the beginning and end for secure weaving and finishing
  • 💡Front post stitches in Row 4 are crucial for creating the authentic vinyl record texture

These charming vinyl record coasters bring a perfect blend of nostalgia and practicality to any home. Whether you're a music enthusiast or just love retro décor, these quick-to-make coasters are sure to spark conversations and protect your surfaces in style. The simple construction makes them perfect for beginners, while the endless color possibilities keep them interesting for experienced crocheters. Create a whole set in different colors to represent your favorite albums! 🎵 Happy crocheting! 🧶✨

You ask,

we answer.

FAQs

Can I use different yarn weights for this pattern?

The pattern is designed for worsted weight yarn with a 3mm hook. Using different weights may change the final size and texture of your coasters.

How many coasters does this pattern make?

This pattern provides instructions for making one coaster. You can repeat the pattern to create a full set of 4-6 coasters.

Why does my coaster look wavy during construction?

This is completely normal! The pattern specifically mentions that the coaster will be wavy until the final round, which flattens it back out perfectly.

What are front post stitches and why are they important?

Front post stitches create texture by working around the post of the stitch instead of through the top. They're essential for creating the authentic vinyl record appearance.

Can I make these coasters in different sizes?

Yes, you can add or reduce rounds to make larger or smaller coasters, but you'll need to adjust the stitch counts accordingly to maintain the circular shape.