🧢 Beautiful ✨ Detailed πŸ’ Adorable

Doll Eliza Amigurumi Pattern

Doll Eliza Amigurumi Pattern
4.6β˜… Rating
12-15 Hours Time Needed
4.0K Made This
βœ‚οΈ

Intermediate Level

Ideal for those with basic knitting experience, featuring slightly more advanced stitches and techniques to expand your skills.

⏱️

Slow & Steady

A 10-12 hour projectβ€”great for savoring the process over several sessions.

🧸

Cute Companion

An adorable friend to cherish, handcrafted with love to bring comfort and joy for years to come.

About This Doll Eliza Amigurumi Pattern

This beautiful Eliza doll pattern brings together classic amigurumi techniques with detailed clothing construction. Standing at 32cm tall, she features intricate curly hair, a multi-colored dress with ruffles, and adorable blue shoes with laces. The pattern includes comprehensive instructions for creating a poseable doll with wire armature options.

Doll Eliza Amigurumi Pattern crochet pattern - detailed view of completed project

Every detail has been carefully designed, from her sweet facial features to the decorative flowers in her hair. This pattern will help you create a truly special handmade treasure.

Why You'll Love This Doll Eliza Amigurumi Pattern

I absolutely love how this pattern combines traditional doll-making with modern amigurumi techniques. The attention to detail in every element, from the structured dress to the curly hair construction, makes this such a rewarding project. You'll enjoy watching Eliza come to life as you work through each component, and the final result is truly magical.

Doll Eliza Amigurumi Pattern step 1 - construction progress Doll Eliza Amigurumi Pattern step 2 - assembly progress Doll Eliza Amigurumi Pattern step 3 - details and accessories Doll Eliza Amigurumi Pattern step 4 - final assembly and finishing

Switch Things Up

I love how versatile this Eliza pattern is - there are so many ways to make her uniquely yours! You could easily change up her hair color to blonde, brown, or even fun fantasy colors like purple or pink. The dress opens up endless possibilities too - imagine her in different color combinations or even seasonal themes like autumn oranges and browns or spring pastels.

I've seen crafters add embroidered details to the dress, create different shoe styles, or even make additional outfits so Eliza can have a whole wardrobe. You could add freckles with embroidery, change her eye color, or create different facial expressions. Some makers love adding tiny accessories like a purse, hat, or even a pet companion.

The beauty of amigurumi is that each maker brings their own touch to the pattern, so your Eliza will be completely unique to you!

Common Mistakes & How to Fix Them

βœ— Forgetting to stuff the arms and legs firmly during construction causing floppy limbs βœ— Not maintaining consistent tension when working on the shoe construction leading to uneven soles βœ— Skipping the wire armature installation which makes the doll less poseable and sturdy βœ— Rushing through the dress color changes without securing yarn ends properly causing loose sections

Doll Eliza Amigurumi Pattern

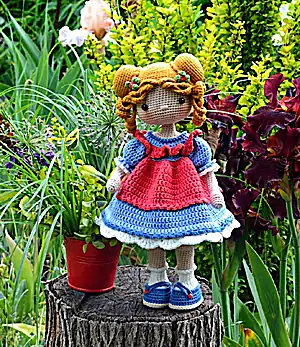
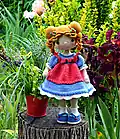
Create your own adorable Eliza doll with this charming amigurumi pattern! This sweet companion features beautiful curly mustard-colored hair, a lovely blue and coral dress with intricate details, and matching blue shoes. Perfect for intermediate crocheters looking to craft a special keepsake that will be treasured for years to come.

Intermediate 12-15 Hours

Materials Needed for Doll Eliza Amigurumi Pattern

β€” Main Fabric

  • 01
    Alize Cotton Gold cotton/acrylic blend in white, skin, light pink, mustard, red, and green
  • 02
    YarnArt Jeans cotton/acrylic blend in beige, blue, yellow, coral, light blue, and green

β€” Tools Required

  • 01
    Crochet hook size 2mm
  • 02
    Crochet hook size 2.5mm
  • 03
    Fiberfill stuffing
  • 04
    2 black safety eyes 7mm
  • 05
    Two small beads
  • 06
    Cardboard or plastic for shoe soles
  • 07
    Yarn needle
  • 08
    Stitch markers
  • 09
    Scissors
  • 10
    Wooden chopstick for stuffing
  • 11
    Wire 32cm long for armature

Progress Tracker

0% Complete

β€” Arms (2) :

R 1 :

6 sc in the magic ring (6)

R 2 :

6 inc (12)

R 3 :

1 sc in each st around (12)

R 4 :

(3 sc, inc)*3 times (15)

R 5 :

1 sc in each st around (15)

R 6 :

2 inc, 13 sc (17)

R 7 :

1 sc in each st around (17)

R 8 :

2 dec, 3 sc, dec, 3 sc, dec, 3 sc (13)

R 9 :

dec, 5 sc, 1 dec, 4 sc (11)

R 10 :

6 sc, 1 inc, 4 sc (12)

Info :

Stuff the ready part of the arm tightly

R 11-32 :

12 sc (22 rnd) (12)

Left arm R 33 :

5 sc, slst

Right arm R 33 :

1 sc, slst

β€” Shoes :

Ch 8 :

work starting from the 2nd ch from the hook

R 1 :

1 inc, 5 sc, 3 sc in one st, 6 sc (16)

R 2 :

2 inc, 5 sc, 3 inc, 5 sc, 1 inc (22)

R 3 :

2 inc, 1 sc, 1 inc, 5 sc, 1 inc, 1 sc, 2 inc, 1 sc, 1 inc, 5 sc, 1 inc, 1 sc (30)

R 4 :

1 inc, 2 sc, 1 inc, 1 sc, 1 inc, 7 sc, 1 inc, 1 sc, 1 inc, 2 sc, 1 inc, 1 sc, 1 inc, 7 sc, 1 inc, 1 sc (38)

R 5 :

38 sc (38)

Info :

Move the beginning of the row to the middle of the sole, crochet 3 sc to do it

R 1-4 :

1 ch (not count as st), 1 sc into the base of the ch, 37 sc, slst to the 1st st of the round to join (38)

R 5 :

1 ch, 1 sc into the base of the ch, 13sc, (sc2tog, 1 sc)*3 times, sc2tog, 13 sc, slst to the 1st st of the round to join (34)

β€” Head :

R 1 :

6 sc in MR (6)

R 2 :

6 inc (12)

R 3 :

(1 sc, inc)* 6 times (18)

R 4 :

1 sc, inc, (2 sc, inc)*5 times, 1 sc (24)

R 5 :

(3 sc, inc) *6 times (30)

R 6 :

2 sc, inc, (4 sc, inc)*5 times, 2 sc (36)

R 7 :

(5 sc, inc)* 6 times (42)

R 8 :

3 sc, inc, (6 sc, inc)*5 times, 3 sc (48)

R 9 :

(7 sc, inc)* 6 times (54)

R 10 :

4 sc, inc, (8 sc, inc)*5 times, 4 sc (60)

R 11-R 21 :

(11 rnd) 60 sc (60)

R 22 :

17 sc, (inc, 1 sc)*5 times, 7 sc, (1 sc, inc)*5 times, 16 sc (70)

R 23-R 26 :

(4 rnd) 70 sc (70)

R 27 :

(4 sc, dec)*3 times, 34 sc, (dec, 4 sc)*3 times (64)

R 28 :

64 sc (64)

Info :

Place the eyes between the 21th and 22th rounds. The distance between the eyes should be 12 stitches

R 29 :

(2 sc, dec)*16 times (48)

R 30 :

3 sc, dec, (6 sc, dec)*5 times, 3 sc (42)

R 31 :

(5 sc, dec)*6 times (36)

R 32 :

2 sc, dec, (4 sc, dec)*5 times, 2 sc (30)

R 33 :

(3 sc, dec)*6 times (24)

R 34 :

1 sc, dec, (2 sc, dec)*5 times, 1 sc (18)

R 35 :

(4 sc, dec)*3 times, slst (15)

β€” Body & Legs :

R 44 :

25 sc on the left leg detail, then 2 sc on chain, 25 sc on the right leg, 1 sc on the other side of the on chain

R 45 :

1 sc on chain, (inc, 2 sc)*4 times, 28 sc, (2 sc, inc)*4 times, 1 sc (62)

β€” Wig :

R 1 :

6 sc in MR (6)

R 2 :

6 inc (12)

R 3 :

(1 sc, inc)* 6 times (18)

β€” Dress :

Ch 33 :

work starting from 2th st from the hook

R 1 :

32 sc, turn the work (32)

R 2 :

1 ch (does not count as st), 2 sc, inc, (3 sc, inc)*3 times, 2 sc, (inc, 3 sc)*3 times, inc, 2 sc, turn the work (40)

β€” Flower :

Leaves :

5 ch and work starting from 2th st from the hook – 1 sc, 2 hdc, 1 sc, 5 ch, starting from 2th st from the hook - 1 sc, 2 hdc, 1 sc

Roses :

6 sc in MR

Assembly Instructions

  • Attach head to body ensuring the eyes of the doll look forward and sew with yarn end
  • Insert wire armature into arms and attach arms to body at row 71 ensuring thumbs point correctly
  • Sew completed shoes to legs and stuff legs firmly during construction process
  • Attach wig to head and secure curly hair pieces around the sides
  • Dress the doll in the completed outfit and attach decorative flowers to hair
  • Add final details like blusher to cheeks and secure all loose yarn ends

Important Notes

  • πŸ’‘Use stitch markers to track rounds especially during complex shaping sections
  • πŸ’‘Stuff all body parts firmly but not too tightly for best shape retention
  • πŸ’‘Wire armature is optional but recommended for poseable arms - omit for children's safety
  • πŸ’‘Maintain consistent tension throughout especially on shoes and dress construction
  • πŸ’‘Place safety eyes securely between rounds 21-22 with 12 stitches separation
  • πŸ’‘Color changes should be secured properly to prevent loose sections in dress

This enchanting Eliza doll pattern combines traditional amigurumi techniques with detailed costume construction to create a truly special companion. With her beautiful curly hair, layered dress, and charming accessories, she's perfect for gifting or keeping as a treasured handmade creation. Every stitch brings her personality to life! 🧢 Happy crocheting! 🧡✨

You ask,

we answer.

FAQs

Can I make this doll without the wire armature?

Yes, absolutely! The wire armature is optional and can be omitted, especially if making the doll for young children. The doll will still hold its shape well without it.

What size will the finished doll be?

The finished Eliza doll will be approximately 32cm (12.6 inches) tall when using the specified yarns and hook sizes.

Can I use different colors for the dress?

Definitely! Feel free to customize the color scheme to your preference. Just make sure to maintain the same yarn weight for consistent results.

How difficult is the dress construction?

The dress involves turning rows and color changes which require intermediate skills. Take your time with the instructions and use stitch markers to keep track of your progress.

What if I can't find the exact yarn specified?

You can substitute with any sport weight cotton or cotton/acrylic blend yarn. Just make sure your gauge matches for the correct finished size.