🧢 Beautiful ✨ Detailed πŸ’ Adorable

Dragon Toothless Amigurumi Pattern

Dragon Toothless Amigurumi Pattern
4.8β˜… Rating
15-20 Hours Time Needed
2.9K Made This
βœ‚οΈ

Advanced Level

Designed for experienced knitters, these patterns involve intricate designs and complex techniques to challenge and inspire.

⏱️

All-Day Adventure

Requires 8-10 hours, ideal for a full day of immersive knitting.

🧸

Cute Companion

An adorable friend to cherish, handcrafted with love to bring comfort and joy for years to come.

About This Dragon Toothless Amigurumi Pattern

This Dragon Toothless pattern brings the beloved Night Fury to life with incredible attention to detail. Featuring advanced techniques like wire frame construction for poseable wings and moveable leg joints, this pattern creates a truly impressive 30cm dragon. The intricate design includes textured spines, detailed facial features with golden eyes, and authentic proportions that capture Toothless's endearing character perfectly.

Dragon Toothless Amigurumi Pattern crochet pattern - detailed view of completed project

Working with multiple yarn weights and specialized construction techniques, this pattern challenges experienced crocheters to create something truly magical. The wire framework allows for dynamic poses while the jointed legs add realistic movement.

Why You'll Love This Dragon Toothless Amigurumi Pattern

I absolutely love how this pattern transforms simple stitches into such an iconic character! The satisfaction of watching Toothless come to life piece by piece is incredible, and the advanced techniques like wire framing and joint construction really push your crochet skills to new heights. The finished dragon isn't just a toy - it's a stunning display piece that captures every detail of everyone's favorite Night Fury with remarkable accuracy.

Dragon Toothless Amigurumi Pattern step 1 - construction progress Dragon Toothless Amigurumi Pattern step 2 - assembly progress Dragon Toothless Amigurumi Pattern step 3 - details and accessories Dragon Toothless Amigurumi Pattern step 4 - final assembly and finishing

Switch Things Up

I love experimenting with different approaches to make each Toothless unique! Try using a slightly different shade of gray for a weathered look, or add metallic thread highlights to the wings for extra magic. You could create different expressions by adjusting the eyelid placement - make him sleepy, alert, or even winking! I've seen crafters add LED lights inside the eyes for a glowing effect, or use different colored beads for the spinal decorations.

For a personalized touch, consider making a smaller version using lighter weight yarn and smaller hooks, or go bold with a giant version using chunky yarn. The wire frame technique can be adapted for different poses - make him in flight position or curled up sleeping. Some makers even create multiple dragons in different poses to tell a story!

Don't be afraid to modify the facial features slightly to match your favorite Toothless scenes from the movies. The beauty of this pattern is in the details, so take your time and make it truly your own masterpiece!

Common Mistakes & How to Fix Them

βœ— Forgetting to mark stitch placement for joints and wings which causes misalignment during assembly βœ— Not properly securing wire ends which can poke through the fabric and cause safety issues βœ— Stuffing too firmly around joint areas which prevents proper movement and articulation of limbs βœ— Skipping the extra shift stitches mentioned in the pattern which throws off stitch counts

Dragon Toothless Amigurumi Pattern

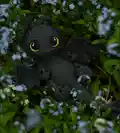
Create your own adorable Toothless dragon from How to Train Your Dragon with this detailed crochet pattern! This stunning amigurumi features intricate wings with wire frames for poseable display, moveable joints for the legs, and authentic details including golden eyes and spinal ridges. Perfect for dragon lovers and fans of the beloved animated series, this pattern creates a 30cm masterpiece that captures Toothless's lovable personality.

Advanced 15-20 Hours

Materials Needed for Dragon Toothless Amigurumi Pattern

β€” Main Fabric

  • 01
    Fine/4ply yarn Yarn Art Baby Cotton 50g/165m (50% cotton, 50% acrylic) in dark gray (454), black (460), and yellow (10)
  • 02
    Lace weight/1ply yarn Alpina Lena 50g/280m (100% mercerized cotton) in yellow

β€” Tools Required

  • 01
    Crochet hook size 2 mm and 1.25 mm
  • 02
    Toy stuffing material (fiberfill)
  • 03
    Beading needle and needle with blunt end
  • 04
    Scissors
  • 05
    Sewing pins
  • 06
    Wire for frame - diameter 0.9mm (23cm-2pcs, 19cm-4pcs, 13cm-2pcs) and diameter 1.6mm (45cm)
  • 07
    Hot glue gun
  • 08
    Textile paint in black and white colors
  • 09
    Seed beads
  • 10
    Plastic joints size 25mm for hind legs (2pcs) and 15mm for forelegs (2pcs)
  • 11
    Disks size 25mm (4pcs) and 15mm (4pcs)
  • 12
    T-shaped cotter pins 20x2 (4pcs)
  • 13
    Round nose pliers
  • 14
    Fishing line or nylon thread for sewing seed beads
  • 15
    Dry pastel in black color for tinting

Progress Tracker

0% Complete

β€” Head :

Round 1 :

6sc in a MR (6)

Round 2 :

6inc (12)

Round 3 :

(1sc, inc)*6 (18)

Round 4 :

1sc, inc, (2sc, inc)*5, 1sc (24)

Round 5 :

(3sc, inc)*6 (30)

Round 6 :

2sc, inc, (4sc, inc)*5, 2sc (36)

Round 7 :

(5sc, inc)*6 (42)

Round 8 :

3sc, inc, (6sc, inc)*5, 3sc (48)

Round 9 :

(7sc, inc)*6 (54)

Round 10 :

4sc, inc, (8sc, inc)*5, 4sc (60)

Round 11 :

(9sc, inc)*6 (66)

Round 12 :

66sc (66)

Round 13 :

5sc, inc, (10sc, inc)*5, 5sc (72)

Round 14-21 :

72sc (8 rounds)

Round 22 :

18sc, (BLO 36sc), 18sc (72)

Round 23 :

5sc, dec, (10sc, dec)*5, 5sc (66)

Round 24 :

(9sc, dec)*6 (60)

Round 25 :

4sc, dec, (8sc, dec)*5, 4sc (54)

Round 26 :

(7sc, dec)*6 (48)

Round 27 :

2sc, dec, (4sc, dec)*7, ch3

Round 28 :

skip 2 stitches before marker and 2 stitches after marker, next crochet 1sc, dec, (3sc, dec)*6, 3sc, 1sc on the chain (32)

Round 29 :

2sc on the chain, dec, (2sc, dec)*7 (24)

Round 30 :

(2sc, dec)*6 (18)

Round 31 :

(1sc, dec)*6 (12)

Round 32 :

6dec (6)

Info :

Cut the yarn, fasten off, tighten the hole. We will use the hole in round 27-28 to bring the wire frame from the body into the head. Attach the dark gray yarn to the first unused front loop of round 21 and crochet: 17sc, 2hdcinc, 17sc

β€” Eyes (make 2) :

Round 1 :

6sc in a MR (6)

Round 2 :

6inc (12)

Round 3 :

(1sc, inc)*6 (18)

Round 4 :

(inc, 2sc)*6 (24)

Round 5 :

3sc, 2hdcinc, 2sc (short round)

Info :

Cut the yarn, fasten off, weave in the ends. Draw a pupil with black textile paint and a glare with white paint. HDC increases in round 5 are located in the upper inner corner of the eyes

β€” Eyelids (make 2) :

Construction :

Ch9, start in the second chain from the hook: sl st, 6sc, sl st. Cut the yarn, leaving a long end for sewing pieces

β€” Ears (make 2) :

Round 1 :

6sc in a MR (6)

Round 2 :

(1sc, inc)*3 (9)

Round 3 :

4sc, inc, 4sc (10)

Round 4 :

4sc, inc, 5sc (11)

Round 5 :

5sc, inc, 5sc (12)

Round 6 :

(inc, 5sc)*2 (14)

Round 7-8 :

14sc (2 rounds)

Round 9 :

6sc, dec, 6sc (13)

Round 10 :

5sc, dec, 6sc (12)

Info :

Fold in half and crochet through both sides 6sc. Cut the yarn, leaving a long end for sewing pieces

β€” Spines 1 (make 2) :

Round 1 :

6sc in a MR (6)

Round 2 :

6sc (6)

Info :

Cut the yarn, leaving a long end for sewing pieces

β€” Spines 2 (make 2) :

Round 1 :

6sc in a MR (6)

Round 2 :

(2sc, inc)*2 (8)

Round 3 :

8sc (8)

Info :

Fold in half and crochet through both sides 4sc. Cut the yarn, leaving a long end for sewing pieces

β€” Spines 3 (make 2) :

Round 1 :

6sc in a MR (6)

Round 2 :

6sc (6)

Round 3 :

(1sc, dec)*2 (4)

Info :

Cut the yarn, leaving a long end for sewing pieces

β€” Hind Legs :

Construction :

Ch8, start on the second chain from the hook: 6sc, 4sc in the last chain, on the other side of the chain: 5sc, inc (17)

Round 2 :

inc, 5sc, 4inc, 5sc, 2inc (24)

Round 3 :

1sc, inc, 5sc, (1hdc, hdcinc)*4, 5sc, (1sc, inc)*2 (31)

Round 4 :

9sc, (3-dc Bobble st in black, 2sc in dark gray)*4, 9sc – short round

Round 5 :

31sc (31)

Round 6 :

(4sc, dec)*2, 7sc, (dec, 4sc)*2 (27)

Round 7 :

6sc, dec, 5sc, dec, 4sc, dec, 6sc (24)

Round 8 :

6sc, 6dec, 6sc (18)

Round 9-13 :

18sc (5 rounds)

Round 14 :

(5sc, inc)*3 (21)

Round 15-16 :

21sc (2 rounds)

Info :

Begin to gradually stuff the leg with fiberfill. While stuffing tightly only the lower part (foot)

Left hind leg Round 17 :

13sc, ch2, skip 2sc, 6sc (21)

Round 18 :

13sc, 2sc on the chain, 6sc (21)

Round 19 :

21sc (21)

Right hind leg Round 17 :

6sc, ch2, skip 2sc, 13sc (21)

Round 18 :

6sc, 2sc on the chain, 13sc (21)

Round 19 :

21sc (21)

Round 20 :

(5sc, dec)*3 (18)

Round 21 :

(1sc, dec)*6 (12)

Round 22 :

6dec (6)

Info :

Cut the yarn. Tighten the hole and hide the ends inside

β€” Forelegs :

Round 1 :

6sc in a MR (6)

Round 2 :

6inc (12)

Round 3 :

(1sc, inc)*6 (18)

Round 4 :

5sc, (3-dc Bobble st in black, 2sc in dark gray)*3, 4sc

Round 5-7 :

18sc (3 rounds)

Round 8 :

8sc, dec, 8sc (17)

Round 9 :

17sc (17)

Round 10 :

5sc, dec, 3sc, dec, 5sc (15)

Round 11 :

15sc (15)

Round 12 :

6sc, dec, 7sc (14)

Round 13 :

6sc, 2inc, 6sc (16)

Round 14 :

dec, 12sc, dec (14)

Round 15 :

6sc, 2inc, 6sc (16)

Round 16 :

dec, 12sc, dec (14)

Info :

Begin to gradually stuff the leg with fiberfill. While stuffing tightly only the lower part

Left foreleg Round 17 :

6sc, 2inc, 1sc, ch2, skip 2sc, 3sc (16)

Round 18 :

dec, 9sc, 2sc on the chain, 1sc, dec (14)

Right foreleg Round 17 :

3sc, ch2, skip 2sc, 1sc, 2inc, 6sc (16)

Round 18 :

dec, 1sc, 2sc on the chain, 9sc, dec (14)

Round 19 :

(5sc, dec)*2 (12)

Round 20 :

6dec (6)

Info :

Cut the yarn. Tighten the hole and hide the ends inside

β€” Wings (make 2) :

Info :

Take dark gray yarn, hook size 2 mm, wire with a diameter of 0.9mm. Bend the end of each wire as shown in the photo. Work in rows with turning chains and skip stitches

Row 1 :

Ch28, start from the second chain on the hook, working around the wire 23cm long: 27sc (27), turn

Row 2 :

from the 2nd stitch: 8sc, dec, 12sc, dec (22), turn

Row 3 :

from the 2nd stitch: 11sc, dec, 6sc (18), turn

Row 4 :

from the 2nd stitch: 16sc (16), turn

Row 5 :

from the 2nd stitch: 13sc (13), turn

Row 6 :

from the 2nd stitch: 12sc (12), turn

Row 7 :

from the 2nd stitch: 9sc (9), turn

Row 8 :

from the 2nd stitch: 8sc (8), turn

Row 9 :

from the 2nd stitch: 4sc (4), turn

Row 10 :

from the 2nd stitch: 3sc (3), ch3, turn

Info :

Continue with complex wing construction using 19cm and 13cm wires following detailed row-by-row instructions with corners and edge work

β€” Tail :

Round 1 :

4sc in a MR (6)

Round 2-4 :

4sc (3 rounds)

Round 5 :

(1sc, inc)*2 (6)

Round 6-8 :

6sc (3 rounds)

Round 9 :

(2sc, inc)*2 (8)

Round 10-11 :

8sc (2 rounds)

Info :

Continue following detailed tail construction with gradual increases, then connect to body construction

β€” Body :

Round 1 :

11sc, inc, 1sc, 4inc, 1sc, inc, 11sc (36)

Round 2 :

6sc, inc, 22sc, inc, 6sc (38)

Round 3 :

14sc, inc, 8sc, inc, 14sc (40)

Round 4 :

10sc, inc, 18sc, inc, 10sc (42)

Round 5 :

3sc, inc, (6sc, inc)*5, 3sc (48)

Info :

Continue body construction with joint placement and wing attachment following detailed instructions

β€” Tail Fin (make 2) :

Row 1 :

Ch13, start from the second chain on the hook, work in rows in back loops: 12sc (12), ch3, turn

Row 2 :

from the 2nd chain: 2sc, 11sc (13), turn

Info :

Continue alternating pattern for 6 rows total

β€” Spines (make 16) :

Construction :

4sc in a MR. Pull the ring. Cut the yarn, leaving a long end for sewing pieces

Info :

Attach the spines to the tail, body and head. Tint the wings and tail fins with black dry pastel

Assembly Instructions

  • Insert the wire frame into the tail and stuff it, then connect tail to body construction
  • Attach the head to body by inserting the neck portion into the opening and sewing securely
  • Install plastic joints or cotter pins for hind legs in designated holes and secure properly
  • Install plastic joints or cotter pins for forelegs in designated holes and secure properly
  • Insert wing wire frames into holes in round 28, connect with body frame using insulating tape
  • Sew wings to the back of the body ensuring proper positioning and stability
  • Attach spines along the head, body, and tail following placement photos for authentic look

Important Notes

  • πŸ’‘Use stitch markers carefully as this pattern requires precise stitch counting and placement
  • πŸ’‘Stuff gradually and not too tightly to maintain proper shape and joint movement
  • πŸ’‘Be extremely careful when working with wire frames - bend ends securely to prevent injury
  • πŸ’‘Pin all pieces in place before final sewing to ensure correct positioning and proportions
  • πŸ’‘The pattern uses both plastic joints and cotter pin options - choose one method consistently
  • πŸ’‘Pay attention to the extra shift stitch technique explained at the beginning of the pattern

This incredible Dragon Toothless pattern brings the beloved Night Fury to life with stunning detail and advanced construction techniques. From the poseable wire-frame wings to the moveable jointed legs, every element captures the magic of this iconic character. The pattern challenges experienced crocheters with complex assembly and specialized techniques, resulting in a truly impressive 30cm masterpiece. Perfect for display or as a treasured companion for dragon enthusiasts! πŸ‰ Happy crocheting! 🧢✨

You ask,

we answer.

FAQs

What makes this pattern advanced level?

This pattern involves complex techniques including wire frame construction, moveable joints, working in rows with turning chains, and precise assembly of multiple intricate components.

Can I make this without the wire frames?

While possible, the wire frames are essential for the wings' structure and poseability. Without them, the wings won't hold their shape or achieve the authentic Toothless look.

Which joint system should I use - plastic joints or cotter pins?

Both work well - plastic joints are easier for beginners to joint systems, while cotter pins provide more secure attachment. Choose based on your experience and preference.

How do I prevent the wire from poking through?

Always bend wire ends securely as shown in photos, use proper gauge wire, and stuff carefully around wire areas. The pattern includes specific instructions for safe wire handling.

What if my stitch count doesn't match?

Pay careful attention to the 'extra shift stitch' technique explained in the pattern. This is crucial for maintaining proper stitch alignment throughout the complex construction.