๐Ÿงถ Beautiful โœจ Detailed ๐Ÿ’ Adorable

Emma Doll Crochet Amigurumi Pattern

Emma Doll Crochet Amigurumi Pattern
4.5โ˜… Rating
8-10 Hours Time Needed
4.0K Made This
โœ‚๏ธ

Intermediate Level

Ideal for those with basic knitting experience, featuring slightly more advanced stitches and techniques to expand your skills.

โฑ๏ธ

All-Day Adventure

Requires 8-10 hours, ideal for a full day of immersive knitting.

๐Ÿงธ

Cute Companion

An adorable friend to cherish, handcrafted with love to bring comfort and joy for years to come.

About This Emma Doll Crochet Amigurumi Pattern

The Emma Doll pattern creates a beautiful 30cm amigurumi doll with intricate details and elegant styling. She features curly brown hair made with multiple layered strands, a sophisticated purple dress available in two versions (princess style with puffy skirt or A-line), and charming accessories including a decorative hat with flowers, heart-shaped handbag, and vintage-style button shoes. This pattern combines classic amigurumi techniques with fashion doll aesthetics.

Emma Doll Crochet Amigurumi Pattern crochet pattern - detailed view of completed project

What makes Emma special is her poseable arms with wire support and detailed wardrobe options. The pattern includes step-by-step photo tutorials for assembly and finishing techniques to achieve professional results.

Why You'll Love This Emma Doll Crochet Amigurumi Pattern

I absolutely love this Emma doll pattern because it combines the joy of amigurumi with fashion doll charm! The layered hair technique creates such realistic texture, and I adore how the purple color scheme gives Emma such an elegant, vintage feel. The poseable arms make her perfect for display, and the two dress options mean you can customize her style. Working through the detailed accessories like the tiny handbag and button shoes is so satisfying - every little detail adds to her personality and makes the finished doll truly special.

Emma Doll Crochet Amigurumi Pattern step 1 - construction progress Emma Doll Crochet Amigurumi Pattern step 2 - assembly progress Emma Doll Crochet Amigurumi Pattern step 3 - details and accessories Emma Doll Crochet Amigurumi Pattern step 4 - final assembly and finishing

Switch Things Up

I love customizing Emma to make each doll unique and special! Try experimenting with different color combinations - imagine her in soft pastels like mint green and cream, or go bold with jewel tones like emerald and gold. You could create seasonal versions too: autumn Emma in warm oranges and browns, or winter Emma in icy blues and silvers.

For hair variations, consider making shorter styles by reducing the chain length in each strand layer, or create an updo by gathering and securing the strands differently. You might even try different hair colors - blonde Emma would be stunning with yellow yarn, or go dramatic with black hair for a completely different personality.

The accessories offer endless possibilities for personalization. Make multiple outfits by creating the dress pattern in different colors, add embroidered details like flowers or stars to the dress bodice, or create themed accessories like a school bag for student Emma or a chef's hat for cooking enthusiast Emma. The shoes can be made in matching or contrasting colors, and you could even add tiny bows or buttons for extra charm.

Common Mistakes & How to Fix Them

โœ— Forgetting to stuff arms lightly at shoulders when attaching to body causes floppy arm positioning โœ— Not positioning safety eyes correctly between rounds 20-21 with proper 12-stitch spacing affects facial symmetry โœ— Skipping the wire insertion in arms prevents proper poseable functionality for display purposes โœ— Incorrectly placing hair layers without proper spacing creates uneven strand distribution and messy appearance

Emma Doll Crochet Amigurumi Pattern

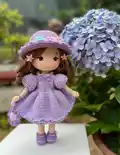
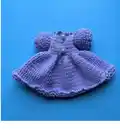
Create your very own charming Emma doll with this detailed crochet pattern! This adorable 30cm amigurumi doll features beautiful brown hair, a stunning purple dress with puffy sleeves, matching accessories including a hat with decorative flowers, handbag, and sweet button-up shoes. Perfect for intermediate crocheters looking to craft a special handmade gift or keepsake that will be treasured for years to come.

Intermediate 8-10 Hours

Materials Needed for Emma Doll Crochet Amigurumi Pattern

โ€” Main Fabric

  • 01
    YarnArt Jeans yarn in skin color (73), white (62), brown (40), purple (72), light purple (89), light pink (36), light blue (76)
  • 02
    Cotton or acrylic yarn suitable for amigurumi work in multiple colors for doll and accessories

โ€” Tools Required

  • 01
    Crochet hook 2.0mm
  • 02
    Safety eyes 8mm
  • 03
    Sewing needles
  • 04
    Fiberfill stuffing
  • 05
    4 buttons 8mm for shoes and dress
  • 06
    Soft wires 1.5mm for poseable arms
  • 07
    Black thread for embroidering eyebrows and eyelids
  • 08
    Stitch markers
  • 09
    Scissors

Progress Tracker

0% Complete

โ€” ARMS (make 2) :

Left arm R1 :

MR, 6 sc

R2 :

6 inc (12)

R3-4 :

12 sc

R5 :

1B, 11 sc

R6 :

(4 sc, dec)*2 (10)

R7 :

(3 sc, dec)*2 (8)

R8 :

8 sc

R9 :

(3 sc, inc)*2 (10)

R10-28 :

10 sc

Info :

Crochet 5 sc more (and 1 slst), last stitch should be at inside of arm. Note thumbs will be in front. Fasten off.

Right arm :

Do same as left arm until R28, slst. Fasten off.

โ€” LEGS (make 2) :

Left leg R1 :

Ch 6, start to crochet on second chain from hook: inc, 3 sc, inc-4, 3 sc, inc (14)

R2 :

2 inc, 3 sc, 4 inc, 3 sc, 2 inc (22)

R3 :

(sc, inc)*2, 3 sc, (sc, inc)*2, (inc, sc)*2, 3 sc, (inc, sc)*2 (30)

R4-5 :

30 sc

R6 :

7 sc, (sc, dec)*3, (dec, sc)*3, 5 sc (24)

R7 :

7 sc, 6 dec, 5 sc (18)

R8 :

6 sc, 4 dec, 4 sc (14)

R9-24 :

14 sc

R25 :

7 sc, 4 hdc, 3 sc (14)

Info :

To form knee, 4 hdc must be at center of front

R26 :

3 sc, inc, 6 sc, inc, 3 sc (16)

R27 :

16 sc

R28 :

(7 sc, inc)*2 (18)

R29-36 :

18 sc

Change to white :

R37: BLO 18 sc

R38 :

18 sc, slst

Right leg :

Same as left leg but add 10 sc (adjustable) to position last stitch at inside. Don't fasten off, continue to body. Connect 2 legs with 3 chains.

โ€” BODY :

R1 :

18 sc (left leg), 3 sc into 3 chains, 18 sc (right leg), 3 sc into 3 last chains (42)

R2 :

(6 sc, inc)*6 (48)

R3-9 :

48 sc. Leave white yarn to crochet ruffle of shorts

Ruffle of shorts :

48 slst. Fasten off.

Change to skin color R10 :

BLO 48 sc

R11 :

(6 sc, dec)*6 (42)

R12 :

(5 sc, dec)*6 (36)

R13-24 :

36 sc

R25 :

8 sc, 4sc (join with left arm), 14 sc, 4 sc (join with right arm), 6 sc (36)

R26 :

8 sc, 6 sc (on left arm), 14 sc on chest, 6 sc (on right arm), 6 sc (40)

R27 :

40 sc

R28 :

(4 sc, dec, 4 sc)*4 (36)

R29 :

(2 sc, dec, 2 sc)*6 (30)

R30 :

(3sc, dec)*6 (24)

R31 :

(sc, dec, sc)*6 (18)

R32-35 :

18 sc

โ€” EARS (make 2) :

R1 :

MR, 3 sc, turn

R2 :

Ch 1, 3 inc (6)

โ€” HEAD :

R1 :

MR, 8 sc

R2 :

8 inc (16)

R3 :

(sc, inc)*8 (24)

R4 :

(3 sc, inc)*6 (30)

R5 :

2 sc, inc, (4 sc, inc)*5, 2 sc (36)

R6 :

(5 sc, inc)*6 (42)

R7 :

3 sc, inc, (6 sc, inc)*5, 3 sc (48)

R8 :

(7 sc, inc)*6 (54)

R9 :

4 sc, inc, (8 sc, inc)*5, 4 sc (60)

R10 :

(9 sc, inc)*6 (66)

R11-26 :

66 sc

R27 :

(9 sc, dec)*6 (60)

R28 :

4 sc, dec, (8 sc, dec)*5, 4 dec (54)

R29 :

(7 sc, dec)*6 (48)

R30 :

3 sc, dec, (6 sc, dec)*5, 3 sc (42)

R31 :

(5 sc, dec)*6 (36)

R32 :

18 dec. Fasten off.

Info :

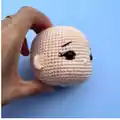
Insert eyes between R20 and R21, distance is 12 stitches. Sew ears at same level as upper eyelid, 6 stitches from outer lash line. Embroider eyebrow with 1 stitch high, 3 stitches wide, 4 rows from eye hole. Embroider nose with 2 stitches wide, 2 rows from eye hole.

โ€” HAIR :

R1 :

MR 8 sc

R2 :

BLO 8 inc (16)

R3 :

BLO (sc, inc)*8 (24)

R4 :

BLO (3 sc, inc)*6 (30), turn, start to crochet strands (BLO)

Layer 1: 15 strands :

(Ch 61, start to crochet on second chain from hook: 60 hdc, 2 slst)*15

Layer 2: 12 strands :

(Ch 61, start to crochet on second chain from hook: 60 hdc, 2 slst)*12

Layer 3: 8 strands :

(Ch 61, start to crochet on second chain from hook: 60 hdc, 2 slst)*8

Layer 4: 4 strands :

(Ch 61, start to crochet on second chain from hook: 60 hdc, 2 slst)*4

Info :

Tie 5 bangs on each side and attach bow/flower as desired

Assembly Instructions

  • Sew head to body using the long tail left from body construction, ensuring proper alignment
  • Attach arms to body at rounds 25-26, inserting wire for poseable functionality if desired
  • Sew ears to head at same level as upper eyelid, 6 stitches from outer lash line
  • Attach hair piece to head, securing all layers and arranging strands naturally
  • Position and sew safety eyes between rounds 20-21 with 12-stitch spacing
  • Embroider facial features: eyebrows (1 stitch high, 3 wide) and nose (2 stitches wide)
  • Complete doll with dress, hat, shoes, and handbag accessories as desired

Important Notes

  • ๐Ÿ’กUse stitch markers to track rounds, especially during color changes in dress construction
  • ๐Ÿ’กStuff body and head firmly but not too tightly for best shape retention
  • ๐Ÿ’กInsert wire in arms carefully for poseable feature, ensure wire ends are covered safely
  • ๐Ÿ’กPin all pieces in place before final sewing to ensure correct proportions and positioning
  • ๐Ÿ’กWork hair strands consistently to achieve even layered texture throughout all four layers

This enchanting Emma Doll pattern brings together classic amigurumi techniques with elegant fashion doll styling! The detailed construction creates a sophisticated companion with beautiful layered hair, poseable arms, and a complete wardrobe including two dress options. Perfect for intermediate crocheters ready to tackle a rewarding project that combines technical skills with creative finishing. Every stitch contributes to Emma's charming personality - from her delicate embroidered features to her tiny button shoes. ๐Ÿงถ Happy crocheting! ๐Ÿงตโœจ

You ask,

we answer.

FAQs

What yarn weight is best for this Emma doll pattern?

The pattern uses YarnArt Jeans which is a DK weight (4) yarn. Any cotton or cotton-acrylic blend in DK weight will work well for the structure and durability needed for amigurumi dolls.

Can I make the doll smaller or larger than 30cm?

Yes! Use a smaller hook (1.5mm) for a smaller doll or larger hook (2.5mm) for bigger size. Just remember to adjust your safety eyes and button sizes accordingly.

Is the wire in the arms necessary?

The wire is optional but recommended for poseable arms. If making for young children, skip the wire for safety. The arms will still attach properly without it.

How do I achieve the layered hair effect?

Work each hair layer from the pattern carefully, maintaining consistent tension. The four layers (15, 12, 8, 4 strands) create natural volume when attached to the base cap.

Which dress version should I choose?

The Princess dress has a fuller, more dramatic skirt perfect for display. The A-line dress is more fitted and practical. Both use the same construction techniques with different shaping.