🧢 Beautiful ✨ Detailed πŸ’ Adorable

Mini Deer Amigurumi Pattern

Mini Deer Amigurumi Pattern
4.5β˜… Rating
4-5 Hours Time Needed
2.8K Made This
βœ‚οΈ

Intermediate Level

Ideal for those with basic knitting experience, featuring slightly more advanced stitches and techniques to expand your skills.

⏱️

Weekend Treat

Takes 5-7 hours, making it an enjoyable project to finish over a couple of days.

🐰

Whimsical Buddy

Playful characters full of personality, designed to spark imagination and become cherished playtime favorites.

About This Mini Deer Amigurumi Pattern

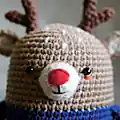
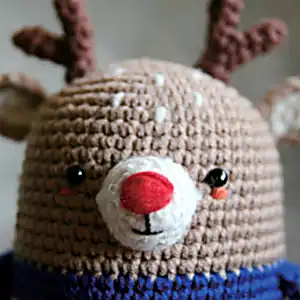
This mini deer pattern creates an enchanting woodland creature that's perfect for animal lovers of all ages. The design features a classic brown body with contrasting antlers and a colorful striped outfit that adds personality and charm. With clear round-by-round instructions, you'll create each part separately before assembling your adorable deer friend.

Mini Deer Amigurumi Pattern crochet pattern - detailed view of completed project

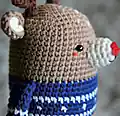
The pattern includes detailed placement guides for eyes, ears, and other features to ensure your deer has the perfect expression. Color-changing techniques are used throughout to create the distinctive striped sweater effect.

Why You'll Love This Mini Deer Amigurumi Pattern

I absolutely love how this pattern brings together classic amigurumi techniques with modern color-work details. The deer's innocent expression and tiny antlers make it irresistibly cute, while the striped sweater adds a playful touch that makes each piece unique. Working through the color changes helps develop your skills, and the finished result is so rewarding – it's the kind of project that makes you smile every time you see it!

Mini Deer Amigurumi Pattern step 1 - construction progress Mini Deer Amigurumi Pattern step 2 - assembly progress Mini Deer Amigurumi Pattern step 3 - details and accessories Mini Deer Amigurumi Pattern step 4 - final assembly and finishing

Switch Things Up

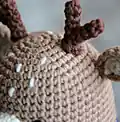
I love experimenting with different color combinations for this sweet deer pattern! You could create a winter version using white and silver for a snowy effect, or go bold with bright rainbow stripes for a more playful look. I've also tried making the antlers in different shades - golden brown gives an autumn feel, while keeping them natural dark brown maintains the classic woodland appearance.

For a more personalized touch, consider adding small accessories like a tiny scarf or bow tie. You could even embroider small flowers or leaves on the sweater section for an extra special detail. The beauty of this pattern is how adaptable it is to your creative vision while maintaining that irresistible deer charm!

Common Mistakes & How to Fix Them

βœ— Forgetting to stuff the body firmly before closing, which can result in a floppy finished deer βœ— Not maintaining consistent tension when changing yarn colors, causing uneven stripes in the sweater section βœ— Placing safety eyes too close together or too far apart, affecting the deer's sweet facial expression βœ— Skipping stitch markers when dividing for legs, leading to misaligned leg placement and stability issues

Mini Deer Amigurumi Pattern

Create this adorable miniature deer with its charming antlers and sweet striped sweater! This delightful pattern combines brown tones with colorful accents to bring a woodland friend to life. Perfect for gift-giving or adding a touch of nature-inspired cuteness to your home. The finished deer stands approximately 15cm tall and features detailed facial features including a light beige snout and expressive safety eyes.

Intermediate 4-5 Hours

Materials Needed for Mini Deer Amigurumi Pattern

β€” Main Fabric

  • 01
    Worsted weight yarn in brown, dark brown, light beige, blue, red, white, yellow, and dark orange colors

β€” Tools Required

  • 01
    5/0 (3mm) crochet hook
  • 02
    5mm black plastic safety eyes (2 pieces)
  • 03
    Yarn needle
  • 04
    Scissors
  • 05
    Stitch markers
  • 06
    Fiberfill stuffing
  • 07
    Craft glue

Progress Tracker

0% Complete

β€” Head / Body / Legs :

Round 1 :

scx6 in the yarn loop, tighten the loop [6 sts]

Round 2 :

(2-sc inc) x 6 [12]

Round 3 :

(scx1, 2-sc inc) x 6 [18]

Round 4 :

(scx2, 2-sc inc) x 6 [24]

Round 5 :

(scx3, 2-sc inc) x 6 [30]

Round 6 :

(scx4, 2-sc inc) x 6 [36]

Round 7 :

(scx5, 2-sc inc) x 6 [42]

Round 8 :

(scx6, 2-sc inc) x 6 [48]

Round 9-36 :

sc in all 48 st [48]

Info :

Change yarn colors according to symbol patterns for striped effect

Round 37-40 :

sc in all 18 st [18]

Round 41 :

(scx1, sc2tog) x 6 [12]

Round 42 :

(sc2tog) x 6 [6]

Info :

Fasten off, stuff the leg, weave yarn tail through front loops and pull tight to close

β€” Arms (Make 2) :

Round 1 :

scx5 in the yarn loop, tighten the loop [5 sts]

Round 2 :

(2-sc inc) x 5 [10]

Round 3-11 :

sc in all 10 st [10]

Info :

Fasten off, flatten the arm, do not stuff

β€” Long Horns (Make 2) :

Round 1 :

scx4 in the yarn loop, tighten the loop [4 sts]

Round 2-5 :

sc in all 4 st [4]

Round 6 :

2-sc inc, scx3 [5]

Round 7 :

2-sc inc, scx4 [6]

Info :

Fasten off, do not stuff

β€” Short Horns (Make 2) :

Round 1 :

scx4 in the yarn loop, tighten the loop [4 sts]

Round 2-4 :

sc in all 4 st [4]

Info :

Fasten off, do not stuff, sew short horn to long horn

β€” Snout :

Round 1 :

scx1 in second ch from hook, scx3 in the bottom chain, working up the other side-scx1, scx1 in the next chain, slst [6 sts]

Round 2 :

ch 1, (2-sc inc) x 6, slst [12]

Round 3 :

ch 1, sc in all 12 st, slst [12]

Round 4 :

ch 1, scx4, 2-sc inc, scx6, 2-sc inc, slst [14]

Round 5 :

ch 1, sc in all 14 st, slst [14]

Info :

Fasten off, fill with stuffing, make nose and mouth details

β€” Ears (Make 4) :

Round 1 :

scx6 in the yarn loop, tighten the loop [6 sts]

Round 2 :

(2-sc inc) x 6 [12]

Info :

Make 2 light beige and 2 brown ears, then edge together with brown yarn

Assembly Instructions

  • Sew the completed horns (long and short pieces together) to the top of the head between rounds 8-10
  • Position and glue safety eyes between rounds 13-14, spacing them appropriately for the deer's expression
  • Attach the snout to the face area, ensuring proper placement according to the pattern diagram
  • Sew the completed ears (brown and beige pieces edged together) to sides of the head
  • Attach arms to the body between rounds 20-21 on each side
  • Add any final facial details like cheeks between rounds 14-15 using red yarn

Important Notes

  • πŸ’‘Use stitch markers consistently to track your place, especially during color changes
  • πŸ’‘Change yarn colors according to the symbol pattern charts provided for accurate striping
  • πŸ’‘Stuff body and head firmly but not overly tight to maintain proper shape
  • πŸ’‘Position all pieces carefully before final sewing using the placement guides in the pattern

This enchanting mini deer pattern brings woodland magic to your crochet collection! With its sweet expression, detailed antlers, and charming striped sweater, this little deer is sure to become a treasured companion. The pattern combines fundamental amigurumi techniques with delightful color work that makes each stitch satisfying. Perfect for nature lovers and anyone who appreciates handmade charm! 🦌 Happy crocheting! 🧢✨

You ask,

we answer.

FAQs

What size will my finished deer be?

The completed deer measures approximately 15cm (5.9 inches) tall when using worsted weight yarn with a 3mm crochet hook.

Can I use different colors for the striped sweater?

Absolutely! While the pattern shows blue, white, and yellow stripes, you can customize the colors to match your preference or decor.

How do I achieve clean color changes in the striped sections?

Follow the symbol pattern chart carefully and change colors at the beginning of rounds for the cleanest transitions between stripes.

Do I need to stuff the antlers?

No, the pattern specifically states not to stuff the horn pieces - this keeps them lightweight and properly shaped.

Can I make this pattern larger?

Yes, you can use a larger hook and thicker yarn to scale up the size, but you'll need to adjust the eye size accordingly.