🧢 Beautiful ✨ Detailed πŸ’ Adorable

Fancy Dog Amigurumi Pattern

Fancy Dog Amigurumi Pattern
4.2β˜… Rating
8-10 Hours Time Needed
1.4K Made This
βœ‚οΈ

Intermediate Level

Ideal for those with basic knitting experience, featuring slightly more advanced stitches and techniques to expand your skills.

⏱️

All-Day Adventure

Requires 8-10 hours, ideal for a full day of immersive knitting.

🧸

Cute Companion

An adorable friend to cherish, handcrafted with love to bring comfort and joy for years to come.

About This Fancy Dog Amigurumi Pattern

This fancy dog amigurumi pattern combines classic techniques with charming details to create a truly special character. The pattern includes step-by-step instructions for creating a dressed-up puppy with a layered ruffled skirt and sweet hairpin accessories. Each section is clearly detailed with helpful photos to guide you through the construction process. The finished doll has a sturdy construction that's perfect for display or gentle play.

Fancy Dog Amigurumi Pattern crochet pattern - detailed view of completed project

The pattern features multiple color changes and decorative elements that make this project both engaging and rewarding. With detailed assembly instructions and finishing touches, you'll create a professional-looking amigurumi that showcases your crochet skills.

Why You'll Love This Fancy Dog Amigurumi Pattern

I absolutely love this pattern because it combines my passion for creating adorable characters with elegant fashion details. The way the ruffled dress layers come together creates such a beautiful silhouette, and those little hairpins add the perfect finishing touch. Every time I work on this design, I'm amazed by how the simple stitches transform into such an expressive and charming companion that brings smiles to everyone who sees it.

Fancy Dog Amigurumi Pattern step 1 - construction progress Fancy Dog Amigurumi Pattern step 2 - assembly progress Fancy Dog Amigurumi Pattern step 3 - details and accessories Fancy Dog Amigurumi Pattern step 4 - final assembly and finishing

Switch Things Up

I love experimenting with different color combinations for this fancy dog pattern – you could create a whole collection of fashionable pups! Try making her dress in seasonal colors like autumn oranges and browns, or go bold with bright rainbow layers. I've also discovered that adding a small crochet collar or bow tie instead of the hairpins creates a completely different look that's perfect for male dog versions.

Another fun variation I enjoy is changing the ear shape – you could make them pointy for a different breed look, or even add spots to the body for a Dalmatian effect. I sometimes skip the ruffled dress entirely and create a simple sweater or vest instead, which gives the dog a more casual, everyday appearance that some people prefer.

The beauty of this pattern is how adaptable it is to your personal style and color preferences!

Common Mistakes & How to Fix Them

βœ— Forgetting to stuff the head tightly before decreasing, resulting in a floppy or misshapen appearance βœ— Not maintaining consistent tension when changing colors, which can create gaps or loose stitches βœ— Skipping the safety eye installation timing, making it difficult to position them properly later βœ— Rushing through the ruffled dress layers without proper stitch counting, causing uneven or puckered edges

Fancy Dog Amigurumi Pattern

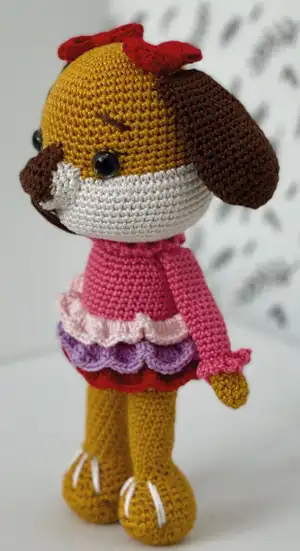
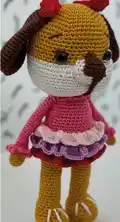
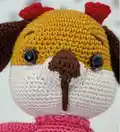
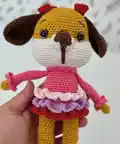
Create an adorable fancy dog amigurumi with this detailed pattern! This charming puppy features a beautiful mustard yellow body with brown ears, wearing an elegant pink dress with ruffled layers in white and purple. Perfect for dog lovers and anyone who enjoys creating sweet characters with personality. The finished doll stands about 20cm tall and makes a wonderful gift or decoration for any space.

Intermediate 8-10 Hours

Materials Needed for Fancy Dog Amigurumi Pattern

β€” Main Fabric

  • 01
    Yarn in Main Color (Mustard/Yellow), Color A (White), Color B (Pink), Color C (Red), Color D (Light Pink), Color E (Lily), and Color F (Brown)
  • 02
    Cotton or acrylic yarn recommended in mustard yellow, white, pink, red, light pink, purple, and brown colors

β€” Tools Required

  • 01
    Crochet hook size 2.5mm or size that fits your yarn
  • 02
    Safety eyes
  • 03
    Scissors
  • 04
    Stuffing
  • 05
    Tapestry needle
  • 06
    Stitch markers
  • 07
    Pins

Progress Tracker

0% Complete

β€” HEAD :

Main Color

Rnd 1:

6 sc in a magic ring

Rnd 2:

6 sc inc(12 sc)

Rnd 3:

(6 times)1 sc into sc next inc(18 sc)

Rnd 4:

(6 times)2 sc into sc next inc(24 sc)

Rnd 5:

(6 times)3 sc into sc next inc(30 sc)

Rnd 6:

(6 times)4 sc into sc next inc(36 sc)

Rnd 7:

(6 times)5 scinto sc next inc(42 sc)

Rnd 8:

(6 times)6 sc into sc next inc(48 sc)

Rnd 9-17:

(9 ring)sc into sc(48 sc) Install the safety eyes between rnd 15-16. There will be 9 sc in between.

Rnd 18:

12 sc into sc (9 sc inc)6 sc into sc (9 sc inc)12 sc into sc(66 sc)

A Color

Rnd 19-26:

(8 ring)sc into sc(66 sc)

Info:

Stuff the head tightly. Keep filling as you go.

Rnd 27:

(6 times)9 sc into sc next dec(60 sc)

Rnd 28:

(6 times)8 sc into sc next dec(54 sc)

Rnd 29:

(6 times)7 sc into sc next dec(48 sc)

Rnd 30:

(6 times)6 sc into sc next dec(42 sc)

Rnd 31:

(6 times)5 sc into sc next dec(36 sc)

Rnd 32:

(6 times)4 sc into sc next dec(30 sc)

Rnd 33:

(6 times)3 sc into sc next dec(24 sc)

Rnd 34:

Sc into sc (24 sc)fo. Leave a long thread for sewing.

β€” ARMS :

Main Color - Make 2

Rnd 1:

6 sc in a magic ring

Rnd 2:

6 sc inc(12 sc)

Rnd 3-6:

(4 ring)sc into sc (12 sc)

Rnd 7:

Only in flo sc into sc(12 sc)

B Color

Rnd 8-22:

(15 ring)sc into sc(12 sc)

Rnd 23:

Flatten the needle in both layers.

Info:

6 sc fo. Do not fill the sleeves.

Arms Detail:

Only in blo sc into 3 ch fo.

β€” LEGS AND BODY :

Main Color - Make 2

Rnd 1:

6 sc in a magic ring

Rnd 2:

6 sc inc(12 sc)

Rnd 3:

(6 times)1 sc into sc next inc(18 sc)

Rnd 4:

sc into sc (18 sc)

Rnd 5:

6 sc into sc(6 sc inc)6 sc into sc(24 sc)

Rnd 6:

(2 times)sc into sc(24 sc)

Rnd 8:

9 sc into sc(6 sc dec)9 sc into sc(18 sc)

Rnd 9:

8 sc into sc(2 sc dec)8 sc into sc(16 sc)

Rnd 10-23:

(14 ring)sc into sc(16 sc)

Info:

Stuff the legs tightly. Bring the legs together. Make 4 ch in between.

Rnd 24:

16 sc into sc(4 ch into 4 sc)16 sc into sc(36 sc)

Rnd 25:

4 sc into unworked loops of ch 36 sc into sc(40 sc)

Rnd 26-28:

(3 ring)sc into sc(40 sc)

B Color

Rnd 29:

Only in flo sc into sc (40 sc)

Rnd 30-32:

(3 ring)sc into sc(40 sc)

Rnd 33:

Only in flo sc into sc(40 sc)

Rnd 34-36:

(3 ring)sc into sc(40 sc)

Rnd 37:

Only in flo sc into sc(40 sc)

Rnd 38-44:

(7 ring)sc into sc(40 sc)

Rnd 45:

(6 times)5 sc into sc next dec(34 sc)

Rnd 46:

sc into sc (34 sc)

Rnd 47:

(4 times)7 sc into sc next dec(30 sc)

Info:

Tightly fill the hull. Keep filling as you go.

Rnd 48:

Only in flo sc into sc(30 sc)

Rnd 49:

sc into sc(30 sc)fo.

Info:

Leave a long thread for sewing.

Elbise detayΔ±- Etek - C Color

Rnd 29:

Only in blo sc into 3 cr(120 cr)

Rnd-2:

Cr into cr(120 cr)

E Color

Rnd 33:

Only in blo sc into 3 cr(120 cr)

Rnd 2:

Cr into cr(120 cr)

D Color

Rnd 37:

Only in blo sc into 3 cr(120 cr)

Rnd 2:

Cr into cr(120 cr)Fo.

Collar Detail - Rnd 48:

Only in blo sc into 3 ch fo.

β€” EARS :

F COLOR - MAKE 2

Rnd 1:

6 sc in a magic ring

Rnd 2:

6 sc inc(12 sc)

Rnd 3:

(6 times)1 sc into sc next inc(18 sc)

Rnd 4:

(6 times)2 sc into sc next inc(24 sc)

Rnd 5:

(6 times)3 sc into sc next inc(30 sc)

Rnd 6-10:

(5 ring)sc into sc(30 sc)

Rnd 11:

(6 times)3 sc into sc next dec(24 sc)

Rnd 12-15:

(4 ring)sc into sc (24 sc)

Rnd 16:

(6 times)2 sc into sc next dec(18 sc)

Rnd 17-21:

(5 ring)sc into sc(18 sc)

Rnd 22:

Flatten the needle in both layers. 9 sc fo.

Info:

Leave a long thread for sewing.

β€” QUEUE :

F Color

Rnd 1:

6 sc in a magic ring

Rnd 2:

6 sc inc(12 sc)

Rnd 3:

(3 times)3 sc into sc next inc(15 sc)

Rnd 4-6:

(3 ring)sc into sc(15 sc)

Rnd 7:

(3 times)3 sc into sc next dec(12 sc)

Rnd 8-12:

(5 ring)sc into sc(12 sc)

Rnd 13:

(4 times)1 sc into sc next dec(8 sc)

Rnd 14-15:

(2 ring)sc into sc(8 sc)

Rnd 16:

Flatten the needle in both layers. 4 sc fo.

β€” HAIRPINS :

C Color - Make 2

Info:

20 ch.20 ch into 20 cr

Rnd 2:

Turn cr into cr(20 cr)fo.

Info:

Wrap the middle of the fold and

Info:

Leave a long thread to sew.

Joining of Parts

Info:

Sew the ears to both sides Rnd-8.

Info:

Sew the sleeves to both sides Rnd-47.

Info:

Sew the buckles Rnd-6 to both sides.

β€” NOSE and NOSE TIP :

NOSE TIP - F Color

Rnd 1:

2 ch into 2 sc turn

Rnd 2:

1 sc inc 2 sc into sc (3 sc)turn

Rnd 3:

1 sc inc 3 sc into sc(4 sc)turn

Rnd 4:

1 sc inc 4 sc into sc(5 sc)turn

Rnd 5:

1 sc inc 5 sc into sc(6 sc)fo.

Info:

Leave a long thread for sewing.

NOSE - A color

Rnd 1:

5 ch ch into sc(10 sc)

Rnd 2:

1 sc inc 4 sc into sc 1 sc inc(12 sc)

Rnd 3:

1 sc inc 5 sc into sc 1 sc inc (14 sc)

Rnd 4:

1 sc inc 6 sc into sc 1 sc inc(16 sc)

Rnd 5:

1 sc inc 7 sc into sc 1 sc inc(18 sc)fo.

Info:

Fill the nose, leave a long thread for sewing.

Info:

Sew the nose between the 2 eyes between Rnd 16-20. fo.

Assembly Instructions

  • Sew the ears to both sides of the head at round 8, positioning them symmetrically
  • Attach the arms to both sides of the body at round 47, ensuring they are level
  • Sew the hairpin buckles to round 6 on both sides of the head for decoration
  • Position and sew the nose between the safety eyes at rounds 16-20 on the head
  • Attach the nose tip to the center of the nose piece before final assembly
  • Sew the tail to the back of the body, stuffing lightly for shape
  • Ensure all seams are secure and stuff all parts firmly before final assembly

Important Notes

  • πŸ’‘Use safety eyes and install them between rounds 15-16 with 9 single crochets between them
  • πŸ’‘Stuff the head and body tightly as you work to maintain proper shape
  • πŸ’‘When working color changes, carry yarn neatly to avoid visible loose ends
  • πŸ’‘Flatten the needle in both layers when finishing arms, ears, and tail for neat closure
  • πŸ’‘Work dress layers in back loops only to create the ruffled effect
  • πŸ’‘Pin all pieces in place before sewing to ensure proper positioning and alignment

This delightful Fancy Dog amigurumi pattern brings together classic crochet techniques with adorable fashion details to create a truly special companion. With her layered ruffled dress and charming hairpin accessories, this sweet pup is perfect for display or as a cherished gift. The pattern includes detailed photos and step-by-step instructions to guide you through every stitch. Create your own fancy friend and watch her bring smiles wherever she goes! 🧢✨

You ask,

we answer.

FAQs

What size yarn and hook should I use for this pattern?

The pattern recommends a 2.5mm hook or the size that fits your yarn. Use cotton or acrylic yarn in the specified colors for best results.

How do I install the safety eyes correctly?

Install safety eyes between rounds 15-16 of the head, with 9 single crochets between them. Make sure to secure them before stuffing the head completely.

Can I make the dress in different colors?

Yes! You can customize the dress colors to your preference. The pattern uses pink, white, and purple for the ruffled layers, but feel free to choose your own color combination.

How do I create the ruffled effect on the dress?

Work in back loops only for the dress layers and use treble crochets to create the fullness needed for the ruffled appearance.

Is this pattern suitable for beginners?

This is an intermediate-level pattern that requires knowledge of color changes, shaping techniques, and basic amigurumi construction. Some crochet experience is recommended.