๐Ÿงถ Beautiful โœจ Detailed ๐Ÿ’ Adorable

Felted Bowl Trio Pattern

Felted Bowl Trio Pattern
4.3โ˜… Rating
4-5 Hours Time Needed
2.8K Made This
โœ‚๏ธ

Beginner Friendly Level

Perfect for those just starting their sewing journey, with clear instructions and simple techniques

โฑ๏ธ

Weekend Treat

Takes 5-7 hours, making it an enjoyable project to finish over a couple of days.

๐Ÿก

Cozy Accent

A warm touch for your space that transforms ordinary corners into inviting nooks filled with handmade charm.

About This Felted Bowl Trio Pattern

Felted Bowl Trio Pattern crochet pattern - detailed view of completed project

The pattern includes instructions for three different sized bowls that nest together perfectly. After felting, you can use a pen-style felting tool to add personalized decorative details like hearts, initials, or words to make each bowl uniquely yours.

Why You'll Love This Felted Bowl Trio Pattern

I absolutely love this pattern because it's such a forgiving project for anyone wanting to try felting for the first time. There's no stress about getting exact measurements since the felting process naturally creates variation, and that's part of the charm. The satisfaction of watching your work transform in the washing machine from loose crochet to dense, fuzzy felt is genuinely magical. Plus, these bowls are incredibly practical - I use mine daily for keys, jewelry, and organizing small items. The ability to personalize them with needle felted designs means each set becomes a one-of-a-kind creation.

Felted Bowl Trio Pattern step 1 - construction progress Felted Bowl Trio Pattern step 2 - assembly progress Felted Bowl Trio Pattern step 3 - details and accessories Felted Bowl Trio Pattern step 4 - final assembly and finishing

Switch Things Up

I love experimenting with different color combinations to match various home decor styles - try earthy neutrals for a bohemian vibe or bright jewel tones for a more vibrant look. You could also make just one large bowl instead of the full trio if you need a specific size for a particular purpose.

Another fun variation I enjoy is adding more intricate needle felted designs after the bowls are complete - think geometric patterns, floral motifs, or even seasonal decorations like snowflakes for winter or flowers for spring. You could personalize each bowl with family members' names or initials to create designated storage spots.

I've found that varying the yarn weight slightly can create interesting texture differences - using a slightly bulkier wool creates a more rustic, chunky bowl while a finer wool creates a smoother finish. The felting process is forgiving enough to accommodate these small changes beautifully.

Common Mistakes & How to Fix Them

โœ— Using superwash wool yarn which will not felt properly - always check your yarn label to ensure it's non-superwash 100% wool for successful felting โœ— Not using stitch markers to track round beginnings which leads to losing your place and uneven shaping throughout the bowl construction โœ— Over-stuffing the washing machine during felting which prevents proper agitation and results in bowls that don't felt evenly or completely โœ— Skipping the contrast marker at specific rounds makes it difficult to count your even rounds accurately and can throw off the bowl shape

Felted Bowl Trio Pattern

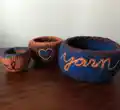
Create a set of three beautiful nesting felted bowls that bring organization and handcrafted charm to any space. This beginner-friendly felting project features bowls worked from the center bottom outward, using simple increases and decreases to create sturdy, functional pieces. Perfect for those new to felting, these bowls don't need precise sizing, and you can personalize them with decorative yarn details using a needle felting tool for a truly unique finished project.

Beginner Friendly 4-5 Hours

Materials Needed for Felted Bowl Trio Pattern

โ€” Main Fabric

  • 01
    Non-superwash, worsted weight, 100% wool yarn - 115 yards in Color A (blue)
  • 02
    Non-superwash, worsted weight, 100% wool yarn - 85 yards in Color B (dark brown)
  • 03
    Non-superwash, worsted weight, 100% wool yarn - 50 yards in Color C (light golden brown)

โ€” Tools Required

  • 01
    Size L (8.0 mm) crochet hook
  • 02
    Locking stitch markers
  • 03
    Tapestry needle
  • 04
    Pen-style felting tool
  • 05
    Washing machine (for felting)

Progress Tracker

0% Complete

โ€” Large Bowl :

Rnd 1 :

Using A, make an adjustable ring, 6 sc in ring, pull on beg yarn tail to close hole โ€“ 6 sts, do not join, but work in the rnd. Use stitch marker to keep track of beg of rnds.

Rnd 2 :

2 sc in each st around โ€“ 12 sts.

Rnd 3 :

[Sc in next st, 2 sc in next st] 6 times โ€“ 18 sts.

Rnd 4 :

[2 sc in next st, sc in next 2 sts] 6 times โ€“ 24 sts.

Rnd 5 :

[1 sc in next 2 sts, 2 sc in next st, sc in next st] 6 times โ€“ 30 sts.

Rnd 6 :

[1 sc in next 4 sts, 2 sc in next st] 6 times โ€“ 36 sts.

Rnd 7 :

[1 sc in next 2 sts, 2 sc in next st, sc in next 3 sts] 6 times โ€“ 42 sts.

Rnd 8 :

[1 sc in next 5 sts, 2 sc in next st, sc in next st] 6 times โ€“ 48 sts.

Rnd 9 :

[1 sc in next 1 sts, 2 sc in next st, sc in next 5 sts] 6 times โ€“ 54 sts.

Rnd 10 :

Sc around.

Rnd 11 :

[1 sc in next 3 sts, 2 sc in next st, sc in next 5 sts] 6 times โ€“ 60 sts.

Rnd 12 :

Sc around.

Rnd 13 :

[1 sc in next 9 sts, 2 sc in next st] 6 times โ€“ 66 sts.

Rnds 14 - 21 :

Sc around. Use contrasting st marker to mark post of first st of Rnd 14. This will help keep track of how many rnds have been worked even.

Rnd 22 :

[1 sc in next 9 sts, sc2tog] 6 times โ€“ 60 sts.

Rnd 23 :

[1 sc in next 3 sts, sc2tog, sc in next 5 sts] 6 times, sl st in first st of rnd โ€“ 54 sts.

Rnd 24 :

Yo with B and pull up loop, pull on A yarn tail until last A loop disappears, ch 1 (does not count as a stitch), sc around, sl st in first sc to fasten off.

Info :

Weave in ends.

โ€” Medium Bowl :

Info :

Using B, work Rnds 1 โ€“ 6 of Large Bowl directions.

Rnd 7 :

Sc around.

Rnd 8 :

[1 sc in next 2 sts, 2 sc in next st, sc in next 3 sts] 6 times โ€“ 42 sts.

Rnd 9 :

Sc around.

Rnd 10 :

[1 sc in next 5 sts, 2 sc in next st, sc in next st] 6 times โ€“ 48 sts.

Rnds 11 - 15 :

Sc around. Use contrasting st marker to mark post of first st of Rnd 11. This will help keep track of how many rnds have been worked even.

Rnd 16 :

[1 sc in next 6 sts, sc2tog] 6 times โ€“ 42 sts.

Rnd 17 :

[1 sc in next 3 sts, sc2tog, sc in next 2 sts] 6 times, sl st in first st of rnd โ€“ 36 sts.

Rnd 18 :

Yo with C and pull up loop, pull on B yarn tail until last B loop disappears, ch 1 (does not count as a stitch), sc around, sl st in first sc to fasten off.

Info :

Weave in ends.

โ€” Small Bowl :

Info :

Using C, work Rnds 1 โ€“ 3 of Large Bowl directions.

Rnd 4 :

Sc around.

Rnd 5 :

[2 sc in next st, sc in next 2 sts] 6 times โ€“ 24 sts.

Rnd 6 :

Sc around.

Rnd 7 :

[1 sc in next 2 sts, 2 sc in next st, sc in next st] 6 times โ€“ 30 sts.

Rnds 8 - 10 :

Sc around. Use contrasting st marker to mark post of first st of Rnd 8. This will help keep track of how many rnds have been worked even.

Rnd 11 :

[1 sc in next 4 sts, sc2tog] 6 times- 24 sts.

Rnd 12 :

Yo with A and pull up loop, pull on C yarn tail until last C loop disappears, ch 1 (does not count as a stitch), sc around, sl st in first sc to fasten off.

Info :

Weave in ends.

โ€” Finishing :

Info :

Felt bowls in washing machine. Shape with hands and air dry after felting is complete. Add strands of yarn to bowls with needle felting tool to decorate.

Assembly Instructions

  • After completing all three bowls, check that all yarn ends are securely woven in before felting to prevent them from working loose during the washing process.
  • Place the completed bowls in a washing machine with hot water and add a small amount of detergent to help with the felting process.
  • Run the bowls through a regular wash cycle with agitation to allow the wool fibers to felt and mat together properly.
  • Check the bowls periodically during washing to monitor the felting progress - they should shrink and become denser and fuzzier.
  • Once felting is complete and bowls have reached desired density, remove from washer and shape with your hands while still damp to ensure proper bowl form.
  • Allow the bowls to air dry completely in their shaped form before adding any decorative details with the needle felting tool.
  • Use the pen-style felting tool to add personalized decorative strands of yarn such as hearts, letters, or patterns to the outside of your finished felted bowls.

Important Notes

  • ๐Ÿ’กAlways use non-superwash 100% wool yarn - some white or off-white wool yarns will not felt well, so test a swatch first
  • ๐Ÿ’กExact gauge is not critical for this project since the bowls will be felted and sizing will vary naturally
  • ๐Ÿ’กUse locking stitch markers to keep track of the beginning of rounds and place contrast markers at specific rounds to track your progress
  • ๐Ÿ’กThe bowls are worked continuously in the round without joining, making it essential to mark your rounds carefully
  • ๐Ÿ’กDecreases at the top edge of each bowl are intentional and help keep the bowl from stretching out of shape after felting
  • ๐Ÿ’กShape the bowls with your hands immediately after removing from the washing machine while they're still damp for best results

This charming Felted Bowl Trio pattern creates a practical and beautiful set of nesting bowls perfect for organizing any space in your home. The simple construction using basic single crochet stitches makes it ideal for beginners wanting to explore the magical world of felting. Once felted, these bowls transform into sturdy, fuzzy vessels that can hold keys, jewelry, office supplies, or any small treasures. Personalize them with needle felted designs to create truly unique handmade pieces. ๐Ÿงถ Happy crocheting and felting! ๐Ÿกโœจ

You ask,

we answer.

FAQs

What type of yarn must I use for this felted bowl project?

You must use non-superwash 100% wool yarn for successful felting. Superwash wool has been treated to prevent felting and will not work for this project. Avoid some white or off-white wool yarns as they may not felt well.

How do I felt the bowls after crocheting them?

Place the completed bowls in a washing machine with hot water and a small amount of detergent. Run them through a regular wash cycle with agitation. The hot water and agitation cause the wool fibers to mat together and shrink, creating the dense felted texture.

Do my bowls need to be exact measurements before felting?

No, exact gauge and sizing are not critical for this project since the bowls will shrink and change during the felting process. This makes it a perfect beginner felting project with less pressure about precise measurements.

How can I personalize my felted bowls?

After the bowls are felted and dried, you can use a pen-style needle felting tool to add decorative details like hearts, initials, words, or patterns using small strands of contrasting colored wool yarn.

What size crochet hook should I use?

Use a size L (8.0 mm) crochet hook or whatever size is needed to achieve a loose gauge before felting. The larger hook creates a looser fabric that will felt more effectively in the washing machine.