๐Ÿงถ Beautiful โœจ Detailed ๐Ÿ’ Adorable

First Aid Kit Zippered Pouch Pattern

First Aid Kit Zippered Pouch Pattern
4.6โ˜… Rating
4-5 Hours Time Needed
1.5K Made This
โœ‚๏ธ

Intermediate Level

Ideal for those with basic knitting experience, featuring slightly more advanced stitches and techniques to expand your skills.

โฑ๏ธ

Weekend Treat

Takes 5-7 hours, making it an enjoyable project to finish over a couple of days.

๐Ÿก

Cozy Accent

A warm touch for your space that transforms ordinary corners into inviting nooks filled with handmade charm.

About This First Aid Kit Zippered Pouch Pattern

This versatile first aid pouch pattern starts with a rectangular base and builds up with single crochet rounds to create a sturdy, zippered container. The highlight is the granny square medical cross symbol that clearly identifies the pouch's purpose. The pattern includes detailed instructions for customizing the size to fit your specific travel needs, making it perfect for everything from small personal kits to larger family emergency supplies.

First Aid Kit Zippered Pouch Pattern crochet pattern - detailed view of completed project

What makes this pattern special is its practical design combined with thoughtful details like a custom zipper tab and professional finishing techniques. The granny square emblem adds both visual appeal and clear identification, while the sturdy construction ensures your medical supplies stay secure during travel.

Why You'll Love This First Aid Kit Zippered Pouch Pattern

I absolutely love how this pattern combines practicality with beautiful craftsmanship. The ability to customize the size means you can create exactly what you need, whether it's a compact travel kit or a comprehensive family emergency pouch. The granny square medical cross is such a clever design element that makes the pouch instantly recognizable while adding that special handmade touch that store-bought versions just can't match.

First Aid Kit Zippered Pouch Pattern step 1 - construction progress First Aid Kit Zippered Pouch Pattern step 2 - assembly progress First Aid Kit Zippered Pouch Pattern step 3 - details and accessories First Aid Kit Zippered Pouch Pattern step 4 - final assembly and finishing

Switch Things Up

I love how versatile this pattern becomes when you start experimenting with different color combinations and sizes. Try making a bright red pouch with white granny squares for that classic medical look, or go subtle with grey and cream for a more modern aesthetic.

You could also adapt this design for other purposes - imagine a toolkit pouch with a wrench symbol, or a sewing kit with scissors and thread motifs. The beauty of this pattern lies in its adaptability.

For families with multiple members, I suggest making different sized pouches in coordinating colors so everyone has their own personalized first aid kit. The kids will love having their own special emergency supplies, and you'll love knowing exactly where everything is when you need it most.

Common Mistakes & How to Fix Them

โœ— Not checking zipper length before purchasing - always measure your finished pouch opening first to get the right size zipper โœ— Skipping the blocking step which can cause uneven granny squares that don't align properly for the cross symbol โœ— Working too tightly on the single crochet rounds which makes the pouch stiff and difficult to stuff with supplies โœ— Forgetting to use stitch markers to track rounds which can lead to uneven sides and misshapen pouches

First Aid Kit Zippered Pouch Pattern

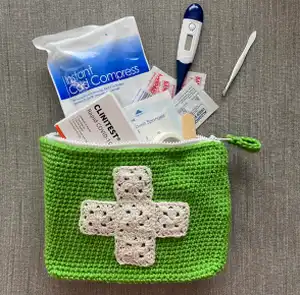
Create a practical and stylish first aid pouch perfect for travel adventures. This customizable zippered pouch features a distinctive granny square medical cross emblem and can be sized to fit your specific needs. The pattern combines functional single crochet construction with decorative granny squares to create a professional-looking emergency kit holder that's both sturdy and portable.

Intermediate 4-5 Hours

Materials Needed for First Aid Kit Zippered Pouch Pattern

โ€” Main Fabric

  • 01
    Approximately 160 yards worsted weight yarn in main color (acrylic, cotton, or wool)
  • 02
    Approximately 60 yards sport or light worsted weight yarn for granny square emblem in contrasting color

โ€” Tools Required

  • 01
    US G (4.0mm) crochet hook for pouch
  • 02
    US D (3.25mm) crochet hook for granny squares
  • 03
    Yarn needle
  • 04
    Removable stitch markers
  • 05
    Non-separating zipper (9 inches or custom size)
  • 06
    Sewing needle and thread
  • 07
    Scissors

Progress Tracker

0% Complete

โ€” Rectangular Bottom :

Foundation :

With MC and larger hook, ch 31

Row 1 :

Beginning with the 2nd ch from hook and working into the bottom of the chain, 1 SC into each st. 30 SC

Rows 2-10 :

Ch 1 (turning ch does not count as a st), turn, 1 SC in each st across. Do not turn after working the last row. Do not fasten off

โ€” Sides :

Set-Up Round :

Ch 1 (does not count as a stitch), rotate work 90 degrees, to stitch along row-ends. Use a stitch marker to divide the side edge (along row-ends) into two equal sections. 5 SC into each of the two sections along row-ends to next corner, place stitch marker in first st to keep track of first st of round, rotate work 90 degrees to stitch along opposite edge of foundation chain, placing one SC into each of the 30 sts across edge, rotate work 90 degrees to stitch along row ends, 5 SC into each of the two sections along row-ends, rotate work 90 degrees and work 1 SC into each st across ending at marked stitch, do not join, but continue to work in the round. 80 SC around

Rounds 1-28 :

SC into each stitch around. On last round fasten off at side edge of bag with a sl st

โ€” Zipper Tab :

Foundation :

With larger hook and MC, ch 13

Row 1 :

Beginning with the 2nd ch from hook and working into the bottom of the chain, 1 sl st in next st, SC in each of next 10 sts, 1 sl st in last st. 2 sl st, 10 SC

Row 2 :

Ch 1 (turning ch does not count as a st), turn, 1 sl st in next st, 1 SC in each of next 10 sts, 1 sl st in last st. Fasten off leaving long tail for sewing

โ€” Granny Square Emblem (Make 5) :

Set-up Round :

With CC and smaller hook, ch 4, sl st in first ch to join into a ring

Round 1 :

Ch 3 (counts as the first DC of rnd), 2 DC in center of ring, [ch 2, 3 DC in ring] 3 times, HDC into top of the ch-3 at beginning of rnd, this HDC counts as the last ch-2 sp of rnd as well as a join

Round 2 :

Ch 3 (counts as first DC of rnd), 2 DC in same sp, *skip next 3 DC, [3 DC, ch 2, 3 DC] in next ch-2 sp, repeat from * twice more, skip next 3 DC, 3 DC into first ch-2 sp, HDC into top of ch-3 to join (HDC counts as a ch-2 sp as well as the join)

Round 3 :

Ch 3 (counts as first DC of rnd), 2 DC in same ch-2 sp, *skip next 3 DC, 3 DC into sp before next set of 3 DC sts, skip next 3 DC, [3 DC, ch 2, 3 DC] in next ch-2 sp, repeat from * twice more, skip next 3 DC, 3 DC into sp before next set of 3 DC sts, skip next 3 DC, [3 DC, ch 2] into first ch-2 sp, sl st into top of ch-3 to join. Fasten off leaving long tail for sewing

Assembly Instructions

  • Block all pieces before assembly to ensure proper shape and sizing
  • Whip stitch the five granny squares together to form the medical cross symbol
  • Pin the completed cross emblem to the front center of the pouch
  • Use yarn needle and yarn tails to sew the emblem in place with back stitches around all edges
  • Pin the zipper into the top opening, ensuring teeth don't snag the crocheted fabric
  • Sew zipper in place from the right side using back stitches just below the top edge
  • Feed zipper tab through zipper pull opening and stitch the short ends together to secure

Important Notes

  • ๐Ÿ’กUse stitch markers to track the beginning of rounds and maintain even shaping
  • ๐Ÿ’กBlock all pieces before assembly for professional-looking results
  • ๐Ÿ’กPurchase zipper after completing the pouch to ensure proper fit
  • ๐Ÿ’กKeep zipper teeth away from crocheted fabric during installation to prevent snagging
  • ๐Ÿ’กCustomize the size by adjusting foundation chains and row counts as noted in pattern

This First Aid Kit Zippered Pouch pattern combines practical functionality with beautiful handcrafted details. The customizable design means you can create the perfect emergency kit for any adventure, while the granny square medical cross makes it instantly recognizable and professionally finished. Whether you're preparing for family camping trips or building a comprehensive home first aid collection, this sturdy and stylish pouch will keep your supplies organized and accessible.

You ask,

we answer.

FAQs

Can I make this pouch in different sizes?

Yes! The pattern includes detailed notes for customizing the size. Add or subtract 4 stitches to the foundation chain for each inch of width change, and add or subtract 5 rows for each inch of depth change.

What if my granny squares are too big for a smaller pouch?

For smaller pouches, use fingering weight yarn or thin crochet thread (size 3 or 10) with a smaller hook to make proportionally smaller granny squares for the medical cross.

How do I shorten a zipper if it's too long?

Stitch around the zipper teeth several times with needle and thread at your desired length, then trim away the excess below the stitching line.

Can I use different yarn weights for this project?

Yes, but you'll need to adjust your hook size and gauge accordingly. The pattern works best with worsted weight for the pouch and sport weight for the emblem.