๐Ÿงถ Beautiful โœจ Detailed ๐Ÿ’ Adorable

Forest Friends Amigurumi Pattern

Forest Friends Amigurumi Pattern
4.5โ˜… Rating
6-8 Hours Time Needed
2.9K Made This
โœ‚๏ธ

Beginner Friendly Level

Perfect for those just starting their sewing journey, with clear instructions and simple techniques

โฑ๏ธ

All-Day Adventure

Requires 8-10 hours, ideal for a full day of immersive knitting.

๐Ÿฐ

Whimsical Buddy

Playful characters full of personality, designed to spark imagination and become cherished playtime favorites.

About This Forest Friends Amigurumi Pattern

This enchanting Forest Friends pattern brings together four adorable woodland creatures in a unique stackable design that's both practical and playful. Each donut-shaped character features distinctive details like floppy bunny ears, delicate birdie wings, a cuddly bear snout, and charming tree leaves. The pattern uses simple stitches and clear round-by-round instructions, making it accessible for beginners while still offering engaging details for experienced crocheters to enjoy.

Forest Friends Amigurumi Pattern crochet pattern - detailed view of completed project

With varying sizes from four to seven inches in diameter, these stackable friends create a delightful display piece that adds warmth and whimsy to nurseries, bedrooms, or living spaces. The donut construction technique taught in this pattern opens up endless creative possibilities for future projects.

Why You'll Love This Forest Friends Amigurumi Pattern

I absolutely love this pattern because it combines functionality with pure cuteness in the most creative way. The stackable donut design is genius - it's like building your own little woodland tower of friends! What makes this pattern special is how each character has its own personality through simple details like the bunny's fluffy pom-pom tail or the birdie's cheerful little wings. I appreciate that it teaches a unique construction method that you can apply to countless other projects. Plus, there's something incredibly satisfying about watching your forest friends come to life one by one, knowing they'll stack together perfectly to create an adorable display that never fails to bring smiles.

Forest Friends Amigurumi Pattern step 1 - construction progress Forest Friends Amigurumi Pattern step 2 - assembly progress Forest Friends Amigurumi Pattern step 3 - details and accessories Forest Friends Amigurumi Pattern step 4 - final assembly and finishing

Switch Things Up

I love experimenting with this pattern because the possibilities are truly endless! Instead of traditional woodland colors, try making a pastel rainbow version where each friend is a different soft color - imagine a mint green birdie, lavender bunny, peachy bear, and baby blue tree stacking together in dreamy harmony.

You could also create seasonal variations by swapping out the accessories. Add a tiny crocheted scarf and earmuffs to the bunny for winter, or make miniature flowers to attach to the tree for spring. For autumn, I've made the tree in burnt orange with golden leaves, and it looks absolutely stunning!

Another fun twist is sizing up or down - using bulky yarn and a larger hook creates adorable oversized friends that work as floor cushions, while using fingering weight yarn makes precious miniature versions perfect for keychains or ornaments.

Consider personalizing the faces too! Instead of safety eyes, you could embroider sleepy eyes for a nursery theme, or add rosy cheeks with fabric paint for extra sweetness. I've even seen crafters add little crocheted accessories like tiny baskets, mushrooms, or acorns that the friends can hold.

The donut construction technique itself is versatile - once you master it with these forest friends, you can apply the same method to create ocean creatures, farm animals, or even fantasy characters. The stacking feature makes them educational toys too, helping little ones learn about size sequencing while they play!

Common Mistakes & How to Fix Them

โœ— N โœ— o โœ— t โœ— โœ— m โœ— a โœ— r โœ— k โœ— i โœ— n โœ— g โœ— โœ— t โœ— h โœ— e โœ— โœ— e โœ— n โœ— d โœ— โœ— o โœ— f โœ— โœ— r โœ— o โœ— u โœ— n โœ— d โœ— s โœ— โœ— c โœ— a โœ— r โœ— e โœ— f โœ— u โœ— l โœ— l โœ— y โœ— โœ— w โœ— h โœ— e โœ— n โœ— โœ— w โœ— o โœ— r โœ— k โœ— i โœ— n โœ— g โœ— โœ— i โœ— n โœ— โœ— c โœ— o โœ— n โœ— t โœ— i โœ— n โœ— u โœ— o โœ— u โœ— s โœ— โœ— s โœ— p โœ— i โœ— r โœ— a โœ— l โœ— s โœ— , โœ— โœ— w โœ— h โœ— i โœ— c โœ— h โœ— โœ— c โœ— a โœ— u โœ— s โœ— e โœ— s โœ— โœ— t โœ— h โœ— e โœ— โœ— p โœ— i โœ— e โœ— c โœ— e โœ— s โœ— โœ— t โœ— o โœ— โœ— b โœ— e โœ— c โœ— o โœ— m โœ— e โœ— โœ— m โœ— i โœ— s โœ— a โœ— l โœ— i โœ— g โœ— n โœ— e โœ— d โœ— โœ— a โœ— n โœ— d โœ— โœ— c โœ— r โœ— e โœ— a โœ— t โœ— e โœ— s โœ— โœ— a โœ— n โœ— โœ— u โœ— n โœ— e โœ— v โœ— e โœ— n โœ— โœ— d โœ— o โœ— n โœ— u โœ— t โœ— โœ— s โœ— h โœ— a โœ— p โœ— e โœ— . โœ— โœ— O โœ— v โœ— e โœ— r โœ— s โœ— t โœ— u โœ— f โœ— f โœ— i โœ— n โœ— g โœ— โœ— t โœ— h โœ— e โœ— โœ— d โœ— o โœ— n โœ— u โœ— t โœ— โœ— b โœ— o โœ— d โœ— i โœ— e โœ— s โœ— โœ— t โœ— o โœ— o โœ— โœ— t โœ— i โœ— g โœ— h โœ— t โœ— l โœ— y โœ— , โœ— โœ— w โœ— h โœ— i โœ— c โœ— h โœ— โœ— d โœ— i โœ— s โœ— t โœ— o โœ— r โœ— t โœ— s โœ— โœ— t โœ— h โœ— e โœ— โœ— c โœ— i โœ— r โœ— c โœ— u โœ— l โœ— a โœ— r โœ— โœ— s โœ— h โœ— a โœ— p โœ— e โœ— โœ— a โœ— n โœ— d โœ— โœ— m โœ— a โœ— k โœ— e โœ— s โœ— โœ— i โœ— t โœ— โœ— d โœ— i โœ— f โœ— f โœ— i โœ— c โœ— u โœ— l โœ— t โœ— โœ— t โœ— o โœ— โœ— s โœ— t โœ— a โœ— c โœ— k โœ— โœ— t โœ— h โœ— e โœ— โœ— p โœ— i โœ— e โœ— c โœ— e โœ— s โœ— โœ— p โœ— r โœ— o โœ— p โœ— e โœ— r โœ— l โœ— y โœ— โœ— t โœ— o โœ— g โœ— e โœ— t โœ— h โœ— e โœ— r โœ— . โœ— โœ— T โœ— w โœ— i โœ— s โœ— t โœ— i โœ— n โœ— g โœ— โœ— t โœ— h โœ— e โœ— โœ— i โœ— n โœ— i โœ— t โœ— i โœ— a โœ— l โœ— โœ— c โœ— h โœ— a โœ— i โœ— n โœ— โœ— w โœ— h โœ— e โœ— n โœ— โœ— s โœ— t โœ— a โœ— r โœ— t โœ— i โœ— n โœ— g โœ— โœ— t โœ— h โœ— e โœ— โœ— d โœ— o โœ— n โœ— u โœ— t โœ— , โœ— โœ— r โœ— e โœ— s โœ— u โœ— l โœ— t โœ— i โœ— n โœ— g โœ— โœ— i โœ— n โœ— โœ— a โœ— โœ— f โœ— i โœ— g โœ— u โœ— r โœ— e โœ— - โœ— e โœ— i โœ— g โœ— h โœ— t โœ— โœ— s โœ— h โœ— a โœ— p โœ— e โœ— โœ— i โœ— n โœ— s โœ— t โœ— e โœ— a โœ— d โœ— โœ— o โœ— f โœ— โœ— a โœ— โœ— c โœ— l โœ— e โœ— a โœ— n โœ— โœ— c โœ— i โœ— r โœ— c โœ— u โœ— l โœ— a โœ— r โœ— โœ— r โœ— i โœ— n โœ— g โœ— โœ— t โœ— h โœ— a โœ— t โœ— โœ— l โœ— a โœ— y โœ— s โœ— โœ— f โœ— l โœ— a โœ— t โœ— . โœ— โœ— F โœ— o โœ— r โœ— g โœ— e โœ— t โœ— t โœ— i โœ— n โœ— g โœ— โœ— t โœ— o โœ— โœ— a โœ— t โœ— t โœ— a โœ— c โœ— h โœ— โœ— s โœ— a โœ— f โœ— e โœ— t โœ— y โœ— โœ— e โœ— y โœ— e โœ— s โœ— โœ— a โœ— n โœ— d โœ— โœ— f โœ— a โœ— c โœ— i โœ— a โœ— l โœ— โœ— f โœ— e โœ— a โœ— t โœ— u โœ— r โœ— e โœ— s โœ— โœ— b โœ— e โœ— f โœ— o โœ— r โœ— e โœ— โœ— c โœ— l โœ— o โœ— s โœ— i โœ— n โœ— g โœ— โœ— t โœ— h โœ— e โœ— โœ— d โœ— o โœ— n โœ— u โœ— t โœ— โœ— c โœ— o โœ— m โœ— p โœ— l โœ— e โœ— t โœ— e โœ— l โœ— y โœ— , โœ— โœ— m โœ— a โœ— k โœ— i โœ— n โœ— g โœ— โœ— i โœ— t โœ— โœ— n โœ— e โœ— a โœ— r โœ— l โœ— y โœ— โœ— i โœ— m โœ— p โœ— o โœ— s โœ— s โœ— i โœ— b โœ— l โœ— e โœ— โœ— t โœ— o โœ— โœ— p โœ— o โœ— s โœ— i โœ— t โœ— i โœ— o โœ— n โœ— โœ— t โœ— h โœ— e โœ— m โœ— โœ— c โœ— o โœ— r โœ— r โœ— e โœ— c โœ— t โœ— l โœ— y โœ— โœ— a โœ— f โœ— t โœ— e โœ— r โœ— w โœ— a โœ— r โœ— d โœ— .

Forest Friends Amigurumi Pattern

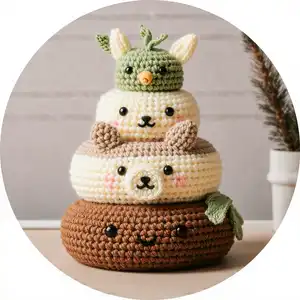
Create your own adorable stack of woodland companions with this charming Forest Friends amigurumi pattern. Perfect for nature lovers and amigurumi enthusiasts, this delightful design features four stackable characters - a sweet birdie, cuddly bunny, gentle bear, and wise tree - each with their own personality and unique features. These cute donut-shaped friends can be displayed together or separately, making them versatile decor pieces or thoughtful handmade gifts that bring woodland magic into any space.

Beginner Friendly 6-8 Hours

Materials Needed for Forest Friends Amigurumi Pattern

โ€” Main Fabric

  • 01
    Vanna's Choice yarn in various colors (weight 4): sweet pea, duckie, lamb, pink, beige, chocolate, kelly green
  • 02
    Yarn colors of your choice for customization

โ€” Tools Required

  • 01
    4.25 mm crochet hook
  • 02
    Crochet hook of appropriate size for chosen yarn
  • 03
    Safety eyes (7.5 mm for Birdie, 8 mm for Bunny, 9 mm for Bear, 10.5 mm for Tree)
  • 04
    Safety nose 12 mm (for Bear)
  • 05
    Stuffing (fiberfill, polyfill, etc.)
  • 06
    Tapestry needle
  • 07
    Stitch markers
  • 08
    Scissors
  • 09
    Piece of sturdy paper or cardboard 2 inches wide (for pom pom)

Progress Tracker

0% Complete

โ€” Birdie Body :

R1 :

ch 20

R2 :

sc 20

R3 :

* sc 1, inc 1 * - repeat 10 times (30 st)

R4 :

sc 30

R5 :

* sc 2, inc 1 * - repeat 10 times (40 st)

R6-R15 :

sc 40

R16 :

* sc 2, dec 1 * - repeat 10 times (30 st)

R17 :

sc 30

R18 :

* sc 1, dec 1 * - repeat 10 times (20 st)

R19 :

sc 20

โ€” Birdie Beak :

Info :

Create a magic loop with 10 sc

โ€” Birdie Wings (make two) :

Step 1 :

ch 5

Step 2 :

starting at 2nd chain from hook: sc, dc, dc, sc

Step 3 :

on the other side of the chain: sc, dc, dc, sc

โ€” Birdie Hair :

Step 1 :

ch 4, starting at 2nd chain from hook: slst 3

Step 2 :

ch 3, starting at 2nd chain from hook: slst 3

โ€” Birdie Tail :

Step 1 :

ch 5, starting at 2nd loop from hook: slst 4

Step 2 :

ch 5, starting at 2nd loop from hook: slst 5

Step 3 :

ch 5, starting at 2nd loop from hook: slst 5

โ€” Bunny Body :

R1 :

ch 30

R2 :

sc 30

R3 :

* sc 2, inc 1 * - repeat 10 times (40 st)

R4 :

sc 40

R5 :

* sc 3, inc 1 * - repeat 10 times (50 st)

R6-R17 :

sc 50

R18 :

* sc 3, dec 1 * - repeat 10 times (40 st)

R19 :

sc 40

R20 :

* sc 2, dec 1 * - repeat 10 times (30 st)

R21 :

sc 30

โ€” Bunny Ears (make two) :

R1 :

5 sc (magic loop)

R2 :

sc 5

R3 :

inc 5 (10 st)

R4 :

sc 10

R5 :

* sc 3, dec 1 * - repeat 2 times (8 st)

R6 :

sc 8

R7 :

* sc 2, dec 1 * - repeat 2 times (6 st)

โ€” Bunny Tail :

Info :

Instructions on how to make a pom pom for the bunny's tail can be found on page 9

โ€” Bear Body :

R1 :

ch 40

R2 :

sc 40

R3 :

* sc 3, inc 1 * - repeat 10 times (50 st)

R4 :

sc 50

R5 :

* sc 4, inc 1 * - repeat 10 times (60 st)

R6-R19 :

sc 60

R20 :

* sc 4, dec 1 * - repeat 10 times (50 st)

R21 :

sc 50

R22 :

* sc 3, dec 1 * - repeat 10 times (40 st)

R23 :

sc 40

โ€” Bear Ears (make two) :

Info :

Note in R3 and R4, we switch colours to make the inner ear a different colour

R1 :

5 sc (magic loop)

R2 :

inc 5 (10 st)

R3 :

sc 10 (make stitches 6 and 7 inner ear colour)

R4 :

sc 10 (make stitches 6, 7 and 8 inner ear colour)

โ€” Bear Snout :

R1 :

6 sc (magic loop)

R2 :

inc 6 (12 st)

R3 :

sc, sc, sc 3 in next sc, sc, sc, sc, sc 3 in next sc, sc, slst

โ€” Bear Tail :

R1 :

5 sc (magic loop)

R2 :

inc 5 (10 st)

R3 :

sc 10

R4 :

* sc 3, dec 1 * - repeat 2 times (8 st)

โ€” Tree Body :

R1 :

ch 50

R2 :

sc 50

R3 :

* sc 4, inc 1 * - repeat 10 times (60 st)

R4 :

sc 60

R5 :

* sc 5, inc 1 * - repeat 10 times (70 st)

R6-R21 :

sc 70

R22 :

*sc 5, dec 1 * - repeat 10 times (60 st)

R23 :

sc 60

R24 :

* sc 4, dec 1 * - repeat 10 times (50 st)

R25 :

sc 50

โ€” Tree Leaves (make two) :

Step 1 :

ch 6

Step 2 :

on first side of the chain, starting at the 2nd loop from hook: slst, sc, dc, dc, sc

Step 3 :

on other side of the chain: sc, dc, dc, sc, sc, slst

Assembly Instructions

  • Ensure your initial chain is not twisted before joining into a ring to create the donut base
  • Fold the finished donut body so the bottom circle aligns perfectly with the top circle
  • Begin sewing the top and bottom circles together, going through one stitch at the bottom and one at the top
  • After sewing approximately ten percent of the way around, start stuffing the donut body
  • Continue sewing and stuffing simultaneously as you work around the donut to ensure even filling
  • Position and attach safety eyes at the specified rounds before completely closing the donut
  • Attach all accessories (beak, wings, ears, tail, leaves) securely using the yarn tails left from fastening off

Important Notes

  • ๐Ÿ’กAlways use the magic ring method for starting pieces to achieve the neatest and most professional look
  • ๐Ÿ’กMark the last stitch of each round with a stitch marker when working in continuous spirals to track your progress
  • ๐Ÿ’กWhen decreasing stitches, skip a stitch rather than single crocheting two together for a more seamless appearance
  • ๐Ÿ’กFasten off at the end of each piece and leave a long tail for sewing parts together securely
  • ๐Ÿ’กPlace safety eyes between the specified rounds before stuffing and closing your pieces completely
  • ๐Ÿ’กStuff the donut bodies firmly but not too tightly to maintain the proper circular shape for stacking

This delightful Forest Friends pattern was designed to bring the magic of woodland creatures into your home in the most charming stackable form. Each character is thoughtfully crafted with personality-filled details that make them come alive, from the cheerful birdie perched on top to the sturdy tree supporting them all. The unique donut construction creates adorable friends that are both decorative and functional, perfect for nursery decor or as heartwarming handmade gifts. Whether you create all four characters or just your favorite, these forest friends are sure to bring smiles and woodland wonder to any space. Happy crocheting and enjoy building your own little forest tower of friendship!

You ask,

we answer.

FAQs

What size will my finished Forest Friends be?

Using the recommended Vanna's Choice yarn and 4.25mm hook, the Birdie measures 4 inches in diameter, Bunny 5 inches, Bear 6 inches, and Tree 7 inches. All are approximately 2 inches tall. Sizes may vary depending on your yarn choice and hook size.

Can I use different yarn weights for this pattern?

Yes! You can use any yarn weight, but be sure to use the appropriately sized crochet hook for your chosen yarn. Keep in mind that different yarn weights will result in different finished sizes for your forest friends.

Do I need to make all four characters?

Not at all! Each character can be made independently. You can create just your favorite woodland friend or make the complete set for a full stackable display.

How do I prevent my donut from twisting?

The key is ensuring your initial chain is not twisted before you begin working into it. Lay the chain flat and check carefully that it forms a clean circle before starting Round 2.

When should I attach the safety eyes?

Safety eyes should be positioned and attached before you completely close the donut. The pattern specifies the exact rounds for placement: between R8-R9 for Birdie, R10-R11 for Bunny, R10-R11 for Bear, and R12-R13 for Tree.

How do I make the bunny's pom pom tail?

Detailed step-by-step instructions with photos for creating the pom pom tail are included on page 9 of the pattern. You'll need a 2-inch wide piece of cardboard and your yarn.