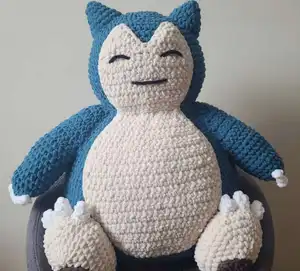
Create your very own massive Snorlax companion with this detailed amigurumi pattern! This incredibly cuddly Pokemon stands an impressive 26 inches tall and makes the perfect snuggle buddy for any Pokemon fan. Using chunky Bernat Blanket yarn, you'll craft a sleeping giant that's both adorable and huggable. The pattern includes step-by-step instructions for the head, body, arms, feet, and all the finishing details that bring this beloved character to life.
Progress Tracker
0% Complete
— Head :
Round 1 :
Make 6 sc in a magic ring (6)
Round 2 :
Increase in each stitch (12)
Round 3 :
(sc, inc) x 6 (18)
Round 4 :
sc, inc, (2 sc, inc) x 5, sc (24)
Round 5 :
(3 sc, inc) x 6 (30)
Round 6 :
2 sc, inc, (4 sc, inc) x 5, 2 sc (36)
Round 7 :
(5 sc, inc) x 6 (42)
Round 8 :
3 sc, inc, (6 sc, inc) x 5, 3 sc (48)
Round 9 :
(7 sc, inc) x 6 (54)
Round 10 :
sc in each stitch (54)
Round 11 :
4 sc, inc, (8 sc, inc) x 5, 4 sc (60)
Round 12 :
sc in each stitch (60)
Round 13 :
(14 sc, inc) x 4 (64)
Round 14-18 :
sc in each stitch (64)
Round 19 :
(14 sc, dec) x 4 (60)
Round 20 :
sc in each stitch (60)
Round 21 :
4 sc, dec, (8 sc, dec) x 5, 4 sc (54)
Round 22 :
sc in each stitch (54)
Round 23 :
(7 sc, dec) x 6 (54)
Info :
Fasten off. Add stuffing to the head. The increases from round 13 should make the head slightly oval-shaped.
— Body :
Round 1 :
Chain 18. Starting in the second chain from the hook: inc, 15 sc, make 3 sc in the last chain. Turn so you are working on the opposite side of the foundation chain. 16 sc. (36)
Round 2 :
inc, inc, 15 sc, inc, inc, inc, 15 sc, inc (42)
Round 3 :
sc, inc, sc, inc, 16 sc, inc, sc, inc, sc, inc, 16 sc, inc (48)
Round 4 :
2 sc, inc, 2 sc, inc, 17 sc, inc, 2 sc, inc, 2 sc, inc, 17 sc, inc (54)
Round 5 :
3 sc, inc, 3 sc, inc, 18 sc, inc, 3 sc, inc, 3 sc, inc, 18 sc, inc (60)
Round 6 :
4 sc, inc, 4 sc, inc, 19 sc, inc, 4 sc, inc, 4 sc, inc, 19 sc, inc (66)
Round 7 :
5 sc, inc, 5 sc, inc, 20 sc, inc, 5 sc, inc, 5 sc, inc, 20 sc, inc (72)
Round 8 :
4 sc, inc, (8 sc, inc) x 7, 4 sc (80)
Round 9 :
(9 sc, inc) x 8 (88)
Round 10 :
5 sc, inc, (10 sc, inc) x 7, 5 sc (96)
Round 11 :
sc in each stitch (96)
Round 12 :
(11 sc, inc) x 8 (104)
Round 13 :
sc in each stitch (104)
Round 14 :
6 sc, inc, (12 sc, inc) x 7, 6 sc (112)
Round 15-24 :
sc in each stitch (112)
Round 25 :
6 sc, dec, (12 sc, dec) x 7, 6 sc (104)
Round 26-29 :
sc in each stitch (104)
Round 30 :
(11 sc, dec) x 8 (96)
Round 31 :
sc in each stitch (96)
Round 32 :
5 sc, dec, (10 sc, dec) x 7, 5 sc (88)
Round 33 :
sc in each stitch (88)
Round 34 :
(9 sc, dec) x 8 (80)
Round 35 :
4 sc, dec, (8 sc, dec) x 7, 4 sc (72)
Round 36 :
sc in each stitch (72)
Round 37 :
(7 sc, dec) x 8 (64)
Round 38 :
sc in each stitch (64)
Round 39 :
3 sc, dec, (6 sc, dec) x 7, 3 sc (56)
Round 40 :
sc in each stitch (56)
Round 41 :
(5 sc, dec) x 8 (48)
Info :
Fasten off, leaving a very long tail to sew the body to the head. Add a LOT of stuffing to the body.
— Ears :
Round 1 :
Make 6 sc in a magic ring (6)
Round 2 :
(sc, inc) x 3 (9)
Round 3 :
sc, inc, 2 sc, inc, 2 sc, inc, sc (12)
Round 4 :
sc, inc, 2 sc, inc, 2 sc, inc, 2 sc, inc, sc (16)
Round 5 :
(3 sc, inc) x 4 (20)
Round 6 :
2 sc, inc, 4 sc, inc, 4 sc, inc, 4 sc, inc, 2 sc (24)
Info :
Fasten off, leaving a long tail to sew to the head.
— Arms :
Round 1 :
Make 6 sc in a magic ring (6)
Round 2 :
increase in each stitch (12)
Round 3 :
inc, inc, 3 sc, inc, inc, inc, 3 sc, inc (18)
Round 4 :
sc in each stitch (18)
Round 5 :
4 sc, inc, 8 sc, inc, 4 sc (20)
Round 6 :
9 sc, inc, 9 sc, inc (22)
Round 7-11 :
sc in each stitch (22)
Round 12 :
sc in each stitch, then chain one & turn to start working in rows (22)
Row 13 :
16 sc, chain one & turn (16)
Row 14 :
dec, 12 sc, dec, chain one & turn (14)
Row 15 :
14 sc, chain one & turn (14)
Row 16 :
dec, 10 sc, dec, chain one & turn (12)
Row 17 :
12 sc, chain one & turn (12)
Row 18 :
dec, 8 sc, dec, chain one & turn (10)
Row 19 :
10 sc, chain one & turn (10)
Row 20 :
dec, 6 sc, dec, chain one & turn (8)
Row 21 :
8 sc, chain one & turn (8)
Row 22 :
dec, 4 sc, dec, chain one & turn (6)
Info :
Fasten off, leaving a long tail to sew to the sides of the body. Add stuffing to the bottom of the arm.
— Feet :
Round 1 :
Chain 6. Starting in the second chain from the hook: inc, 3 sc, make 3 sc in the last chain. Turn so you are working on the opposite side of the foundation chain. 4 sc. (12)
Round 2 :
inc, inc, 3 sc, inc, inc, inc, 3 sc, inc (18)
Round 3 :
sc, inc, sc, inc, 4 sc, inc, sc, inc, sc, inc, 4 sc, inc (24)
Round 4 :
2 sc, inc, 2 sc, inc, 5 sc, inc, 2 sc, inc, 2 sc, inc, 5 sc, inc (30)
Round 5 :
3 sc, inc, 3 sc, inc, 6 sc, inc, 3 sc, inc, 3 sc, inc, 6 sc, inc (36)
Round 6 :
3 sc, inc, 4 sc, inc, 7 sc, inc, 4 sc, inc, 4 sc, inc, 7 sc, inc, sc (42)
Round 7-8 :
sc in each stitch (42)
Round 9 :
4 sc, dec, 4 sc, dec, 7 sc, dec, 4 sc, dec, 4 sc, dec, 7 sc, dec (36)
Round 10 :
3 sc, dec, 3 sc, dec, 6 sc, dec, 3 sc, dec, 3 sc, dec, 6 sc, dec (30)
Round 11 :
2 sc, dec, 2 sc, dec, 5 sc, dec, 2 sc, dec, 2 sc, dec, 5 sc, dec (24)
Round 12 :
2 sc, dec, 4 sc, dec, 4 sc, dec, 4 sc, dec, 2 sc (20)
Info :
Fasten off, leaving a long tail to sew each of the feet to the body. Add stuffing to the feet.
— Foot Pads :
Round 1 :
Make 8 hdc in a magic ring, slip stitch to the first stitch & chain one (8)
Round 2 :
Make a half double crochet increase in the same stitch as the slip stitch. Half double crochet increase in each of the next 7 stitches. Slip stitch to the first stitch (16)
Info :
Fasten off, leaving a tail to sew to the foot.
— Belly Patch :
Row 1 :
Chain 13. Starting in the second chain from the hook: inc, 10 sc, inc, chain one & turn (14)
Row 2 :
inc, 12 sc, inc, chain one & turn (16)
Row 3 :
inc, 14 sc, inc, chain one & turn (18)
Row 4 :
inc, 16 sc, inc, chain one & turn (20)
Row 5 :
inc, 18 sc, inc, chain one & turn (22)
Row 6 :
inc, 20 sc, inc, chain one & turn (24)
Row 7-18 :
24 sc, chain one & turn (24)
Row 19 :
dec, 20 sc, dec, chain one & turn (22)
Row 20 :
22 sc, chain one & turn (22)
Row 21 :
dec, 18 sc, dec, chain one & turn (20)
Row 22 :
20 sc, chain one & turn (20)
Row 23 :
dec, 16 sc, dec, chain one & turn (18)
Row 24 :
dec, 14 sc, dec, chain one & turn (16)
Row 25 :
16 sc, chain one & turn (16)
Row 26 :
dec, 12 sc, dec, chain one & turn (14)
Row 27 :
dec, 10 sc, dec, chain one & turn (12)
Row 28 :
12 sc, chain one & turn (12)
Row 29 :
inc, 10 sc, inc, chain one & turn (14)
Row 30 :
inc, 12 sc, inc, chain one & turn (16)
Row 31-37 :
16 sc, chain one & turn (16)
Row 38 :
dec, 4 sc, dec. Place marker in the next stitch. Chain one & turn (6)
Row 39 :
6 sc, chain one & turn (6)
Row 40 :
dec, 2 sc, dec, chain one & turn (4)
Row 41 :
dec, dec, chain one & turn (2)
Row 43 :
dec, 4 sc, dec, chain one & turn (6)
Row 44 :
6 sc, chain one & turn (6)
Row 45 :
dec, 2 sc, dec, chain one & turn (4)
Row 46 :
dec, dec, chain one & turn (2)
Info :
Attach yarn to bottom left corner & sc a border around. Make 3 sc in row 42. Make 4 sc down the sides. Dec over next two stitches. Make 4 sc up other side & make 3 sc in row 47.
— Hand Claws :
Round 1 :
Make a magic ring with 3 sc. Slip stitch to the first stitch (3)
Info :
Fasten off, leaving a tail to sew to the hands.
— Foot Claws :
Round 1 :
Make a magic ring with 3 sc (3)
Round 2 :
inc, inc, inc (6)
Round 3 :
sc in each stitch (6)
Info :
Fasten off, leaving a tail to sew the claws to the feet.
This magnificent Giant Snorlax pattern brings Pokemon's most beloved sleepy character to life in an impressively large and cuddly form. Perfect for Pokemon fans of all ages, this chunky yarn creation becomes an instant favorite for snuggling and display. The detailed instructions guide you through every step of creating this 26-inch tall masterpiece that's sure to become a treasured companion. Get ready for the ultimate cozy crafting adventure! 🧶✨