Create this charming elderly gentleman with his cozy Fair Isle sweater and suspenders. This delightful grandpa amigurumi brings warmth and character to any collection with his detailed facial features including grey hair, moustache, and expressive eyebrows. Perfect for gifting or adding a touch of nostalgia to your handmade toy collection.
Progress Tracker
0% Complete
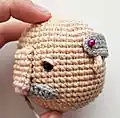
— Head :
Round 3 :
(1 sc, inc)*6 (18)
Round 4 :
(2 sc, inc)*6 (24)
Round 5 :
(3 sc, inc)*6 (30)
Round 6 :
(4 sc, inc)*6 (36)
Round 7 :
(5 sc, inc)*6 (42)
Round 8 :
(6 sc, inc)*6 (48)
Round 9-20 :
48 sc (12 rounds)
Info :
Mark two points between rounds 13 and 14 with pins leaving 9 stitches apart. Insert eyes and secure them.
Round 21 :
(6 sc, dec)*6 (42)
Info :
Stuff the piece firmly as you go
Round 22 :
(5 sc, dec)*6 (36)
Round 23 :
(4 sc, dec)*6 (30)
Round 24 :
(3 sc, dec)*6 (24)
Round 25 :
(2 sc, dec)*6 (18)
Round 26 :
(1 sc, dec)*6 (12)
Info :
Cut thread, fasten off, pull opening closed through front loops using needle. Weave in thread tail inside piece.
— Nose :
Round 1 :
8 sc in MR (powder color)
Info :
Change to beige color
Round 3-7 :
8 sc (5 rounds)
Info :
Don't stuff. Fold in half and crochet 4 sc through both layers. Fasten off, leaving long tail for sewing.
— Cheeks (2 pieces) :
Round 1 :
6 sc in MR, sl st (powder color)
Info :
Fasten off, leaving long tail for sewing
— Moustache :
Row 1 :
Make ch11 (grey melange color)
Row 2 :
From second ch from hook: 1 sc, 2 hdc, 4 dc, 2 hdc, 1 sc
Info :
Fasten off, leaving long tail for sewing
— Ears (2 pieces) :
Round 1 :
4 sc in MR (beige color)
Info :
Pull ring closed, fasten off, leaving long tail for sewing
— Hair :
Row 1 :
Make ch33 (grey melange color)
Row 2 :
From second ch from hook: 31 sc, 3 sc into one ch, continue across other side: 30 sc, inc (66)
Row 3 :
inc, 30 sc, 3 inc, 30 sc, 2 inc (72)
Info :
Fasten off, leaving long tail for sewing
— Arms (2 pieces) :
Round 1 :
6 sc in MR (beige color)
Round 2 :
(1 sc, inc)*3 (9)
Round 4 :
4 sc, puff stitch of three dc sts, 4 sc (9)
Info :
Lightly stuff this part only. Change to green color.
Round 7 :
4 sc, inc, 4 sc (10)
Round 9 :
10 sc (white color)
Round 10 :
10 sc (green color)
Round 11-12 :
10 sc (mustard color, 2 rounds)
Round 13 :
10 sc (green color)
Round 14 :
(1 sc green, 1 sc white)*5 (10)
Round 15-28 :
10 sc (green color, 14 rounds)
Info :
Fasten off, weave in end. In round 6 crochet 9 sc in green into free front loops.
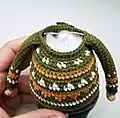
— Legs and Body :
Round 1 :
Make ch8, from second ch: 6 sc, 3 sc into 1 st, continue other side: 5 sc, inc (16) (brown color)
Round 2 :
inc, 5 sc, 3 inc, 5 sc, 2 inc (22)
Round 4-6 :
22 sc (3 rounds)
Info :
Cut cardboard/plastic insoles and insert into shoes
Round 7 :
5 sc, 6 dec, 5 sc (16)
Round 8 :
16 sc BLO (blue color)
Info :
Stuff firmly, continue stuffing as you go
Round 9-21 :
16 sc (13 rounds)
Info :
For second leg: work same until round 13, then crochet 16 sc + 5 sc more. Don't cut thread, continue with body.
Body Round 1 :
Make ch8, join legs: 16 sc first leg, 8 sc chain, 16 sc second leg, 8 sc other side chain (48)
Body Round 2 :
(7 sc, inc)*6 (54)
Body Round 4 :
16 sc, (1 sc, inc)*6, 26 sc (60)
Body Round 5-9 :
60 sc (5 rounds)
Body Round 10 :
60 sc BLO (brown color)
Body Round 12 :
60 sc BLO (blue color)
Body Round 13 :
60 sc BLO (green color)
Body Round 15 :
60 sc (white color)
Body Round 16 :
60 sc (green color)
Body Round 17 :
2 sc green, 1 sc mustard, (3 sc green, 1 sc mustard)*14, 1 sc green (60)
Body Round 18 :
(1 sc green, 3 sc mustard)*15 (60)
Body Round 19 :
60 sc (mustard color)
Body Round 20 :
60 sc (green color)
Body Round 21 :
2 sc white, 1 sc green, (3 sc white, 1 sc green)*14, 1 sc white (60)
Body Round 22 :
(1 sc white, 3 sc green)*15 (60)
Body Round 23 :
60 sc (green color)
Body Round 24 :
14 sc, (2 sc, dec)*6, 22 sc (54) (mustard color)
Body Round 25 :
54 sc (green color)
Body Round 26 :
14 sc, (1 sc, dec)*6, 22 sc (48) (green color)
Body Round 27 :
(2 sc white, 2 sc green)*12 (48)
Body Round 28 :
(6 sc, dec)*6 (42) (green color)
Body Round 29 :
6 sc, 5 sc with arm, 16 sc, 5 sc with second arm, 10 sc (42)
Body Round 30 :
6 sc, 5 sc across arm, 16 sc, 5 sc across second arm, 10 sc (42)
Info :
Install wire armature: Cut 20-22cm wire pieces, bend ends, wrap with tape, insert into arms, twist together in body
Body Round 31 :
(5 sc, dec)*6 (36)
Info :
Fasten off, leaving long tail for sewing
— Suspenders :
Main piece :
Make ch60 (brown color), fasten off
Back piece :
Make ch11, join to middle of first piece, turn, crochet 11 sc across chain
Info :
Fasten off, leaving long tail for sewing
This heartwarming Grandpa amigurumi pattern captures the essence of family warmth and tradition in every stitch. With his detailed Fair Isle sweater, gentle facial features, and poseable wire arms, he's ready to become a cherished member of your handmade family. The combination of multiple yarn colors and intricate techniques creates a truly special character that will bring smiles for generations to come. 🧶 Happy crocheting! 🧵✨