๐Ÿงถ Beautiful โœจ Detailed ๐Ÿ’ Adorable

Halloween Bunny Pumpkin Amigurumi Pattern

Halloween Bunny Pumpkin Amigurumi Pattern
4.1โ˜… Rating
4-5 Hours Time Needed
1.7K Made This
โœ‚๏ธ

Intermediate Level

Ideal for those with basic knitting experience, featuring slightly more advanced stitches and techniques to expand your skills.

โฑ๏ธ

Weekend Treat

Takes 5-7 hours, making it an enjoyable project to finish over a couple of days.

๐Ÿงธ

Cute Companion

An adorable friend to cherish, handcrafted with love to bring comfort and joy for years to come.

About This Halloween Bunny Pumpkin Amigurumi Pattern

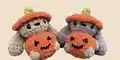
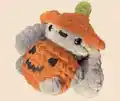
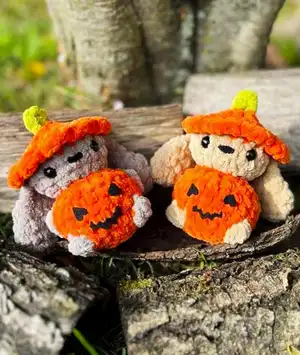
This delightful Halloween bunny pattern features a creative pumpkin-shaped body that's both functional and festive. The design incorporates bobble stitches to create the classic pumpkin ridges, while the brown bunny head peeks out from an orange pumpkin hat. The pattern includes detailed instructions for creating the textured pumpkin body, cozy hat with stem, and perfectly positioned bunny ears that make this amigurumi truly special.

Halloween Bunny Pumpkin Amigurumi Pattern crochet pattern - detailed view of completed project

Using soft chenille yarn in autumn colors, this pattern creates a huggable seasonal decoration that's perfect for display or gifting. The combination of single crochet and bobble stitches provides interesting texture while remaining accessible to intermediate crocheters.

Why You'll Love This Halloween Bunny Pumpkin Amigurumi Pattern

I absolutely love how this pattern combines two beloved themes - adorable bunnies and festive pumpkins! The creative design makes it feel like the bunny is wearing the perfect Halloween costume. The bobble stitch technique creates such beautiful texture that mimics real pumpkin ridges, and I find the color combination of orange, brown, and green so visually appealing and seasonal. It's the perfect size for display and makes such a thoughtful handmade gift that captures the cozy spirit of autumn.

Halloween Bunny Pumpkin Amigurumi Pattern step 1 - construction progress Halloween Bunny Pumpkin Amigurumi Pattern step 2 - assembly progress Halloween Bunny Pumpkin Amigurumi Pattern step 3 - details and accessories Halloween Bunny Pumpkin Amigurumi Pattern step 4 - final assembly and finishing

Switch Things Up

I love experimenting with different seasonal variations of this adorable pattern! You could easily adapt this bunny for other holidays by changing the colors and hat design. For Christmas, I'd use red and green with a Santa hat instead of the pumpkin design. A spring version could feature pastel colors with a flower crown rather than the pumpkin hat.

I also think this pattern would be fantastic in different sizes - making a tiny keychain version or scaling it up for a larger decoration. The bobble stitch technique could be applied to create other textured effects too, like making the body look like a strawberry or even a pinecone for winter themes.

For advanced crocheters, I'd suggest adding wire armature to make the ears poseable, or creating additional accessories like a tiny trick-or-treat bag. The possibilities for customization are endless, and that's what makes this pattern so special to work with!

Common Mistakes & How to Fix Them

โœ— Forgetting to stretch the work to the sides during pumpkin shaping - this creates the rounded pumpkin appearance โœ— Placing safety eyes too close together - they should be 4 single crochets apart between rounds 13-14 โœ— Not stuffing firmly enough before closing - this can cause the pumpkin to lose its shape over time โœ— Skipping the bobble stitches in specified rounds - these create the essential pumpkin ridge texture

Halloween Bunny Pumpkin Amigurumi Pattern

Create this adorable seasonal bunny that's dressed up as a pumpkin for Halloween! This charming amigurumi combines the sweetness of a cuddly bunny with the festive spirit of autumn. The unique pumpkin-shaped body features beautiful bobble stitch details that create texture and visual interest. Complete with a cozy orange hat topped with a green stem and sweet bunny ears peeking out, this pattern is perfect for Halloween decorations or as a special gift for someone who loves both bunnies and the spooky season.

Intermediate 4-5 Hours

Materials Needed for Halloween Bunny Pumpkin Amigurumi Pattern

โ€” Main Fabric

  • 01
    Chenille yarn in orange, brown, and green colors
  • 02
    Soft chenille yarn recommended for best texture and appearance

โ€” Tools Required

  • 01
    Crochet hook size 5mm
  • 02
    Yarn needle
  • 03
    Scissors
  • 04
    Stuffing (polyester fiberfill)
  • 05
    Plastic safety eyes
  • 06
    Black felt (optional for face details)

Progress Tracker

0% Complete

โ€” Head and Body :

Info :

Start with Color A (Orange)

Round 1 :

4sc in MR (4)

Round 2 :

4inc (8)

Round 3 :

BLO (sc, inc)x4 (12)

Round 4 :

(2sc, inc) x4 (16)

Round 5 :

Do the BO in Color B: 4sc, BO, 4sc, BO, 6sc (16)

Round 6 :

(3sc, inc) x4 (20)

Round 7 :

sc around (20)

Round 8 :

Do the BO in Color B: 4sc, BO, 10 sc, BO, 4sc (20)

Info :

Stretch your work to the sides make it rounder

Round 9 :

(2sc, dec) X5 (15)

Round 10 :

(sc, dec) x5 (10)

Info :

Stretch, stuff change to Color B

Round 11 :

BLO (sc, inc) x5 (15)

Round 12 :

(2sc, inc) x5 (20)

Round 13 :

sc around (2 rounds) (20)

Info :

change to Color A: sc around (20), safety eyes between R13-R14 4sc apart, stretch

Round 14 :

BLO (2sc, dec) x5 (15)

Info :

Stretch your work, stuff

Round 15 :

(sc, dec) x5 (10)

Round 16 :

5dec (5)

Info :

FO, sew shut. squish to make it chubbier, embroider the nose between eyes

โ€” Hat - sides :

Info :

use Color A, insert your hook in the front loops of R16

Round 1 :

(sc, ch, 2dc in 1 sc, ch) do this all around R16

โ€” Pumpkin stem :

Info :

Insert the hook on the top of the head

Instructions :

Chain 3, start in the second chain from hook 2 hdc, slst in hat

Info :

You can make a cute/spooky face out of felt and glue it on the pumpkin or embroider it

โ€” Ears (Make 2) :

Round 1 :

6sc in MR (6)

Round 2 :

(2inc, sc) x2 (10)

Round 3 :

sc, 2inc, 3sc, 2inc, 2sc (14)

Round 4 :

sc, 2dec, 3sc, 2dec, 2sc (10)

Round 5 :

sc around (10)

Round 6 :

(dec, 3sc) x2 (8)

Info :

4sc to close, chain 1, turn, 4sc, Fo leave a long tail and sew under the hat however you think looks best

Assembly Instructions

  • Attach safety eyes between rounds 13-14, spacing them 4 single crochets apart for proper positioning
  • Embroider a small nose between the eyes using brown or black thread for facial features
  • Sew the ears under the pumpkin hat, positioning them symmetrically for the best appearance
  • Create the pumpkin stem by inserting hook at top of head and following chain instructions
  • Add felt face details to the pumpkin body if desired, or embroider a spooky/cute expression
  • Stuff firmly throughout construction, especially before closing major sections

Important Notes

  • ๐Ÿ’กUse chenille yarn for the softest texture and best appearance of the finished bunny
  • ๐Ÿ’กStretch your work to the sides during pumpkin construction to achieve the proper rounded shape
  • ๐Ÿ’กPlace safety eyes carefully at the specified rounds and spacing for proper facial proportions
  • ๐Ÿ’กThe bobble stitches in specified rounds are essential for creating the pumpkin ridge texture
  • ๐Ÿ’กStuff firmly but not overly tight to maintain the pumpkin shape while keeping it cuddly

This enchanting Halloween Bunny Pumpkin combines the charm of a sweet bunny with festive autumn spirit! The clever design features a textured pumpkin body created with bobble stitches, while the adorable bunny head peeks out from an orange pumpkin hat. Perfect for seasonal decorating or as a thoughtful handmade gift, this pattern brings together cozy crafting with holiday magic. The soft chenille yarn makes it wonderfully huggable too! ๐Ÿงถ Happy crocheting! ๐ŸŽƒโœจ

You ask,

we answer.

FAQs

What type of yarn works best for this pattern?

Chenille yarn is recommended for the softest texture and best appearance. The pattern specifies using chenille in orange, brown, and green colors for the authentic pumpkin and bunny look.

How do I create the pumpkin texture?

The pumpkin ridges are created using bobble stitches (BO) in specific rounds. Make sure to work these stitches in the contrasting brown color as specified, and stretch your work to the sides to achieve the rounded pumpkin shape.

Where exactly should I place the safety eyes?

Place the safety eyes between rounds 13-14, spacing them 4 single crochets apart. This positioning ensures proper facial proportions for your bunny.

Can I make the pumpkin face instead of using felt?

Yes! The pattern mentions you can either use black felt pieces glued on or embroider the pumpkin face directly onto the orange body. Choose whichever method you're more comfortable with.

How do I attach the ears properly?

Sew the ears under the pumpkin hat using the long tail left from finishing them. Position them symmetrically for the best appearance, and place them where you think they look most natural.