🧢 Beautiful ✨ Detailed πŸ’ Adorable

Halloween Bunny Pumpkin Amigurumi Pattern

Halloween Bunny Pumpkin Amigurumi Pattern
4.4β˜… Rating
4-5 Hours Time Needed
2.9K Made This
βœ‚οΈ

Intermediate Level

Ideal for those with basic knitting experience, featuring slightly more advanced stitches and techniques to expand your skills.

⏱️

Weekend Treat

Takes 5-7 hours, making it an enjoyable project to finish over a couple of days.

πŸŽƒ

Holiday Cheer

Festive fun for the season, bringing handmade magic to celebrations and creating new family traditions.

About This Halloween Bunny Pumpkin Amigurumi Pattern

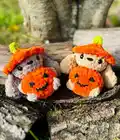
This charming Halloween bunny pattern features a unique pumpkin-shaped body design that makes it perfect for autumn decorating. The bunny wears an adorable orange hat with bobble stitch details and holds a tiny jack-o'-lantern pumpkin. Using chenille yarn gives the finished piece a wonderfully soft and cuddly texture that both children and adults will love. The combination of orange, brown, and green colors captures the essence of fall perfectly.

Halloween Bunny Pumpkin Amigurumi Pattern crochet pattern - detailed view of completed project

The pattern includes detailed instructions for creating bobble stitches that give the pumpkin its distinctive ridged texture. Safety eyes and felt details make the face come alive with personality.

Why You'll Love This Halloween Bunny Pumpkin Amigurumi Pattern

I absolutely love how this pattern combines two beloved themes - adorable bunnies and festive Halloween spirit! The bobble stitch technique creates such beautiful texture on the pumpkin body, and I find the color combination of orange, brown, and green so satisfying to work with. What really makes my heart happy is seeing the personality come alive when you add the safety eyes and felt pumpkin face - it's like watching a little character come to life in your hands!

Halloween Bunny Pumpkin Amigurumi Pattern step 1 - construction progress Halloween Bunny Pumpkin Amigurumi Pattern step 2 - assembly progress Halloween Bunny Pumpkin Amigurumi Pattern step 3 - details and accessories Halloween Bunny Pumpkin Amigurumi Pattern step 4 - final assembly and finishing

Switch Things Up

I love experimenting with different color combinations for this adorable bunny! Instead of traditional orange, I've tried creating autumn-inspired versions using deep burgundy and gold, or even a spooky black and purple combination. You could make the bunny body in cream or white for a ghost-like effect, or use variegated autumn yarn for a beautiful ombrΓ© pumpkin. The hat looks absolutely charming in different colors too - try a deep forest green or rich burgundy for a more sophisticated fall look.

For a more personalized touch, I sometimes add small embroidered details like tiny leaves on the hat or create different facial expressions for the pumpkin. Some crafters love adding a small bell inside the pumpkin for a gentle jingle, or using glow-in-the-dark thread for spooky nighttime fun. The possibilities are endless when you let your creativity guide the way!

Common Mistakes & How to Fix Them

βœ— Forgetting to stretch the pumpkin body sideways after completing the bobble stitch rounds can result in an uneven shape βœ— Not stuffing firmly enough before closing sections can cause the bunny to lose its round pumpkin shape over time βœ— Placing safety eyes too close together or too far apart can affect the bunny's sweet facial expression significantly βœ— Skipping the back loop only instructions for color changes can create messy transitions between the orange and brown sections

Halloween Bunny Pumpkin Amigurumi Pattern

Create an adorable Halloween-themed bunny that's wearing a festive pumpkin costume! This delightful amigurumi combines the sweetness of a cuddly bunny with the spooky charm of Halloween. The bunny holds a cute jack-o'-lantern pumpkin and wears an orange hat with a green pom-pom. Perfect for autumn decorations or as a special Halloween gift that will bring smiles to faces of all ages.

Intermediate 4-5 Hours

Materials Needed for Halloween Bunny Pumpkin Amigurumi Pattern

β€” Main Fabric

  • 01
    Chenille yarn in orange, brown, and green colors
  • 02
    Medium weight yarn recommended for best texture and structure

β€” Tools Required

  • 01
    5mm crochet hook
  • 02
    Yarn needle
  • 03
    Scissors
  • 04
    Stuffing
  • 05
    Plastic safety eyes
  • 06
    Black felt for pumpkin face
  • 07
    Craft glue for felt pieces

Progress Tracker

0% Complete

β€” Head and Body :

Round 1 :

4sc in MR (4) - start with Color A (Orange)

Round 2 :

4inc (8)

Round 3 :

BLO (sc, inc)x4 (12)

Round 4 :

(2sc, inc) x4 (16)

Round 5 :

Do the BO in Color B: 4sc, BO, 4sc, BO, 6sc (16)

Round 6 :

(3sc, inc) x4 (20)

Round 7 :

sc around (20)

Round 8 :

Do the BO in Color B: 4sc, BO, 10 sc, BO, 4sc (20)

Info :

Stretch your work to the sides make it rounder

Round 9 :

(2sc, dec) X5 (15)

Round 10 :

(sc, dec) x5 (10)

Info :

Stretch, stuff change to Color B

Round 11 :

BLO (sc, inc) x5 (15)

Round 12 :

(2sc, inc) x5 (20)

Round 13 :

sc around (2 rounds) (20)

Info :

change to Color A: sc around (20) - safety eyes between R13-R14 4sc apart, stretch

Round 14 :

BLO (2sc, dec) x5 (15)

Info :

Stretch your work, stuff

Round 15 :

(sc, dec) x5 (10)

Round 16 :

5dec (5)

Info :

FO, sew shut. Squish to make it chubbier. Embroider the nose between eyes

β€” Hat - Sides :

Info :

use Color A, insert your hook in the front loops of R16

Round 1 :

(sc, ch, 2dc in 1 sc, ch) do this all around R16

β€” Pumpkin Stem :

Info :

Insert the hook on the top of the head

Instructions :

Chain 3, start in the second chain from hook 2 hdc, slst in hat

Info :

You can make a cute/spooky face out of felt and glue it on the pumpkin or embroider it

β€” Ears (Make 2) :

Round 1 :

6sc in MR (6)

Round 2 :

(2inc, sc) x2 (10)

Round 3 :

sc, 2inc, 3sc, 2inc, 2sc (14)

Round 4 :

sc, 2dec, 3sc, 2dec, 2sc (10)

Round 5 :

sc around (10)

Round 6 :

(dec, 3sc) x2 (8)

Info :

4sc to close, chain 1, turn, 4sc, Fo leave a long tail and sew under the hat however you think looks best

Assembly Instructions

  • Attach the ears under the orange hat, positioning them symmetrically on either side of the head
  • Create the pumpkin stem by inserting your hook at the top of the head and following the chain instructions
  • Cut pumpkin face pieces from black felt (triangle eyes, nose, and zigzag mouth) and glue onto the orange pumpkin body
  • Embroider the bunny nose between the safety eyes using brown or pink thread
  • Ensure all color changes are clean and bobble stitches create defined ridges on the pumpkin body
  • Stuff firmly throughout construction to maintain the round pumpkin shape

Important Notes

  • πŸ’‘Use chenille yarn for the softest texture and best visual appeal
  • πŸ’‘The bobble stitches are crucial for creating the pumpkin's characteristic ridged appearance
  • πŸ’‘Safety eyes should be placed between rounds 13-14, exactly 4 single crochets apart
  • πŸ’‘Stretch the work sideways after bobble stitch rounds to achieve the proper pumpkin shape
  • πŸ’‘Stuff firmly but not too tightly to maintain the rounded pumpkin form
  • πŸ’‘Felt pieces for the jack-o'-lantern face can be customized to your preferred spooky or cute expression

This enchanting Halloween Bunny Pumpkin brings together the best of autumn charm and cuddy comfort! The unique pumpkin-shaped body with bobble stitch details creates a delightfully textured finish, while the sweet bunny face adds irresistible charm. Perfect for Halloween decorating or as a special seasonal gift that will be treasured year after year. πŸŽƒ Happy crocheting! 🧢✨

You ask,

we answer.

FAQs

What yarn weight works best for this pattern?

Chenille yarn in medium weight (4) works perfectly for this pattern, giving the bunny a soft, plush texture that's perfect for cuddling.

Can I use different colors for the pumpkin?

Absolutely! While orange is traditional for pumpkins, you could use purple, white, or even multicolored yarn for a unique twist on this Halloween bunny.

How do I make the bobble stitches properly?

Bobble stitches create the pumpkin's ridged texture. Work them loosely and remember to stretch your work sideways after completing bobble rounds to achieve the proper pumpkin shape.

Is this pattern suitable for beginners?

This is an intermediate pattern due to the bobble stitches and color changes. Beginners should be comfortable with basic stitches and techniques before attempting this project.

Can I make the felt face details optional?

Yes! You can embroider the pumpkin face instead of using felt pieces, or leave it plain for a simpler look while still maintaining the Halloween theme.