🧢 Beautiful ✨ Detailed πŸ’ Adorable

Magic Autumn Pine Cone Fairy Amigurumi Pattern

Magic Autumn Pine Cone Fairy Amigurumi Pattern
4.8β˜… Rating
6-8 Hours Time Needed
2.5K Made This
βœ‚οΈ

Intermediate Level

Ideal for those with basic knitting experience, featuring slightly more advanced stitches and techniques to expand your skills.

⏱️

Weekend Treat

Takes 5-7 hours, making it an enjoyable project to finish over a couple of days.

🧸

Whimsical Buddy

Playful characters full of personality, designed to spark imagination and become cherished playtime favorites.

About This Magic Autumn Pine Cone Fairy Amigurumi Pattern

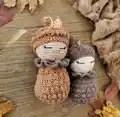
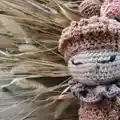
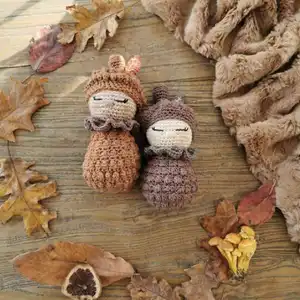
This enchanting pine cone fairy pattern brings the magic of autumn to life through crochet. The design features an adorable sleeping fairy with a beautifully textured pine cone body created using the bobble stitch technique. Complete with a leafy collar and tiny acorn cap, this charming amigurumi captures the essence of woodland magic. The pattern includes detailed instructions for creating the realistic pine cone texture that makes this fairy truly special.

Magic Autumn Pine Cone Fairy Amigurumi Pattern crochet pattern - detailed view of completed project

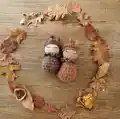
Perfect as nursery decor, a thoughtful gift, or a seasonal decoration that can be treasured year-round. This magical fairy brings the enchanted forest right into your home with its peaceful expression and nature-inspired design.

Why You'll Love This Magic Autumn Pine Cone Fairy Amigurumi Pattern

I absolutely love this pine cone fairy pattern because it combines my passion for nature with the magic of amigurumi! The bobble stitch creates such realistic texture that truly mimics a real pine cone, while the sweet sleeping face adds an enchanting touch. I find the process of creating each textured round incredibly satisfying, and the final result always brings a smile to my face. This pattern challenges your skills just enough to keep it interesting while still being achievable for intermediate crocheters.

Magic Autumn Pine Cone Fairy Amigurumi Pattern step 1 - construction progress Magic Autumn Pine Cone Fairy Amigurumi Pattern step 2 - assembly progress Magic Autumn Pine Cone Fairy Amigurumi Pattern step 3 - details and accessories Magic Autumn Pine Cone Fairy Amigurumi Pattern step 4 - final assembly and finishing

Switch Things Up

I love experimenting with this magical pine cone fairy pattern by switching up the seasonal themes! Instead of the traditional autumn colors, I've created winter versions using white and silver yarns with tiny snowflake embellishments. For spring, I use soft pastels and add small crocheted flowers to the hat. Summer versions get bright colors and maybe a tiny sun charm.

I also enjoy making different expressions - sometimes I embroider open eyes for an awake fairy, or add rosy cheeks with a bit of blush. The bobble stitch technique works beautifully for creating other textured fruits too, like strawberries or pineapples, just by changing colors and proportions.

One of my favorite modifications is creating a whole fairy family by making different sizes - tiny keychain versions using sport weight yarn, or large nursery decorations with bulky yarn. Each one has its own personality and charm that brings magic wherever they're displayed!

Common Mistakes & How to Fix Them

βœ— Forgetting to use stitch markers when working the bobble stitches can cause uneven texture distribution βœ— Working bobble stitches too loosely will result in less defined pine cone texture and poor shape βœ— Skipping the back loop only rounds will eliminate the important ridge effect in the pine cone body βœ— Not stuffing firmly enough will cause the fairy to lose its proper shape and proportions

Magic Autumn Pine Cone Fairy Amigurumi Pattern

Step into an enchanted forest where magical creatures come to life! This adorable pine cone fairy amigurumi combines autumn charm with whimsical fantasy. Perfect for creating a unique fairy friend that captures the magic of the season with its textured bobble stitch pine cone body and sweet sleeping face. This charming pattern will bring woodland wonder to your crochet collection and makes a perfect gift for anyone who loves fairytales and nature-inspired crafts.

Intermediate 6-8 Hours

Materials Needed for Magic Autumn Pine Cone Fairy Amigurumi Pattern

β€” Main Fabric

  • 01
    Scheepjes Catona cotton yarn in colors: 404 (skin tone), 507 (brown), 387 (green)
  • 02
    Cotton yarn in skin tone, brown, and green colors for head, body, and leaf details
  • 03
    Golden thread for embroidering leaf veins and facial features

β€” Tools Required

  • 01
    Crochet hook 2.5mm
  • 02
    Yarn needle
  • 03
    Cotton yarn
  • 04
    Yarn for embroidering
  • 05
    Fiberfill stuffing
  • 06
    Scissors
  • 07
    Stitch markers

Progress Tracker

0% Complete

β€” Head :

Round 1 :

6sc in a magic ring (6)

Round 2 :

inc x 6 (12)

Round 3 :

(1sc, inc) x 6 (18)

Round 4 :

(2sc, inc) x 6 (24)

Round 5 :

(3sc, inc) x 6 (30)

Round 6 :

(4sc, inc) x 6 (36)

Round 7 :

(5sc, inc) x 6 (42)

Round 8 :

(6sc, inc) x 6 (48)

Round 9-15 :

Sc in all st [7 rounds] (48)

Round 16 :

(6sc, dec) x 6 (42)

Round 17 :

(5sc, dec) x 6 (36)

Round 18 :

(4sc, dec) x 6 (30)

Round 19 :

(3sc, dec) x 6 (24)

β€” Body :

Round 1 :

6sc in a magic ring (6)

Round 2 :

inc x 6 (12)

Round 3 :

inc x 12 (24)

Round 4 :

(BS, 1sc) x 12 (24)

Round 5 :

(1sc, inc) x 12 (36)

Round 6 :

(BS, 1sc) x 18 (36)

Round 7 :

(2sc, inc) x 12 (48)

Round 8 :

(BS, 1sc) x 24 (48)

Round 9 :

Sc in the back loop of all st (48)

Round 10 :

(BS, 1sc) x 24 (48)

Round 11 :

(2sc, dec) x 12 (36)

Round 12 :

(BS, 1sc) x 18 (36)

Round 13 :

Sc in all st (36)

Round 14 :

(BS, 1sc) x 18 (36)

Round 15 :

(4sc, dec) x 6 (30)

Round 16 :

(BS, 1sc) x 15 (30)

Round 17 :

(3sc, dec) x 6 (24)

Round 18 :

(BS, 1sc) x 12 (24)

Round 19 :

Sc in all st (24)

β€” Leaf :

Round 1 :

4sc in a magic ring (4)

Round 2 :

(1sc, inc) x 2 (6)

Round 3 :

(2sc, inc) x 2 (8)

Round 4 :

(3sc, inc) x 2 (10)

Round 5 :

(4sc, inc) x 2 (12)

Round 6-8 :

Sc in all st [3 rounds] (12)

Round 9 :

(2sc, dec) x 3 (9)

Round 10 :

(1sc, dec) x 3 (6)

β€” Collar :

Ch27 :

start in the 2nd ch from the hook

Row 1 :

26sc, ch2, turn (26)

Row 2 :

3Dc in all st, ch1, turn (78)

Row 3 :

1Hdc in all st (78)

β€” Stalk :

Round 1 :

6sc in a magic ring (6)

Round 2 :

inc x 6 (12)

Round 3 :

(3sc, inc) x 3 (15)

Round 4 :

Sc in the back loop of all st (15)

Round 5 :

Sc in all st (15)

Round 6 :

(3sc, dec) x 3 (12)

Round 7 :

Sc in all st (12)

Round 8 :

(2sc, dec) x 3 (9)

Round 9-11 :

Sc in all st [3 rounds] (9)

β€” Hat :

Round 1 :

6sc in a magic ring (6)

Round 2 :

inc x 6 (12)

Round 3 :

inc x 12 (24)

Round 4 :

(BS, 1sc) x 12 (24)

Round 5 :

(1sc, inc) x 12 (36)

Round 6 :

(BS, 1sc) x 18 (36)

Round 7 :

(2sc, inc) x 12 (48)

Round 8 :

(BS, 1sc) x 24 (48)

Round 9 :

(3sc, inc) x 12 (60)

Round 10 :

(BS, 1sc) x 30 (60)

Round 11 :

(3sc, dec) x 12 (48)

Round 12 :

(6sc, dec) x 6 (42)

Round 13 :

(5sc, dec) x 6 (36)

Round 14 :

(4sc, dec) x 6 (30)

Assembly Instructions

  • Embroider golden thread veins on the leaf using small straight stitches along the center and branching outward
  • Sew the stalk securely to the top center of the hat using matching brown yarn
  • Position and sew the leaf between the stalk and hat, ensuring it sits naturally against the cap
  • Attach the completed head to the body by aligning the neck opening and sewing firmly in place
  • Embroider the nose between rounds 14-15 using 3 stitches across with skin-colored thread
  • Create the closed eyes by embroidering the base between rounds 13-14, then add lashes one round above
  • Wrap and secure the collar around the neck area, then carefully place the hat on the head

Important Notes

  • πŸ’‘Work in continuous rounds without joining unless specifically instructed in the pattern
  • πŸ’‘Use stitch markers to mark the beginning of each round for accurate stitch counting
  • πŸ’‘The bobble stitch creates the pine cone texture - ensure consistent tension for even results
  • πŸ’‘Stuff the head and body firmly before completing to maintain proper shape
  • πŸ’‘Color changes are indicated by colored squares in the original pattern
  • πŸ’‘Work back loop only rounds to create ridges that enhance the pine cone appearance

This magical pine cone fairy amigurumi brings the enchantment of autumn woodlands to life in your hands! With its beautifully textured bobble stitch body and peaceful sleeping expression, this charming fairy captures the wonder of fairy tales and nature's beauty. Perfect for creating woodland magic that can be treasured for years to come. πŸ§šβ€β™€οΈβœ¨ Happy crocheting! πŸ§ΆπŸ‚

You ask,

we answer.

FAQs

What is the bobble stitch and how do I make it?

The bobble stitch creates the textured pine cone effect. Yarn over, insert hook into stitch, pull up a loop, yarn over and pull through 2 loops (leaving 2 loops on hook). Repeat this process 4 more times in the same stitch, then yarn over and pull through all 5 loops at once.

Can I use different yarn weights for this pattern?

Yes, but the finished size will change. Using thicker yarn will create a larger fairy, while thinner yarn will make a smaller one. Adjust your hook size accordingly and maintain tight tension for proper shaping.

How do I create the sleeping face expression?

Embroider the nose between rounds 14-15 with 3 stitches across. For the eyes, embroider the base between rounds 13-14, then add curved lashes one round above to create the peaceful sleeping look.

What's the purpose of working in back loops only?

Working in back loops only creates ridges that enhance the pine cone texture and help define the different sections of the body, making it look more realistic.

Can I make this pattern without the hat?

Absolutely! The fairy looks adorable with just the leaf collar. You could also substitute the acorn hat with a flower crown or other seasonal accessories.