๐Ÿงถ Beautiful โœจ Detailed ๐Ÿ’ Adorable

Kawaii Creeper Amigurumi Pattern

Kawaii Creeper Amigurumi Pattern
4.3โ˜… Rating
4-5 Hours Time Needed
3.4K Made This
โœ‚๏ธ

Intermediate Level

Ideal for those with basic knitting experience, featuring slightly more advanced stitches and techniques to expand your skills.

โฑ๏ธ

Weekend Treat

Takes 5-7 hours, making it an enjoyable project to finish over a couple of days.

๐Ÿงธ

Cute Companion

An adorable friend to cherish, handcrafted with love to bring comfort and joy for years to come.

About This Kawaii Creeper Amigurumi Pattern

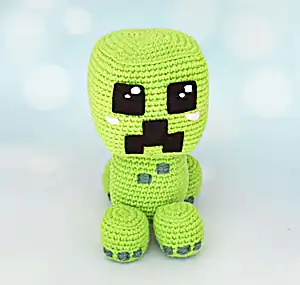
This delightful Kawaii-style Creeper pattern transforms the iconic Minecraft character into an irresistibly cute amigurumi companion. Standing at 15cm tall when made with 2.5mm cotton yarn, this pattern features detailed instructions for creating the classic blocky head, cylindrical body, and four sturdy feet. The kawaii elements include sparkling felt eyes with white reflections, pink yarn blushes, and carefully embroidered dark green squares that give it that authentic pixelated appearance.

Kawaii Creeper Amigurumi Pattern crochet pattern - detailed view of completed project

Each component is worked in continuous rounds using lime green cotton yarn, with special attention to proper stuffing and shaping techniques. The pattern includes step-by-step photos and clear assembly instructions to ensure your Creeper comes together perfectly.

Why You'll Love This Kawaii Creeper Amigurumi Pattern

I absolutely love how this pattern bridges the gap between gaming nostalgia and cozy crafting! The kawaii twist on the classic Creeper design makes it approachable and endearing rather than intimidating. I find the repetitive rounds incredibly soothing to work, and there's something so satisfying about watching those iconic green squares come to life through careful embroidery work.

Kawaii Creeper Amigurumi Pattern step 1 - construction progress Kawaii Creeper Amigurumi Pattern step 2 - assembly progress Kawaii Creeper Amigurumi Pattern step 3 - details and accessories Kawaii Creeper Amigurumi Pattern step 4 - final assembly and finishing

Switch Things Up

I love how versatile this Creeper pattern can be with just a few creative tweaks! You could easily transform this into a holiday version by using red and green yarn for a Christmas Creeper, or try metallic yarns for a special shimmery effect. I've experimented with adding small accessories like a tiny crocheted bow tie or even miniature tools to give each Creeper its own personality.

For those who want to challenge themselves further, consider making a whole family of Creepers in different sizes using various hook sizes. I particularly enjoy creating mini versions using embroidery thread and a 1.5mm hook โ€“ they make perfect keychains or bag charms! You could also experiment with different facial expressions by adjusting the mouth shape or adding eyebrows with embroidery.

Another fun variation I love is creating seasonal Creepers by changing up the color scheme entirely. A pastel pink version with white squares makes an adorable spring companion, while deep blues and purples create a mystical nighttime Creeper. The possibilities are truly endless when you let your creativity run wild with this foundation pattern!

Common Mistakes & How to Fix Them

โœ— Forgetting to stuff parts firmly enough, which can cause the Creeper to lose its blocky shape over time โœ— Not maintaining consistent tension when switching between rounds, leading to visible gaps or puckering in the fabric โœ— Placing the felt eyes incorrectly between rounds, which throws off the entire facial expression and proportions โœ— Rushing the embroidery work on the pixelated squares, resulting in uneven or crooked details that detract from the overall appearance

Kawaii Creeper Amigurumi Pattern

Create your own adorable Kawaii-style Minecraft Creeper with this detailed amigurumi pattern! This charming green companion features the iconic pixelated face with cute kawaii touches like pink blushes and sparkling eyes. Perfect for Minecraft fans and crochet enthusiasts alike, this 15cm tall Creeper will bring gaming nostalgia to life in the coziest way possible.

Intermediate 4-5 Hours

Materials Needed for Kawaii Creeper Amigurumi Pattern

โ€” Main Fabric

  • 01
    2.5mm cotton yarn in lime green (Rainbow cotton 8/6 recommended)
  • 02
    2.5mm cotton yarn in dark green for embroidery details
  • 03
    2.5mm cotton yarn in pink for kawaii blushes
  • 04
    2.5mm cotton yarn in white for eye reflections

โ€” Tools Required

  • 01
    2.5mm crochet hook
  • 02
    Black felt for eyes and mouth
  • 03
    Hot glue gun or needle and thread for felt attachment
  • 04
    Synthetic cotton filling
  • 05
    Yarn needle for embroidery and assembly
  • 06
    Scissors

Progress Tracker

0% Complete

โ€” Head :

Round 1 :

8 sc in a magic ring (8)

Round 2 :

8 inc (16)

Round 3 :

2 inc, 2 sc (24)

Round 4 :

1 sc, 2 inc, (4 sc, 2 inc) x3, 3 sc (32)

Round 5 :

2 sc, 2 inc, (6 sc, 2 inc) x3, 4 sc (40)

Round 6 :

3 sc, 2 inc, (8 sc, 2 inc) x3, 5 sc (48)

Round 7 :

4 sc, 2 inc, (10 sc, 2 inc) x3, 6 sc (56)

Round 8 :

5 sc, 2 inc, (12 sc, 2 inc) x3, 7 sc (64)

Round 9 :

1 sc BLO (64)

Round 10-26 :

1 sc (64)

Round 27 :

7 sc, 2 dec, (12 sc, 2 dec) x3, 5 sc BLO (56)

Round 28 :

6 sc, 2 dec, (10 sc, 2 dec) x3, 4 sc (48)

Round 29 :

5 sc, 2 dec, (8 sc, 2 dec) x3, 3 sc (40)

Round 30 :

4 sc, 2 dec, (6 sc, 2 dec) x3, 2 sc (32)

Round 31 :

3 sc, 2 dec, (4 sc, 2 dec) x3, 1 sc (24)

Info :

Stuffing

Round 32 :

2 sc, 2 dec (16)

Round 33 :

8 dec (8)

Round 34 :

4 dec (4)

Info :

Fasten off with sl st, cut and hide the strand

โ€” Body :

Round 1 :

8 sc in a magic ring (8)

Round 2 :

8 inc (16)

Round 3 :

2 inc, 2 sc (24)

Round 4 :

1 sc, 2 inc, (4 sc, 2 inc) x3, 3 sc (32)

Round 5 :

2 sc, 2 inc, (6 sc, 2 inc) x3, 4 sc (40)

Round 6 :

1 sc BLO (40)

Round 7-18 :

1 sc (40)

Round 19 :

2 sc, 2 dec, (6 sc, 2 dec) x3, 4 sc BLO (32)

Round 20 :

1 sc, 2 dec, (4 sc, 2 dec) x3, 3 sc (24)

Info :

Stuffing

Round 21 :

2 sc, 2 dec (16)

Round 22 :

8 dec (8)

Round 23 :

4 dec (4)

Info :

Fasten off with sl st and leave a long strand to sew to the head. Sew with a yarn needle joining R.19 of the body to R.29 of the head

โ€” Feet (Make 4) :

Round 1 :

8 sc in a magic ring (8)

Round 2 :

8 inc (16)

Round 3 :

2 inc, 2 sc (24)

Round 4 :

1 sc BLO (24)

Round 5-10 :

1 sc (24)

Round 11 :

2 sc, 2 dec (16)

Info :

Stuffing

Round 12 :

8 dec (8)

Round 13 :

4 dec (4)

Info :

Fasten off with sl st and leave a long strand to sew to the body. Join R.4-R.6 of the feet to R.6-R.8 of the body. Sew two feet to the front and two feet to the back

โ€” Details :

Foot Squares :

With dark green yarn and needle, embroider three squares in front of each foot in R.9

Body Squares :

With dark green yarn and needle, embroider two squares in the front part of the body, one square in R.14 and another in R.16

โ€” Face :

Eyes :

Cut out two 2.5 cm eyes with black felt and embroider two reflections with white cotton yarn and needle to give it a kawaii touch. Glue the eyes between R.13 and R.17 of the head

Mouth :

With black felt, cut out a mouth 4.5 cm long and 3 cm high. Glue the mouth between R.19 and R.25 of the head

Blushes :

With pink cotton yarn and needle make two blushes in R.19 on the head

Assembly Instructions

  • Attach the body to the head by sewing Round 19 of the body to Round 29 of the head using the long strand left from fastening off the body
  • Position and sew four feet to the body, with two feet attached to the front and two feet to the back, joining Rounds 4-6 of each foot to Rounds 6-8 of the body
  • Embroider three dark green squares on the front of each foot using Round 9 as your guide for placement
  • Add two dark green embroidered squares to the front of the body, placing one in Round 14 and another in Round 16
  • Cut and attach two 2.5cm black felt eyes between Rounds 13-17 of the head, adding white yarn reflections for the kawaii effect
  • Create and attach the iconic Creeper mouth using black felt cut to 4.5cm long by 3cm high, positioning it between Rounds 19-25 of the head
  • Finish with pink yarn blushes embroidered in Round 19 on both sides of the head for the perfect kawaii touch

Important Notes

  • ๐Ÿ’กUse lime green cotton yarn consistently throughout the main body parts to maintain the authentic Creeper color
  • ๐Ÿ’กStuff each section firmly but not overly tight to maintain the characteristic blocky Minecraft shape
  • ๐Ÿ’กPay special attention to the BLO (back loop only) rounds as they create important shape definition
  • ๐Ÿ’กWhen embroidering the pixelated squares, use a yarn needle and take your time to ensure even, square shapes
  • ๐Ÿ’กThe kawaii elements (pink blushes and eye reflections) are what set this pattern apart, so don't skip these details
  • ๐Ÿ’กAllow glue to fully dry before handling if using a hot glue gun for felt attachment

This adorable Kawaii Creeper pattern brings together the best of gaming culture and cozy crafting traditions. The combination of Minecraft's iconic design with cute kawaii elements creates a unique companion that's perfect for gamers of all ages. Whether you're new to amigurumi or looking for your next charming project, this pattern offers clear instructions and delightful results. ๐Ÿงถ Happy crocheting and may your Creeper bring endless joy! ๐ŸŽฎโœจ

You ask,

we answer.

FAQs

What size will my finished Creeper be?

Using 2.5mm cotton yarn as specified, your finished Creeper will be approximately 15cm (6 inches) tall. The size may vary if you use different yarn weights or hook sizes.

Can I use different colored yarn instead of lime green?

Absolutely! While lime green is the traditional Creeper color, you can experiment with any color you prefer. Just make sure to use a contrasting dark color for the embroidered squares.

Is this pattern suitable for beginners?

This pattern is rated intermediate due to the embroidery work and multiple components that need assembly. Beginners with basic single crochet and increasing/decreasing skills can attempt it with patience.

What if I can't find the exact Rainbow Cotton 8/6 yarn mentioned?

Any 2.5mm weight cotton yarn will work perfectly fine. The key is maintaining consistent tension and using colors that provide good contrast for the facial features.

Can I make this pattern larger or smaller?

Yes! Simply use a larger or smaller hook with corresponding yarn weight. A 4mm hook with worsted weight yarn will make a larger Creeper, while a 2mm hook will create a smaller version.

How do I prevent the stuffing from showing through my stitches?

Maintain consistent tension throughout your work and stuff firmly but not overly tight. If your stitches are loose, try going down a hook size or practicing tension control.