🧢 Beautiful ✨ Detailed πŸ’ Adorable

Holiday Lights Amigurumi Pattern

Holiday Lights Amigurumi Pattern
4.3β˜… Rating
1-1.5 Hours Time Needed
3.4K Made This
βœ‚οΈ

Beginner Friendly Level

Perfect for those just starting their sewing journey, with clear instructions and simple techniques

⏱️

Bite-Sized Project

Complete in under 2 hoursβ€”quick, fun, and perfect for a little creative escape.

πŸŽ„

Holiday Cheer

Festive fun for the season, bringing handmade magic to celebrations and creating new family traditions.

About This Holiday Lights Amigurumi Pattern

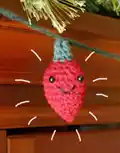
This delightful Holiday Lights pattern creates miniature Christmas light bulbs that capture the warm glow of the season. Each bulb measures approximately 3 inches tall and features a classic teardrop shape with a green base reminiscent of real holiday lights. The pattern uses simple single crochet stitches and basic increases and decreases, making it perfect for beginners looking to create something festive and fun.

Holiday Lights Amigurumi Pattern crochet pattern - detailed view of completed project

The finished bulbs can be displayed individually as ornaments or strung together to create charming garland for your holiday decorating. With optional safety eyes, each little light develops its own cheerful personality that brings smiles to faces of all ages.

Why You'll Love This Holiday Lights Amigurumi Pattern

I absolutely love how these little lights instantly transform any space into a winter wonderland! There's something so satisfying about watching a simple ball of yarn become these adorable miniature decorations. I find myself making them in batches because they work up so quickly, and each color combination feels like unwrapping a tiny present. The best part is seeing how they bring joy to everyone who sees them - they're like little ambassadors of holiday happiness that never fail to spark conversations and smiles.

Holiday Lights Amigurumi Pattern step 1 - construction progress Holiday Lights Amigurumi Pattern step 2 - assembly progress Holiday Lights Amigurumi Pattern step 3 - details and accessories Holiday Lights Amigurumi Pattern step 4 - final assembly and finishing

Switch Things Up

I love experimenting with different color combinations to create unique light displays! Instead of traditional Christmas colors, try making bulbs in pastel shades for a vintage-inspired look, or go bold with neon brights for a modern twist. You can even create themed sets - all blues and silvers for a winter wonderland, warm oranges and reds for autumn, or soft pinks and purples for a magical fairy light effect.

For extra sparkle, try using metallic yarn for the green base or add a touch of glitter yarn held together with your main color. I've also discovered that making mini versions with size E hook and sport weight yarn creates adorable doll house decorations or charm-sized ornaments perfect for gift packages.

Don't limit yourself to just garland either - these versatile little lights make beautiful individual ornaments, gift toppers, or even mobile elements for a nursery. I love clustering different sized bulbs together in a clear glass bowl for a stunning centerpiece that captures the magic of twinkling lights without needing electricity!

Common Mistakes & How to Fix Them

βœ— Not stuffing firmly enough before closing - stuff well for proper bulb shape βœ— Forgetting to attach safety eyes before stuffing completely - add eyes at row 10 βœ— Making magic ring too loose - keep initial ring tight for clean bulb tip βœ— Switching yarn colors too abruptly - carry green yarn up from inside for smoother transition

Holiday Lights Amigurumi Pattern

Create adorable miniature holiday light bulbs that bring festive cheer to any space! This charming amigurumi pattern makes perfect Christmas decorations that can be strung together as garland or displayed individually. Each little light bulb is crafted with colorful worsted weight yarn and features optional safety eyes for extra personality. Quick to work up and beginner-friendly, these delightful ornaments make wonderful gifts or seasonal home decor that captures the magic of the holidays.

Beginner Friendly 1-1.5 Hours

Materials Needed for Holiday Lights Amigurumi Pattern

β€” Main Fabric

  • 01
    Worsted weight yarn in desired holiday colors (red, green, blue, yellow, etc.)
  • 02
    Green worsted weight yarn for bulb base/cap

β€” Tools Required

  • 01
    G Hook (4.0mm)
  • 02
    Polyfil stuffing
  • 03
    Needle for sewing
  • 04
    Safety eyes (optional)
  • 05
    Black embroidery thread (optional)
  • 06
    Scissors
  • 07
    Stitch markers

Progress Tracker

0% Complete

β€” Holiday Light Bulb :

Magic Ring :

Make a 3 stitch magic ring

Row 1 :

Inc around (6)

Row 2 :

*sc 2, inc 1. Repeat from * (8)

Row 3 :

*sc 1, inc 1. Repeat from * (12)

Row 4 :

*sc 2, inc 1. Repeat from * (16)

Row 5 :

*sc 3, inc 1. Repeat from * (20)

Rows 6-8 :

sc around (20)

Row 9 :

*sc 3, dec 1. Repeat from * (16)

Row 10 :

*sc 2, dec 1. Repeat from * (12)

Info :

Attach safety eyes if desired. Stuff with Polyfil.

Row 11 :

dec around (6)

Row 12 :

switch to green yarn, sc around (6)

Row 13 :

sc around (6)

Finishing :

Break off yarn, weave in ends. Embroider eyes and mouth if desired.

β€” Assembly Instructions :

Stringing Bulbs :

Begin a chain with desired color and chain through the top of a bulb every 10 inches or spaced however far apart you wish

Assembly Instructions

  • Weave in all yarn ends securely before stuffing to prevent them from showing through
  • Stuff bulb firmly but not overly tight to maintain the classic light bulb teardrop shape
  • If using safety eyes, position them between rows 8-9 for best proportion and attach before final stuffing
  • For embroidered features, use black thread to create simple dot eyes and curved smile
  • When stringing multiple bulbs together, space them evenly at 8-10 inch intervals for balanced garland
  • Thread chain through the green base section to allow bulbs to hang naturally
  • Secure end knots well to prevent bulbs from sliding off the chain

Important Notes

  • πŸ’‘Keep consistent tension throughout to ensure all bulbs are uniform in size
  • πŸ’‘Stuff gradually as you work the decrease rounds for easier shaping
  • πŸ’‘Safety eyes are optional - embroidered features work just as well for a softer look
  • πŸ’‘Choose bright, festive colors that coordinate with your holiday decorating scheme
  • πŸ’‘Make extras - these little lights are so cute people will want to take them home!

These cheerful Holiday Lights bring the warmth and wonder of Christmas right into your home! Each adorable bulb is a tiny masterpiece that captures the nostalgic charm of vintage holiday decorations. Whether you display them as individual ornaments or string them together as festive garland, they're guaranteed to light up faces with pure joy. The simple construction makes them perfect for gift-giving or creating new family traditions. Happy crocheting and happiest of holidays!

You ask,

we answer.

FAQs

What size hook should I use for this pattern?

The pattern calls for a G hook (4.0mm). This size works perfectly with worsted weight yarn to create the right gauge and bulb shape.

Can I make these bulbs in different sizes?

Yes! Use a smaller hook (F or E) with DK weight yarn for mini bulbs, or a larger hook (H or I) with worsted yarn for jumbo lights.

How many bulbs should I make for garland?

For a standard 6-foot garland, make 8-10 bulbs spaced about 8-10 inches apart. Adjust quantity based on your desired length.

Do I have to use safety eyes?

No, safety eyes are completely optional. You can embroider simple faces with black thread or leave them plain for a more traditional light bulb look.

What's the best way to string multiple bulbs together?

Chain with your chosen cord color and thread through the green base of each bulb. Make sure to secure the chain ends well so bulbs don't slide off.