๐Ÿงถ Beautiful โœจ Detailed ๐Ÿ’ Adorable

Ice Cream Turtle Amigurumi Pattern

Ice Cream Turtle Amigurumi Pattern
4.3โ˜… Rating
4-5 Hours Time Needed
2.3K Made This
โœ‚๏ธ

Intermediate Level

Ideal for those with basic knitting experience, featuring slightly more advanced stitches and techniques to expand your skills.

โฑ๏ธ

Weekend Treat

Takes 5-7 hours, making it an enjoyable project to finish over a couple of days.

๐Ÿงธ

Cute Companion

An adorable friend to cherish, handcrafted with love to bring comfort and joy for years to come.

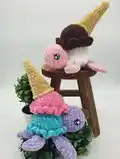
About This Ice Cream Turtle Amigurumi Pattern

This Ice Cream Turtle pattern brings together two beloved things - adorable sea creatures and delicious ice cream treats. The design features a sweet turtle with ice cream scoops forming its shell, topped with a golden waffle cone that adds the perfect finishing touch. The pattern offers flexibility with two stunning color schemes: classic Neapolitan with brown, white, and pink, or the vibrant Cotton Candy combination featuring aqua, lavender, and flamingo pink.

Ice Cream Turtle Amigurumi Pattern crochet pattern - detailed view of completed project

Standing approximately 6 inches in each direction, this charming turtle makes a perfect desk companion, nursery decoration, or thoughtful gift for anyone who loves unique amigurumi creations. The textured ice cream scoops created with front loop only techniques add delightful dimension to the finished piece.

Why You'll Love This Ice Cream Turtle Amigurumi Pattern

I absolutely love how this pattern combines unexpected elements to create something truly magical. The way the ice cream scoops naturally form the turtle's shell is pure genius, and I find myself smiling every time I see the finished result. The texture work on the ice cream creates such satisfying ridges that look incredibly realistic, while the cone placement adds that perfect whimsical touch that makes people do a double-take.

Ice Cream Turtle Amigurumi Pattern step 1 - construction progress Ice Cream Turtle Amigurumi Pattern step 2 - assembly progress Ice Cream Turtle Amigurumi Pattern step 3 - details and accessories Ice Cream Turtle Amigurumi Pattern step 4 - final assembly and finishing

Switch Things Up

I love experimenting with different color combinations for this adorable turtle! Try creating a mint chocolate chip version using green and white with black specks, or go tropical with bright orange and yellow for a sunset sherbet look. You could even add small crocheted sprinkles on top of the ice cream scoops for extra whimsy.

For a more realistic approach, I sometimes skip the cone and create just the turtle with natural shell colors in browns and greens. The textured technique from the ice cream scoops works beautifully for creating realistic shell segments too!

I've also made mini versions using worsted weight yarn and smaller hooks - they turn out perfectly pocket-sized and make amazing keychains or bag charms. The possibilities are endless when you start playing with scale and color!

Common Mistakes & How to Fix Them
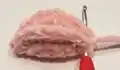
โœ— Forgetting to stuff ice cream scoops before completing each section - this makes the final shape lumpy and uneven โœ— Placing safety eyes too close together or too far apart - measure 9-10 stitches between eyes for proper proportion
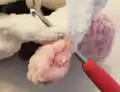
 โœ— Not maintaining consistent tension when working with chunky yarn - this causes visible gaps between stitches
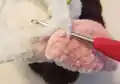
 โœ— Attaching legs with wrong curve orientation - check photos carefully to ensure proper flipper positioning and direction

Ice Cream Turtle Amigurumi Pattern

Create this adorable ice cream turtle that combines the sweetness of dessert with the charm of a beloved sea creature. This delightful amigurumi features colorful ice cream scoops stacked on a turtle's shell, complete with a waffle cone and cute flippers. Perfect for summer-themed decorations, gifts for ice cream lovers, or adding whimsy to any crochet collection. The pattern includes two color schemes - classic Neapolitan and vibrant Cotton Candy - allowing you to customize your turtle's personality.

Intermediate 4-5 Hours

Materials Needed for Ice Cream Turtle Amigurumi Pattern

โ€” Main Fabric

  • 01
    Size 5-6 Bulky Yarn in multiple colors for ice cream scoops and turtle parts
  • 02
    Premier Just Chenille in White, Pink, Aqua, Lavender, and Flamingo (Size 6)
  • 03
    Estako Velvet in Brown or Bernat Velvet in Soft Sunshine (Size 5)
  • 04
    Note: Premier Just Chenille is similar to Bernat Velvet, not super bulky like typical size 6 yarns

โ€” Tools Required

  • 01
    Crochet hook size 3.5mm (E)
  • 02
    Safety eyes 12mm
  • 03
    Tapestry needle
  • 04
    Scissors
  • 05
    Poly-Fil stuffing
  • 06
    Stitch markers (recommended for chunky yarn)

Progress Tracker

0% Complete

โ€” Front Legs :

Info :

Using Pink (Neapolitan) or Lavender (Cotton Candy), Make 2

R1 :

8SC in MR

R2 :

Inc (16)

R3 :

SC, Inc (24)

R4 :

3SC, Inc (30)

Info :

SlSt into next St. Fold your circle in half to make a half circle, SC around the half circle through both stitches. BO, there is no need to leave a tail for sewing, you will SC the legs into a round of the body.

โ€” Back Legs :

Info :

Using Pink (Neapolitan) or Lavender (Cotton Candy), Make 2

R1 :

8SC in MR

R2 :

Inc (16)

R3 :

SC, Inc (24)

Info :

SlSt into next St. Fold your circle in half to make a half circle, SC around the half circle through both stitches. BO, there is no need to leave a tail for sewing, you will SC the legs into a round of the body.

โ€” Tail :

Info :

Using Pink (Neapolitan) or Lavender (Cotton Candy)

R1 :

3SC in MR

R2 :

Inc (6)

R3-5 :

SC (6)

Info :

SlSt, BO, there is no need to leave a tail for sewing, you will SC the tail piece into a round of the body.

โ€” Head :

Info :

Using Pink (Neapolitan) or Lavender (Cotton Candy)

R1 :

8SC in MR

R2 :

Inc (16)

R3 :

SC, Inc (24)

R4 :

3SC, Inc (30)

R5-8 :

SC (30)

R9 :

SC, Dec (20)

R10 :

2SC, Dec (15)

Info :

SlSt, leave a long tail for sewing. Add eyes and stuff the head. Eyes placed at around rows 5-6 and about 9-10 stitches apart

โ€” Shell/Body :

Info :

Begin with the top ice cream scoop color. Brown (Neapolitan) or Flamingo (Cotton Candy)

R1 :

8 SC in MR

R2 :

Inc (16)

R3 :

SC, Inc (24)

R4 :

3SC, Inc (30)

R5-9 :

SC (30)

R10 :

Working in FLO, 3HDC in each stitch, SlSt into the first HDC and BO (90)

R11 :

Attach the same color yarn with a SC into the first stitch of the BLO of R9 and SC around in the rest of the back loops (30)

R12 :

SC, Dec (20)

Info :

Color change to the second ice cream scoop color. White (Neapolitan) or Aqua (Cotton Candy). Add stuffing to the first scoop.

R13 :

SC (20)

R14 :

SC, Inc (30)

R15-19 :

SC (30)

R20 :

Working in FLO, 3HDC in each stitch, SlSt into the first HDC and BO

R21 :

Attach the same color yarn with a SC into the first stitch of the BLO of R19 and SC around in the rest of the back loops (30)

R22 :

Attach legs and tail: 3SC, front leg with 3SC, 4SC, back leg with 2SC, 1SC, tail with 4SC, 1SC, second back leg with 2SC, 4SC, second front leg with 3SC, 3SC (30)

R23 :

SC, Dec (20)

R24 :

2SC, Dec (15)

R25 :

3SC, Dec (12)

R26 :

Dec (6)

Info :

SlSt, cut yarn leaving a short tail to sew the hole closed. Sew the head onto the body underneath the ruffle of the top scoop between the two front legs.

โ€” Cone :

Info :

Using tan color (Bernat - Soft Sunshine)

R1 :

6SC in MR

R2-3 :

SC (6)

R4 :

SC, Inc (9)

R5-7 :

SC (9)

R8 :

2SC, Inc (12)

R9-10 :

SC (12)

R11 :

2SC, Inc (16)

R12-15 :

SC (16)

R16 :

SC, Inc (24)

R17 :

SC in FLO (24)

Info :

SlSt, BO, leave a long tail for sewing. Sew the cone onto the top ice cream scoop slightly off to the side.

Assembly Instructions

  • Sew the head onto the body underneath the ruffle of the top ice cream scoop, positioning it evenly between the two front legs
  • Attach the waffle cone to the top ice cream scoop slightly off to the side or wherever preferred for best visual balance
  • Ensure all legs are properly oriented with curves facing the correct direction as shown in pattern photos
  • Stuff each ice cream scoop section firmly before completing to maintain proper shape and structure
  • Secure all yarn tails by weaving them through multiple stitches and trimming excess close to the work

Important Notes

  • ๐Ÿ’กUse stitch markers when working with chunky yarn to help identify stitches and maintain proper stitch count
  • ๐Ÿ’กThe Premier Just Chenille yarn behaves more like Size 5 yarn despite being labeled Size 6, similar to Bernat Velvet
  • ๐Ÿ’กStuff ice cream sections as you complete them to prevent difficulty stuffing through small openings later
  • ๐Ÿ’กPay attention to leg orientation when attaching - curve should face right for first two legs, left for second two
  • ๐Ÿ’กFront loop only technique in rounds 10 and 20 creates the textured ruffle effect for realistic ice cream appearance

This Ice Cream Turtle pattern captures the pure joy of summer treats and ocean adventures in one delightful amigurumi! The clever design transforms classic ice cream scoops into a turtle's shell, creating a whimsical character that brings smiles to faces of all ages. Whether you choose the classic Neapolitan colors or go bold with Cotton Candy hues, this little guy is sure to become a treasured companion. The textured details and playful cone topping make it a standout piece in any crochet collection! ๐Ÿงถ Happy crocheting! ๐Ÿงตโœจ

You ask,

we answer.

FAQs

Can I substitute different yarn weights for this pattern?

While the pattern is designed for Size 5-6 bulky yarn, you can substitute with worsted weight yarn and a smaller hook, but the finished size will be smaller. Maintain consistent yarn weight across all colors for best results.

How do I achieve the textured ice cream scoop effect?

The textured ruffles are created by working 3 half double crochets in each front loop only stitch. This creates the dimensional ridges that mimic real ice cream texture.

What's the best way to attach the legs to prevent them from falling off?

The legs are crocheted directly into Round 22 of the body, which creates a much stronger attachment than sewing. Make sure to push your hook through the leg piece first, then through the body stitch.

Can I make this pattern without safety eyes for a baby-safe version?

Yes! You can embroider the eyes using black yarn or create small crocheted circles and sew them on securely. This makes the turtle safe for babies and very young children.