๐Ÿงถ Beautiful โœจ Detailed ๐Ÿ’ Adorable

Kawaii Bunny with Basket Amigurumi Pattern

Kawaii Bunny with Basket Amigurumi Pattern
4.8โ˜… Rating
4-5 Hours Time Needed
2.0K Made This
โœ‚๏ธ

Intermediate Level

Ideal for those with basic knitting experience, featuring slightly more advanced stitches and techniques to expand your skills.

โฑ๏ธ

Weekend Treat

Takes 5-7 hours, making it an enjoyable project to finish over a couple of days.

๐Ÿงธ

Cute Companion

An adorable friend to cherish, handcrafted with love to bring comfort and joy for years to come.

About This Kawaii Bunny with Basket Amigurumi Pattern

This kawaii bunny pattern combines traditional amigurumi techniques with modern cute aesthetics to create an irresistible character. The pattern includes detailed instructions for creating the bunny's body, head, ears, arms, adorable hat, functional basket, and tiny decorative egg. Each component is carefully designed with specific color changes and shaping techniques that give this bunny its distinctive personality and charm.

Kawaii Bunny with Basket Amigurumi Pattern crochet pattern - detailed view of completed project

The finished bunny features safety eyes for a professional look and includes lovely details like a purple button on the overalls and a decorative flower on the hat. This pattern is perfect for intermediate crocheters looking to expand their amigurumi skills.

Why You'll Love This Kawaii Bunny with Basket Amigurumi Pattern

I absolutely love how this pattern brings together so many delightful elements in one project! The color combination is simply magical - the soft whites paired with vibrant pinks and purples create such a dreamy aesthetic. What really makes my heart sing is the attention to detail, from the tiny basket that actually holds things to the sweet flower accent on the hat. Every time I work on this pattern, I find myself smiling at how the personality emerges with each stitch, and the final result is always a conversation starter that brings joy to anyone who sees it.

Kawaii Bunny with Basket Amigurumi Pattern step 1 - construction progress Kawaii Bunny with Basket Amigurumi Pattern step 2 - assembly progress Kawaii Bunny with Basket Amigurumi Pattern step 3 - details and accessories Kawaii Bunny with Basket Amigurumi Pattern step 4 - final assembly and finishing

Switch Things Up

I love experimenting with different color combinations for this adorable bunny pattern! Instead of the traditional pink and purple, try creating a spring version with soft yellows and greens, or go bold with a rainbow theme using bright, vibrant colors. You could also switch up the accessories - maybe create a tiny backpack instead of a basket, or add a little bow tie for a dapper gentleman bunny.

For seasonal variations, consider making a winter bunny with blues and whites, complete with a tiny scarf, or a autumn version in warm oranges and browns. The flower on the hat could easily become a snowflake, a leaf, or even a tiny heart for Valentine's Day. Don't be afraid to personalize the facial features either - try different colored safety eyes or even embroidered closed eyes for a sleepy expression.

Advanced crocheters might enjoy adding wire armature to make the bunny poseable, or creating an entire family with different sized hooks. The possibilities are endless when you let your creativity run wild with this versatile pattern!

Common Mistakes & How to Fix Them

โœ— Forgetting to stuff the body parts firmly enough, which can cause the bunny to lose its shape and become floppy โœ— Placing safety eyes incorrectly or too close together, which affects the cute kawaii expression significantly โœ— Not maintaining consistent tension throughout the project, leading to uneven stitches and irregular sizing of parts โœ— Skipping the color change instructions carefully, resulting in messy transitions between the different colored sections

Kawaii Bunny with Basket Amigurumi Pattern

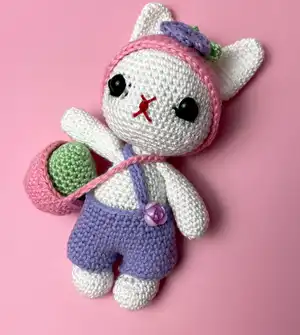
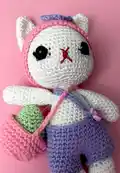
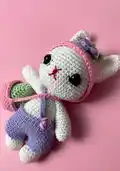
Create this absolutely adorable kawaii-style bunny amigurumi complete with a charming pink hat, purple overalls, and a sweet basket filled with goodies! This delightful pattern features beautiful color combinations of white, pink, purple, and green that come together to make the most enchanting little companion. Perfect for gifting or adding a touch of cuteness to any space, this bunny measures approximately 15cm in circumference and 7cm in length.

Intermediate 4-5 Hours

Materials Needed for Kawaii Bunny with Basket Amigurumi Pattern

โ€” Main Fabric

  • 01
    Cotton or acrylic yarn in white (main color)
  • 02
    Cotton or acrylic yarn in pink/fuchsia (Color A)
  • 03
    Cotton or acrylic yarn in blue/purple (Color B)
  • 04
    Cotton or acrylic yarn in red (Color C for details)
  • 05
    Cotton or acrylic yarn in green (for egg and leaf accents)

โ€” Tools Required

  • 01
    2.5mm crochet hook or size that fits your yarn
  • 02
    Safety eyes (black)
  • 03
    Scissors
  • 04
    Stuffing (polyester fiberfill)
  • 05
    Tapestry needle for sewing
  • 06
    Stitch markers
  • 07
    Pins for positioning parts
  • 08
    Purple button for overalls decoration

Progress Tracker

0% Complete

โ€” LEGS & BODY :

Round 1 :

6 sc in a mr

Round 2 :

6 sc inc(12)

Round 3 :

(6 times)1 sc into sc next inc(18)

Round 4-6 :

(3 ring)sc into sc(18)

Round 7 :

4 sc into sc(4 sc dec)4 sc into sc(14)

Round 8 :

5 sc into sc (2 sc dec)5 sc into sc(12)

Round 9-11 :

(3 ring)sc into sc(12)

Info :

Assemble and stuff the legs. Stuff the body tightly. Keep filling as you go.

Round 12 :

sc into sc(24)

Round 13 :

(6 times)3 sc into sc next inc(30)

Round 14 :

sc into sc(30)

Round 15 :

(6 times)4 sc into sc next inc(36)

Round 16-20 :

(5 ring)sc into sc(36)

Round 21 :

(6 times)4 sc into sc next dec(30)

Round 22 :

sc into sc(30)

Round 23 :

(6 times)3 sc into sc next dec(24)

Round 24 :

sc into sc(24)

Round 25 :

(6 times)2 sc into sc next dec(18)

Round 26 :

sc into sc(18)

Round 27 :

(6 times)1 sc into sc next dec(12)

Round 28-31 :

(4 ring)sc into sc(12)fo.

โ€” HEAD :

Round 1 :

8 sc in a mr

Round 2 :

8 sc inc(16)

Round 3 :

(8 times)1 sc into sc next inc(24)

Round 4 :

(8 times)2 sc into sc next inc(32)

Round 5 :

(8 times)3 sc into sc next inc(40)

Round 6 :

(8 times)4 sc into sc next inc(48)

Round 7-11 :

(5 ring)sc into sc(48)

Round 12 :

(6 times)7 sc into sc next inc(54)

Round 13-15 :

(3 ring)sc into sc(54)

Round 16 :

(6 times)8 sc into sc next inc(60)

Round 17 :

(6 times)8 sc into sc next dec(54)

Round 18 :

3 sc into sc(5 times)7 sc into sc next dec 4 sc into sc(48)

Round 19 :

(6 times)6 sc into sc next dec(42)

Round 20 :

2 sc into sc(5 times)5 sc into sc next dec 3 sc into sc(36)

Round 21 :

(6 times)4 sc into sc next dec(30)

Info :

Stuff the head tightly. Keep filling as you go. Place the safe eyes between rnd 13-14. There should be 9 sc between them.

Round 22 :

1 sc into sc(5 times)3 sc into sc next dec 2 sc into sc(24)

Round 23 :

(8 times)1 sc into sc next dec(16)fo.Leave a long thread end to sew

โ€” HAT :

Round 1 :

6 sc in a mr

Round 2 :

6 sc inc(12)

Round 3 :

(6 times)1 sc into sc next inc(18)

Round 4 :

(6 times)2 sc into sc next inc(24)

Round 5 :

(6 times)3 sc into sc next inc(30)

Round 6 :

(6 times)4 sc into sc next inc(36)

Round 7 :

(6 times)5 sc into sc next inc(42)

Round 8 :

(6 times)6 sc into sc next inc(48)

Round 9-14 :

(6 ring)sc into sc(48)

Round 15 :

sc into hdc(48 hdc)fo.

โ€” ARMS :

Round 1 :

6 sc in a mr

Round 2 :

6 sc inc(12)

Round 3- 15 :

(13 ring)sc into sc(12)

Info :

Fill the arms a little

Round 16 :

Straighten it. Dip the awl into both layers. 6 sc fo. Leave a long thread to sew on.

โ€” EARS - MAKE 2 :

Round 1 :

6 sc in a mr

Round 2 :

6 sc inc(12)

Round 3 :

sc into sc(12)

Round 4 :

2 sc inc(14)

Round 5 :

sc into sc(14)

Round 6 :

2 sc inc(16)

Round 7 :

sc into sc(16)

Round 8 :

2 sc inc(18)

Round 9 :

sc into sc(18)

Round 10 :

2 sc inc(20)

Round 11 :

sc into sc(20)

Round 12 :

2 sc inc(22)

Round 13-14 :

(2 ring)sc into sc(22)

Round 15 :

(4 times)3 sc into sc next dec(18)

Round 16 :

(4 times)2 sc into sc next dec(14)

Round 17 :

Straighten it. Dip the awl into both layers. 7 sc fo. Leave a long thread to sew on.

โ€” BASKET :

Round 1 :

6 sc in a mr

Round 2 :

6 sc inc(12)

Round 3 :

(6 times)1 sc into sc next inc(18)

Round 4 :

(6 times)2 sc into sc next inc(24)

Round 5 :

ln flo sc into sc(24)

Round 6 :

(6 times)3 sc into sc next inc(30)

Round 7-10 :

(4 ring)sc into sc(30)

Round 11 :

30 ch.

โ€” EGG :

Round 1 :

6 sc in a mr

Round 2 :

6 sc inc(12)

Round 3 :

2 sc inc(14)

Round 4 :

2 sc inc(16)

Round 5 :

2 sc inc(18)

Round 6 :

2 sc inc(20)

Round 7 :

2 sc inc(22)

Round 8 :

2 sc inc(24)

Round 9-12 :

(4 ring)sc into sc(24) Tightly fill the egg

Round 13 :

(6 times)2 sc into sc next dec(18)

Round 14 :

(6 times)1 sc into sc next dec(12)

Round 15 :

6 sc dec(6)fo.

โ€” FLOWER :

Round 1 :

10 sc in a mr

Round 2 :

(5 times)1 sc into 3 cr 1 sc into sc fo. Leave a long thread end to sew.

Leaf :

(2 times)10 ch turn 10 ch into 10 hdc fo.Leave a long thread end to sew.

โ€” SHORT :

Round 1 :

21 ch. Combine.

Round 2-4 :

(3 ring)ch into sc(20 sc) Combine.

Round 5 :

sc into sc(40)

Round 6-8 :

(3 ring)sc into sc(40)

Round 9 :

(8 times)3 sc into sc next dec(32)

Round 10-11 :

(2 ring)sc into sc(32)

Round 12 :

3 sc into sc 20 ch.Turn

Round 13 :

ch into sc(20 sc)fo.

โ€” JOINING PARTS :

Info :

Sew sleeves to both sides, rnd-27.

Info :

Sew the ears on both sides, on top of the hat to rnd-3.

Info :

Sew flowers and leaves to the top of the hat.

Assembly Instructions

  • Attach the head to the body by sewing the neck opening securely to the top of the body.
  • Sew the arms to both sides of the body at round 27, ensuring they are positioned symmetrically.
  • Position and sew the ears to the top of the hat at round 3, making sure they are evenly spaced.
  • Attach the decorative flower and leaves to the top of the hat for the finishing touch.
  • Sew the purple button to the center front of the overalls for decoration.
  • Place the basket in one of the bunny's arms and secure if desired, then add the crocheted egg inside.

Important Notes

  • ๐Ÿ’กUse safety eyes and position them between rounds 13-14 with 9 single crochets between them for the perfect kawaii expression
  • ๐Ÿ’กStuff all body parts firmly but not overly tight to maintain the proper shape and proportions
  • ๐Ÿ’กPay careful attention to color changes, especially when switching between the main white and accent colors
  • ๐Ÿ’กKeep consistent tension throughout the project to ensure even stitches and uniform sizing
  • ๐Ÿ’กPin all parts in their final positions before sewing to ensure proper placement and symmetry

This enchanting kawaii bunny pattern brings together the best of Japanese cute culture with traditional amigurumi craftsmanship. With its sweet expression, charming accessories, and delightful color palette, this little friend is sure to capture hearts and bring smiles wherever it goes. The attention to detail in every component makes this a truly special project that showcases your crochet skills beautifully. ๐Ÿงถ Happy crocheting! ๐Ÿฐโœจ

You ask,

we answer.

FAQs

What size yarn should I use for this pattern?

This pattern works best with DK or worsted weight yarn (3-4 weight) paired with a 2.5mm crochet hook for the tight, neat stitches characteristic of amigurumi.

Can I make this bunny larger or smaller?

Yes! You can adjust the size by using a larger hook and thicker yarn for a bigger bunny, or a smaller hook and thinner yarn for a mini version. Just remember to adjust your safety eye size accordingly.

Are the basket and egg removable?

Yes, both the basket and egg are separate pieces that can be removed. The basket has a chain handle and the egg sits inside loosely, making them perfect interactive elements.

How do I achieve the perfect kawaii expression?

The key is in the eye placement - position safety eyes between rounds 13-14 with exactly 9 single crochets between them. The small red 'x' mouth should be embroidered below and centered between the eyes.

What's the best way to attach the hat?

The hat should fit snugly over the head. You can either sew it permanently in place or leave it removable. If sewing, attach around the hat's edge to the head at approximately round 12-13.