๐Ÿงถ Beautiful โœจ Detailed ๐Ÿ’ Adorable

Lily Bunny Amigurumi Pattern

Lily Bunny Amigurumi Pattern
4.8โ˜… Rating
8-10 Hours Time Needed
3.5K Made This
โœ‚๏ธ

Intermediate Level

Ideal for those with basic knitting experience, featuring slightly more advanced stitches and techniques to expand your skills.

โฑ๏ธ

All-Day Adventure

Requires 8-10 hours, ideal for a full day of immersive knitting.

๐Ÿงธ

Cute Companion

An adorable friend to cherish, handcrafted with love to bring comfort and joy for years to come.

About This Lily Bunny Amigurumi Pattern

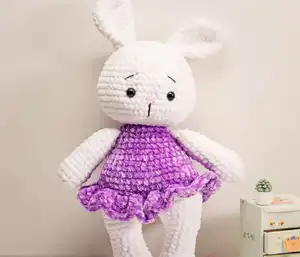
This delightful Lily Bunny pattern creates a cuddly companion that's perfect for children and collectors alike. Standing at 35cm tall, she features a charming purple ruffled dress and sweet embroidered facial features. The pattern combines basic amigurumi techniques with special finishing touches like head sculpting and dress construction. Her soft chenille yarn construction makes her perfect for snuggling and play.

Lily Bunny Amigurumi Pattern crochet pattern - detailed view of completed project

The bunny is worked primarily in single crochet with increases and decreases to create the classic amigurumi shape. Special attention is given to the ruffled skirt detail and proper stuffing techniques for the perfect finished appearance.

Why You'll Love This Lily Bunny Amigurumi Pattern

I absolutely love how this pattern brings together classic amigurumi techniques with elegant finishing touches. The chenille yarn creates such a soft, luxurious feel that makes this bunny irresistible to touch. What really sets this pattern apart is the beautiful ruffled dress - it adds such a sweet, feminine touch that transforms a simple bunny into a special keepsake. The size is perfect for little hands to hold, yet detailed enough to be a cherished collectible.

Lily Bunny Amigurumi Pattern step 1 - construction progress Lily Bunny Amigurumi Pattern step 2 - assembly progress Lily Bunny Amigurumi Pattern step 3 - details and accessories Lily Bunny Amigurumi Pattern step 4 - final assembly and finishing

Switch Things Up

I love experimenting with different color combinations for this Lily Bunny pattern - imagine how stunning she'd look in soft pastels like mint green and coral, or even in sophisticated neutrals like cream and dusty rose. The dress opens up so many creative possibilities too; you could add tiny buttons, a belt, or even crochet a matching hat or purse for extra charm.

For those wanting to make her even more special, consider adding small details like a crocheted flower for her ear or a tiny bow around her neck. The beauty of this pattern is how adaptable it is to your personal style while maintaining that classic, timeless appeal that makes amigurumi so beloved.

Common Mistakes & How to Fix Them

โœ— Forgetting to stuff the arms only 2/3 full, which can make them too stiff and bulky for proper positioning โœ— Not maintaining consistent tension when working the dress ruffle, leading to uneven or puckered fabric appearance โœ— Placing safety eyes incorrectly between rounds 8 and 9, resulting in asymmetrical or poorly positioned facial features โœ— Overstuffing the head and body, which can distort the shape and make seaming difficult during assembly

Lily Bunny Amigurumi Pattern

Create your own adorable Lily Bunny with this charming amigurumi pattern! This sweet companion features a beautiful purple dress and stands approximately 35cm tall. Perfect for cuddling or as a special gift, this bunny combines simple stitches with delightful details. The pattern includes step-by-step instructions for the head, body, arms, legs, ears, and a lovely ruffled skirt that adds extra charm to your finished creation.

Intermediate 8-10 Hours

Materials Needed for Lily Bunny Amigurumi Pattern

โ€” Main Fabric

  • 01
    Chenille sport yarn in white (Chenille 01)
  • 02
    Chenille sport yarn in purple (Chenille 13)
  • 03
    Brown embroidery thread for eyebrows and muzzle
  • 04
    Pink embroidery thread for nose
  • 05
    White thread for head sculpting

โ€” Tools Required

  • 01
    Crochet hook 5mm
  • 02
    Safety eyes 14mm
  • 03
    Polyester fiber fill stuffing
  • 04
    Yarn needle for sewing
  • 05
    Scissors
  • 06
    Stitch markers

Progress Tracker

0% Complete

โ€” Arms :

Round 1 :

6 sc into a magic ring (6)

Round 2 :

6 inc (12)

Round 3 :

(3 sc, inc) * 3 (15)

Round 4-5 :

15 sc (2 rounds)

Round 6 :

(3 sc, dec) * 3 (12)

Round 7-14 :

12 sc (8 rounds)

Round 15 :

(4 sc, dec) * 2 (10)

Round 16 :

10 sc

Info :

Fold the arm in half and crochet 5 sc through both sides. Fasten off and cut the yarn, leaving a tail for sewing. Stuff only 2/3 of the arm.

โ€” Legs :

Round 1 :

7 sc into a magic ring (7)

Round 2 :

7 inc (14)

Round 3 :

(sc, inc) * 7 (21)

Round 4-5 :

21 sc (2 rounds)

Round 6 :

7 sc, 4 dec, 6 sc (17)

Round 7 :

7 sc, 2 dec, 6 sc (15)

Round 8-10 :

15 sc (3 rounds)

Round 11 :

(4 sc, inc) * 3 (18)

Round 12 :

18 sc

Round 13 :

For the left leg: crochet only 14 sc, fasten off. For the right leg: 18 sc, don't cut yarn

โ€” Body :

Round 1 :

Crochet 7 sc on the right leg; make 3 chains; 18 sc on the left leg; 3 sc on the chain; 18 sc on the right leg; 3 sc on the chain; put the marker here (42)

Round 2 :

(6 sc, inc) * 6 (48)

Round 3-6 :

48 sc (4 rounds). Change yarn to purple color

Round 7 :

48 sc

Round 8 :

back loops only: 48 sc

Round 9 :

(6 sc, dec) * 6 (42)

Round 10-11 :

42 sc (2 rounds)

Round 12 :

(5 sc, dec) * 6 (36)

Round 13-14 :

36 sc (2 rounds)

Round 15 :

(4 sc, dec) * 6 (30)

Round 16-17 :

30 sc (2 rounds)

Round 18 :

(3 sc, dec) * 6 (24)

Round 19 :

24 sc

Round 20 :

(6 sc, dec) * 3 (21)

Info :

Stuff the body firmly, especially in the neck. Cut the purple yarn.

โ€” Skirt :

Round 1 :

Attach purple yarn to back of body in front loops of round 8. Crochet with body upside down: (2 dc in one stitch) * 48 (96)

Round 2 :

96 dc

Info :

Fasten off and cut yarn. Hide thread inside body.

โ€” Head :

Round 1 :

Change to white yarn. 21 sc

Round 2 :

21 inc (42)

Round 3 :

(6 sc, inc) * 6 (48)

Round 4 :

(7 sc, inc) * 6 (54)

Round 5-9 :

54 sc (5 rounds)

Info :

Insert safety eyes between rounds 8 and 9 with 8 st between them

Round 10 :

(7 sc, dec) * 6 (48)

Round 11-13 :

48 sc (3 rounds)

Round 14 :

(6 sc, dec) * 6 (42)

Round 15 :

42 sc

Round 16 :

(5 sc, dec) * 6 (36)

Round 17 :

(4 sc, dec) * 6 (30)

Round 18 :

(3 sc, dec) * 6 (24)

Round 19 :

(2 sc, dec) * 6 (18)

Round 20 :

(sc, dec) * 6 (12)

Round 21 :

6 dec (6)

Info :

Make sure head is stuffed firmly. Close opening and hide yarn inside.

โ€” Ears :

Round 1 :

6 sc into a magic ring (6)

Round 2 :

6 inc (12)

Round 3 :

(sc, inc) * 6 (18)

Round 4 :

(2 sc, inc) * 6 (24)

Round 5-6 :

24 sc (2 rounds)

Round 7 :

(6 sc, dec) * 3 (21)

Round 8 :

(5 sc, dec) * 3 (18)

Round 9 :

(4 sc, dec) * 3 (15)

Round 10-12 :

15 sc (3 rounds)

Info :

Fasten off and cut yarn, leaving tail for sewing. Fold ear in half and sew ends together.

Assembly Instructions

  • Sew the arms two rounds under the beginning of the head, ensuring they are positioned symmetrically
  • Attach the legs securely to the bottom of the body, making sure the bunny can sit upright
  • Sew the ears on the top of the head with 4 stitches between them for proper spacing
  • Embroider the eyebrows and muzzle using brown thread for facial expression
  • Embroider the nose using pink thread, creating a small triangular or oval shape
  • Perform head sculpting using white thread to define facial features and create dimension

Important Notes

  • ๐Ÿ’กUse chenille yarn as specified for the soft, plush texture that makes this bunny special
  • ๐Ÿ’กStuff only 2/3 of the arms to maintain proper flexibility and positioning
  • ๐Ÿ’กMaintain consistent tension throughout the pattern, especially when creating the ruffled skirt
  • ๐Ÿ’กInsert safety eyes carefully between the specified rounds for the best facial appearance
  • ๐Ÿ’กStuff the head and body firmly, particularly in the neck area for structural integrity

This sweet Lily Bunny pattern brings together classic amigurumi techniques with elegant feminine touches. The combination of soft chenille yarn and the beautiful purple ruffled dress creates a truly special companion that's perfect for gifting or keeping as a treasured collectible. Her 35cm height makes her the perfect size for cuddling, while the detailed construction ensures she'll be loved for years to come. ๐Ÿงถ Happy crocheting! ๐Ÿฐโœจ

You ask,

we answer.

FAQs

What size will my finished Lily Bunny be?

When using the specified materials (sport weight chenille yarn and 5mm hook), your finished bunny will be approximately 35cm (about 14 inches) tall.

Can I use different yarn weights for this pattern?

While you can substitute yarn weights, it will change the final size. Using heavier yarn will make a larger bunny, while lighter yarn will create a smaller one. Adjust your hook size accordingly.

Why should I only stuff the arms 2/3 full?

Partially stuffing the arms allows them to hang naturally and be positioned more easily when sewing them to the body. Fully stuffed arms would be too rigid and bulky.

How do I create the ruffled skirt effect?

The ruffle is created by working in the front loops only of round 8, then doubling the stitch count with double crochets. This creates the natural gathering effect that forms the ruffle.

What's the best way to embroider the facial features?

Use small, careful stitches for the eyebrows and muzzle with brown thread, and create a small triangular nose with pink thread. Practice on a sample piece first if you're new to embroidering on crochet.