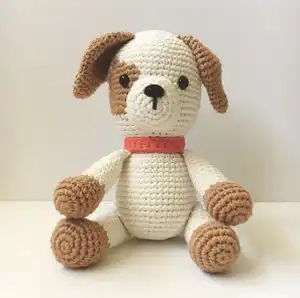
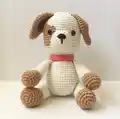
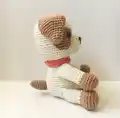
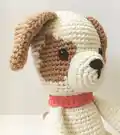
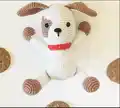
Create your own sweet and cuddly Puppy Chip with this delightful free amigurumi pattern! This charming puppy features an adorable chocolate chip patch over one eye and a bright red collar. Standing approximately 7 inches tall, this loveable companion is perfect for dog lovers of all ages. The pattern includes detailed instructions for the head, body, ears, legs, muzzle, tail, and collar, all worked in soft cotton yarn.
Progress Tracker
0% Complete
— Head and Body :
Round 2 :
(inc in each st) around [12]
Round 3 :
(sc; inc in next st) around [18]
Round 4 :
(sc in next 2 sts; inc in next st) around [24]
Round 5 :
(sc in next 3 sts; inc in next st) around [30]
Round 6 :
(sc in next 4 sts; inc in next st) around [36]
Round 7 :
(sc in next 5 sts; inc in next st) around [42]
Round 8 :
(sc in next 6 sts; inc in next st) around [48]
Round 9 :
(sc in next 7 sts; inc in next st) around [54]
Round 10 :
(sc in each st) around [54]
Info :
Attach yarn B in this round
Round 11 :
5 sc in color A; 2 sc in color B; 47 sc in color A around [54]
Round 12 :
5 sc in color A; 4 sc in color B; 45 sc in color A around [54]
Round 13 :
4 sc in color A; 7 sc in color B; 43 sc in color A around [54]
Round 14 :
3 sc in color A; 9 sc in color B; 42 sc in color A around [54]
Round 15 :
3 sc in color A; 9 sc in color B; 42 sc in color A around [54]
Round 16 :
4 sc in color A; 8 sc in color B; 42 sc in color A around [54]
Round 17 :
3 sc in color A; 10 sc in color B; 41 sc in color A around [54]
Round 18 :
2 sc in color A; 9 sc in color B; 43 sc in color A around [54]
Round 19 :
3 sc in color A; 8 sc in color B; 43 sc in color A around [54]
Round 20 :
4 sc in color A; 6 sc in color B; 44 sc in color A around [54]
Info :
F/O yarn B. Attach safety eyes between rows 15 and 16. Count 9 sc from one eye to another. Stuff and shape the head as you work.
Round 21 :
(sc in next 7 sts; dec) around [48]
Round 22 :
(sc in next 6 sts; dec) around [42]
Round 23 :
(sc in next 5 sts; dec) around [36]
Round 24 :
(sc in next 4 sts; dec) around [30]
Round 25 :
(sc in next 3 sts; dec) around [24]
Round 26-27 :
(sc in each st) around [24]
Round 28 :
(sc in next 3 sts; inc in next st) around [30]
Round 29-30 :
(sc in each st) around [30]
Round 31 :
(sc in next 4 sts; inc in next st) around [36]
Round 32-33 :
(sc in each st) around [36]
Round 34 :
(sc in next 5 sts; inc in next st) around [42]
Round 35-36 :
(sc in each st) around [42]
Round 37 :
(sc in next 6 sts; inc in next st) around [48]
Round 38-40 :
(sc in each st) around [48]
Round 41 :
(sc in next 11 sts; inc in next st) around [52]
Round 42 :
(sc in each st) around [52]
Round 43 :
(sc in next 11 sts; dec) around [48]
Round 44 :
(sc in next 6 sts; dec) around [42]
Round 45 :
(sc in next 5 sts; dec) around [36]
Round 46 :
(sc in next 4 sts; dec) around [30]
Round 47 :
(sc in next 3 sts; dec) around [24]
Round 48 :
(sc in next 2 sts; dec) around [18]
Round 49 :
(sc in next st; dec) around [12]
Round 50 :
(dec x 6) around [6]
Info :
Fill the body with fiberfill firmly. F/O and thread tail end of yarn onto a tapestry needle, insert the needle in and out of the remaining sts, pull tight to close and weave in end.
— Ears (Make 2) :
Round 2 :
(sc; inc in next st) around [9]
Round 3 :
(sc in next 2 sts; inc in next st) around [12]
Round 4 :
(sc in each st) around [12]
Round 5 :
(sc in next 3 sts; inc in next st) around [15]
Round 6 :
(sc in next 4 sts; inc in next st) around [18]
Round 7 :
(sc in each st) around [18]
Round 8 :
(sc in next 2 sts; inc in next st) around [24]
Round 9 :
(sc in next 3 sts; inc in next st) around [30]
Round 10-11 :
(sc in each st) around [30]
Round 12 :
(sc in next 3 sts; dec) around [24]
Round 13-14 :
(sc in each st) around [24]
Round 15 :
(sc in next 4 sts; dec) around [20]
Round 16 :
(sc in each st) around [20]
Round 17 :
(sc in next 8 sts; dec) around [18]
Info :
Do not stuff the ears. Flatten the top of the ear in half, and sc in next 9 sts through both sides. F/O leaving a long tail for sewing.
— Hind Legs (Make 2) :
Round 2 :
(inc in each st) around [12]
Round 3 :
(sc; inc in next st) around [18]
Round 4 :
(sc in next 2 sts; inc in next st) around [24]
Round 5-6 :
(sc in each st) around [24]
Round 7 :
sc in next 6 sts; (sc in next 2 sts; dec)x 3 times; sc in 6 next sts around [21]
Round 8 :
sc in next 6 sts; (sc in next st; dec)x 3 times; sc in next 6 sts around [18]
Round 9 :
sc in next 6 sts; (dec)x 3 times; sc in next 6 sts around [15]
Info :
Change to color A yarn
Round 10-19 :
(sc in each st) around [15]
Info :
Stuff and shape the paw firmly, stuff the bottom of leg lightly. First leg: Undo one stitch from the last round. Fold the top of the leg in half, sc in the next 7 sts through both sides. Second leg: Sc in the next 6 sts. Fold the top of the leg in half, sc in the next 7 sts through both sides. Make sure one paw points to the right and other to the left.
— Fore Legs (Make 2) :
Round 2 :
(inc in each st) around [12]
Round 3 :
(sc; inc in next st) around [18]
Round 4 :
(sc in next 5 sts; inc in next st) around [21]
Round 5-6 :
(sc in each st) around [21]
Round 7 :
(sc in next 5 sts; dec) around [18]
Round 8 :
(sc in next 5 sts; dec x 4 times; sc in next 5 sts) around [14]
Info :
Change to color A yarn
Round 9-19 :
(sc in each st) around [14]
Info :
Stuff and shape the paw firmly and bottom of the leg lightly. First Leg: Fold the top of the leg in half, sc in the next 7 sts through both sides. Second leg: Sc in the next 2 sts. Fold the top of the leg in half, sc in the next 7 sts through both sides. Make sure one paw points to the left and other to the right.
— Muzzle :
Round 2 :
(inc in each st) around [12]
Round 3 :
(sc; inc in next st) around [18]
Round 4 :
(sc in next 2 sts; inc in next st) around [24]
Round 5 :
(sc in next 5 sts; inc in next st) around [28]
Round 6 :
(sc in each st) around [28]
Info :
Sl st in next stitch and F/O leaving a long tail for sewing.
— Tail :
Round 2 :
(sc, inc in next st) around [9]
Round 3 :
(sc in next 2 sts; inc in next st) around [12]
Round 4-9 :
(sc in each st) around [12]
Round 10 :
(sc in next 4 sts; dec) around [10]
Info :
Sl st in next stitch. Stuff the tail lightly. F/O leaving a long tail for sewing.
— Collar :
Round 2 :
hdc into 2nd ch from hook and across [24]
Info :
Try this on your puppy and adjust the no. of stitches if needed.
This heartwarming Puppy Chip pattern captures all the charm of a beloved pet in adorable amigurumi form. With his signature chocolate chip patch and bright red collar, this sweet companion is perfect for dog lovers young and old. The detailed instructions guide you through color-changing techniques and proper construction methods to create a professional-looking result. Whether made as a gift or personal keepsake, this cuddly puppy is sure to bring smiles and comfort to anyone who holds him. 🐶 Happy crocheting! 🧶✨
