๐Ÿงถ Beautiful โœจ Detailed ๐Ÿ’ Adorable

Little Floweret Amigurumi Pattern

Little Floweret Amigurumi Pattern
4.8โ˜… Rating
8-10 Hours Time Needed
4.0K Made This
โœ‚๏ธ

Intermediate Level

Ideal for those with basic knitting experience, featuring slightly more advanced stitches and techniques to expand your skills.

โฑ๏ธ

All-Day Adventure

Requires 8-10 hours, ideal for a full day of immersive knitting.

๐Ÿงธ

Cute Companion

An adorable friend to cherish, handcrafted with love to bring comfort and joy for years to come.

About This Little Floweret Amigurumi Pattern

This Little Floweret pattern creates an enchanting flower character that's both playful and sophisticated. The design features a unique construction where the petals are attached directly while working the head, creating a seamless and professional finish. The pattern includes multiple shades of pink and yellow to create depth and visual interest, though you can easily adapt it to your preferred color palette.

Little Floweret Amigurumi Pattern crochet pattern - detailed view of completed project

The finished toy stands approximately 18cm tall and includes a removable collar detail. The flower pot base provides stability and adds to the charm of this delightful creation.

Why You'll Love This Little Floweret Amigurumi Pattern

I absolutely love how this pattern combines technical skill with pure cuteness! The innovative petal attachment technique creates such a professional look, and there's something so satisfying about watching the flower come to life as you work. The safety eyes give it such personality, and the little collar detail is just the perfect finishing touch that makes it feel extra special.

Little Floweret Amigurumi Pattern step 1 - construction progress Little Floweret Amigurumi Pattern step 2 - assembly progress Little Floweret Amigurumi Pattern step 3 - details and accessories Little Floweret Amigurumi Pattern step 4 - final assembly and finishing

Switch Things Up

I love how versatile this Little Floweret pattern can be with just a few creative tweaks! You could easily transform this into a sunflower by using yellow and brown yarns, or create a whole garden by making multiple flowers in different color combinations. I've experimented with adding small white French knots to the center for extra texture, and even tried making mini versions using thinner yarn and smaller hooks. The pot could become a pencil holder if you make it larger, or you could skip the pot entirely and add a longer stem for a bouquet arrangement.

Another fun variation I enjoy is changing up the leaf shapes - you could make them more pointed for roses or rounder for daisies. The collar is also perfect for seasonal adaptations - imagine tiny holly leaves for Christmas or little hearts for Valentine's Day! The possibilities are endless when you start playing with this basic flower structure.

Common Mistakes & How to Fix Them

โœ— Forgetting to stuff petals before closing - stuff halfway through for proper shape โœ— Not marking round beginnings when joining body parts - use stitch markers consistently โœ— Pulling too tightly when cinching the posterior shaping - medium tension creates better definition โœ— Skipping the cardboard reinforcement in pot base - this prevents sagging over time

Little Floweret Amigurumi Pattern

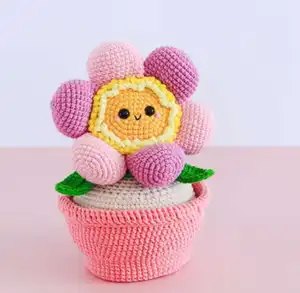
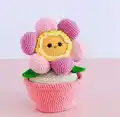
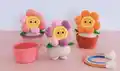
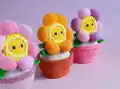
Create your own adorable flower friend with this charming Little Floweret amigurumi pattern! This delightful project features a sweet flower character with pink petals, a sunny yellow center, and cute safety eyes that will melt your heart. Perfect for gifting or decorating your space, this 18cm tall flower sits beautifully in its own crocheted pot. The pattern includes detailed instructions for creating the body, flower head with attached petals, leaves, and decorative collar.

Intermediate 8-10 Hours

Materials Needed for Little Floweret Amigurumi Pattern

โ€” Main Fabric

  • 01
    Cotton blend yarn (330m/100g) in pink (Alize Cotton Gold 518 & 98)
  • 02
    Green yarn (Alize Cotton Gold 126) for leaves and collar
  • 03
    Nude/beige yarn (Alize Cotton Gold 382 or 401) for body
  • 04
    Yellow yarns in 3 shades: dark yellow (Yarn Art Jeans 35), yellow (Alize Cotton Gold 110), pastel yellow (Alize Cotton Gold 187)
  • 05
    Dark pink yarn (Alize Cotton Gold 33) for flower pot

โ€” Tools Required

  • 01
    Crochet hook 2mm (US steel hook 4, UK 2ยฝ)
  • 02
    Polyester fiberfill stuffing
  • 03
    Tapestry needle with large eye
  • 04
    Safety eyes 8mm diameter (2 pieces)
  • 05
    Black thread or embroidery floss for mouth
  • 06
    Dry pastel chalk for cheek tinting
  • 07
    Soft cloth for applying chalk
  • 08
    Tailor pins
  • 09
    Cardboard for pot reinforcement

Progress Tracker

0% Complete

โ€” LEGS :

Round 1 :

6 sc into an AMR (6)

Round 2 :

6 inc (12)

Round 3 :

(1 sc, 1 inc) 6 times (18)

Round 4 :

(2 sc, 1 inc) 6 times (24)

Round 5 :

1 sc each in every stitch (24)

Round 6 :

5 sc, 7 dec, 5 sc (17)

Round 7 :

1 sc each in every stitch (17)

Info :

On first leg, break yarn and secure. On second leg, work 4 sc more to reach inside of leg, continue to body.

โ€” BODY :

Round 1 :

5 inc, 7 sc, 10 inc, 7 sc, 5 inc (54)

Round 2 :

1 sc each in every stitch (54)

Round 3 :

4 sc, 1 inc, (8 sc, 1 inc) 5 times, 4 sc (60)

Round 4 :

(9 sc, 1 inc) 6 times (66)

Round 5 :

5 sc, 1 inc, (10 sc, 1 inc) 5 times, 5 sc (72)

Rounds 6-15 :

10 rounds total - 1 sc each in every stitch (72)

Round 16 :

24 sc, 12 dec, 24 sc (60)

Round 17 :

(8 sc, 1 dec) 6 times (54)

Round 18 :

1 sc each in every stitch (54)

Round 19 :

(7 sc, 1 dec) 6 times (48)

Round 20 :

1 sc each in every stitch (48)

Round 21 :

(6 sc, 1 dec) 6 times (42)

Round 22 :

1 sc each in every stitch (42)

Round 23 :

(5 sc, 1 dec) 6 times (36)

Round 24 :

1 sc each in every stitch (36)

Round 25 :

(4 sc, 1 dec) 6 times (30)

โ€” PETALS (make 6) :

Round 1 :

6 sc into an AMR (6)

Round 2 :

6 inc (12)

Round 3 :

(1 sc, 1 inc) 6 times (18)

Round 4 :

(2 sc, 1 inc) 6 times (24)

Round 5 :

(3 sc, 1 inc) 6 times (30)

Rounds 6-8 :

3 rounds total - 1 sc each in every stitch (30)

Round 9 :

(8 sc, 1 dec) 3 times (27)

Round 10 :

1 sc each in every stitch (27)

Round 11 :

(7 sc, 1 dec) 3 times (24)

Round 12 :

1 sc each in every stitch (24)

Round 13 :

(2 sc, 1 dec) 6 times (18)

Info :

Stuff halfway, fold in half, crochet edges together with 8 sc

โ€” HEAD :

Setup :

Begin with dark yellow, crochet ch5 + ch1 for height

Round 1 :

4 sc, 3 sc into last chain, continue on opposite side: 3 sc, 1 inc into first chain (12)

Round 2 :

1 inc, 3 sc, 3 inc, 3 sc, 2 inc (18)

Round 3 :

1 sc, 1 inc, 3 sc, (1 sc, 1 inc) 3 times, 3 sc, (1 sc, 1 inc) 2 times (24)

Round 4 :

2 sc, 1 inc, 3 sc, (2 sc, 1 inc) 3 times, 3 sc, (2 sc, 1 inc) 2 times (30)

Round 5 :

3 sc, 1 inc, 3 sc, (3 sc, 1 inc) 3 times, 3 sc, (3 sc, 1 inc) 2 times (36)

Round 6 :

4 sc, 1 inc, 3 sc, (4 sc, 1 inc) 3 times, 3 sc, (4 sc, 1 inc) 2 times (42)

Round 7 :

blo - 1 sc each in every stitch (42)

Round 8 :

Join petals by working through petal stitches + blo of head center

Round 9 :

Change to green - (6 sc, 1 inc) 6 times (48)

Info :

Insert safety eyes and embroider mouth

Rounds 10-17 :

8 rounds total - 1 sc each into every st (48)

Round 18 :

3 sc, dec, (6 sc, 1 dec) 5 times, 3 sc (42)

Round 19 :

(5 sc, 1 dec) 6 times (36)

Round 20 :

2 sc, dec, (4 sc, 1 dec) 5 times, 2 sc (30)

Round 21 :

(3 sc, 1 dec) 6 times (24)

Round 22 :

1 sc, dec, (2 sc, 1 dec) 5 times, 1 sc (18)

Round 23 :

(1 sc, 1 dec) 6 times (12)

Round 24 :

6 dec, cinch closed

โ€” LEAF (make 2) :

Step 1 :

Crochet ch11 + ch1 for height adjustment

Step 2 :

Work 11 sl-st along chain, ch1

Step 3 :

Work into unused loops: 2 sc into same st, 1 hdc, 6 dc, 1 hdc, 2 sc, ch2

Step 4 :

Mirror sequence on other side: 2 sc, 1 hdc, 6 dc, 1 hdc, 2 sc into same st

Step 5 :

1 sl-st each into every st around

โ€” COLLAR :

Setup :

Crochet ch36 + ch1 for height, work in rows with turning

Row 1 :

1 sc each in every stitch, ch3, turn

Row 2 :

Alternate (dc, dc-inc) to end, ch3, sl-st into same st

Ties :

Ch30, work 36 sl-st along upper edge, ch30, sl-st into last st

โ€” FLOWER POT :

Setup :

Crochet ch5 + ch1 for height

Round 1 :

4 sc, 3 sc into last chain, continue on opposite side: 3 sc, 1 inc into first chain (12)

Round 2 :

1 inc, 3 sc, 3 inc, 3 sc, 2 inc (18)

Rounds 3-9 :

Continue increasing pattern to (60)

Round 10 :

blo - 1 sc each in every stitch (60)

Rounds 11-24 :

Continue pattern increasing to (78) and add decorative brim

Assembly Instructions

  • Sew head to body using a double-pointed needle for stability, pin in place first
  • Attach leaves to sides of body, 4 rounds below the head seam to create 'arms'
  • Place removable collar around neck and tie in back with chain ties
  • Insert cardboard circle into bottom of flower pot for reinforcement
  • Apply dry pastel chalk to cheek area using soft cloth for natural blush effect

Important Notes

  • ๐Ÿ’กStuff body parts firmly but not too tightly to maintain proper shape
  • ๐Ÿ’กUse stitch markers consistently to track round beginnings, especially when joining parts
  • ๐Ÿ’กWork petal attachment carefully in Round 8 - this creates the professional seamless look
  • ๐Ÿ’กInsert safety eyes before completing head decreases for easier installation
  • ๐Ÿ’กThe collar is removable - don't sew it permanently to allow for washing or style changes

This enchanting Little Floweret brings springtime joy to any space with its cheerful yellow center and delicate pink petals. The clever construction technique creates a seamless professional finish that's sure to impress. Whether displayed in your home or given as a heartfelt gift, this adorable flower friend will bloom in hearts for years to come. The removable collar adds a sweet touch that makes it extra special! ๐ŸŒธ

You ask,

we answer.

FAQs

Can I use different colors for the petals?

Absolutely! While the pattern uses two shades of pink, you can make all petals the same color or experiment with any color combination you prefer.

Is the collar permanently attached?

No, the collar is designed to be removable so you can take it off for washing or simply change the look of your flower.

What if I can't find the exact yarn colors specified?

The pattern works with any cotton blend yarn of similar weight. Feel free to substitute colors to match your preference or available supplies.

How do I attach the petals in Round 8?

Work through both the petal stitches and the back loop only of the head center simultaneously, following the detailed step-by-step instructions in the pattern.

Can I make this without safety eyes?

Yes, you can embroider the eyes instead using black thread, though safety eyes give a more professional finish and character expression.