🧢 Beautiful ✨ Detailed πŸ’ Adorable

Little Sheep Amigurumi Pattern

Little Sheep Amigurumi Pattern
4.8β˜… Rating
2-3 Hours Time Needed
3.0K Made This
βœ‚οΈ

Beginner Friendly Level

Perfect for those just starting their sewing journey, with clear instructions and simple techniques

⏱️

Bite-Sized Project

Complete in under 2 hoursβ€”quick, fun, and perfect for a little creative escape.

πŸ‘

Cute Companion

An adorable friend to cherish, handcrafted with love to bring comfort and joy for years to come.

About This Little Sheep Amigurumi Pattern

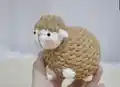
This Little Sheep pattern combines simple single crochet techniques with fun bobble stitches to create texture and personality. The design uses basic color changes between cream and white yarn to achieve the distinctive sheep look. With clear round-by-round instructions and helpful video tutorials, this pattern guides you through creating both the fluffy body and sweet face details that make this sheep so endearing.

Little Sheep Amigurumi Pattern crochet pattern - detailed view of completed project

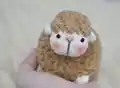
The finished sheep measures approximately 7cm (2.75 inches) tall, making it perfect for display or as a pocket companion. Safety eyes and simple embroidery details bring the face to life with minimal effort.

Why You'll Love This Little Sheep Amigurumi Pattern

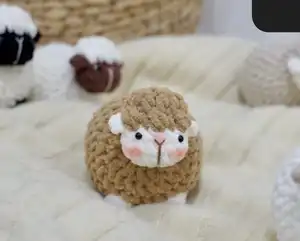
I absolutely love this pattern because it teaches you bobble stitches in the most adorable way possible! There's something so satisfying about watching those fluffy texture stitches come together to create realistic sheep wool. The size is perfect for quick satisfaction - you can finish it in an afternoon and have an instant mood booster sitting on your desk. Plus, the video tutorials make even tricky techniques feel manageable and fun.

Little Sheep Amigurumi Pattern step 1 - construction progress Little Sheep Amigurumi Pattern step 2 - assembly progress Little Sheep Amigurumi Pattern step 3 - details and accessories Little Sheep Amigurumi Pattern step 4 - final assembly and finishing

Switch Things Up

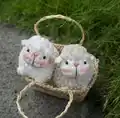
I love how versatile this little sheep pattern can be with just a few creative tweaks! Sometimes I make a whole flock using different cream and beige tones - from pure white to soft caramel - creating a beautiful gradient family. You could easily turn this into a keychain by adding a small loop to the top, or make it larger by using bulky yarn and a bigger hook for a super cuddly version.

For seasonal fun, I've experimented with adding tiny Santa hats for Christmas or small flower crowns for spring. The bobble stitch body could even be done in pastel rainbow colors for a magical unicorn sheep! I've also made some with embroidered closed sleepy eyes instead of safety eyes for the sweetest bedtime companions. The possibilities are endless when you start playing with colors and small detail changes!

Common Mistakes & How to Fix Them

βœ— Not stuffing firmly enough which causes the sheep to lose its round shape and cute proportions βœ— Skipping stitch markers when working bobble stitches leading to uneven texture and miscounted rounds βœ— Placing safety eyes too far apart or at wrong rounds creating an unbalanced facial expression βœ— Working bobble stitches too loosely causing gaps in the fluffy texture instead of solid coverage

Little Sheep Amigurumi Pattern

Create an adorable pocket-sized sheep companion with this charming amigurumi pattern! This delightful little sheep features a fluffy textured body using bobble stitches and a sweet cream-colored face with rosy cheeks. Perfect for beginners looking to practice color changes and basic shaping techniques while creating something truly special. The finished sheep stands approximately 7cm tall, making it an ideal desk companion or gift.

Beginner Friendly 2-3 Hours

Materials Needed for Little Sheep Amigurumi Pattern

β€” Main Fabric

  • 01
    Chunky yarn size 4-5mm in cream/beige and white colors
  • 02
    Himalaya Velvet or Himalaya Dolphin Baby yarn recommended for best texture results

β€” Tools Required

  • 01
    4mm crochet hook
  • 02
    4.5mm toy safety eyes
  • 03
    Needle for sewing
  • 04
    Toy stuffing (fiberfill)
  • 05
    Stitch marker
  • 06
    Scissors
  • 07
    Brown embroidery thread for nose
  • 08
    Powder blush for cheeks

Progress Tracker

0% Complete

β€” Body :

Round 1 :

8sc in MR [8]

Round 2 :

8inc [16]

Round 3 :

(sc, inc) x 8 [24]

Round 4 :

(3sc, inc) x 6 [30]

Round 5 :

11sc, bo4, 4sc, bo4, 13 sc [30]

Round 6-9 (4 rounds) :

30sc [30]

Round 10 :

11sc, bo4, 4sc, bo4, 13 sc [30]

Round 11 :

(3sc, dec) x 6 [24]

Round 12 :

(sc, dec) x 8 [16]

Info :

Stuff the body firmly with fiberfill

Round 13 :

8dec [8]

Info :

Fasten off, leaving the yarn tail. Using the yarn needle, weave the yarn tail through the front loop of each remaining stitch and pull it tight to close

β€” Head :

Info :

Start in cream yarn. Ch 4. Stitches are worked in both sides of the foundation chain

Round 1 :

Skip the first ch on the hook, inc in next ch, sc in next ch, 4sc in next ch. Continue on the other side of the foundation chain, sc in next ch, inc in next ch [10]

Round 2 :

2inc, sc, 4inc, sc, 2inc [18]

Round 3 :

18sc [18]

Round 4 :

(ch 4 , skip 3 ch from the hook, slst in next ch), sc in next st of the base, dec, (sc, dec) x 2, (ch 4, skip 3 ch from the hook, slst in next ch), sc in next st of the base, dec, (sc, dec) x 2 [12]

Info :

Change to white yarn

Round 5 :

(sc, bo2) x 6 [12]

Info :

Stuff the head firmly with fiberfill

Round 6 :

6dc-dec [6]

Info :

Fasten off, leaving the yarn tail. Using the yarn needle, weave the yarn tail through the front loop of each remaining stitch and pull it tight to close

β€” Finishing :

Assembly :

Insert the 4.5mm safety eyes between rounds 3 and 4, 4 stitches apart

Details :

Use powder blush for the cheeks

Embroidery :

Embroider the nose with brown threads

Final Step :

Sew the head to the body

Assembly Instructions

  • Insert 4.5mm safety eyes between rounds 3 and 4 of the head, spacing them 4 stitches apart for proper proportion
  • Apply powder blush to create rosy cheeks using a small brush or cotton swab for a natural look
  • Embroider the nose using brown embroidery thread with simple straight stitches to form a small triangular shape
  • Securely sew the completed head to the body using matching yarn and a whip stitch technique
  • Ensure all yarn tails are properly woven in and trimmed for a clean finished appearance

Important Notes

  • πŸ’‘Use stitch markers consistently to track your rounds, especially when working the textured bobble stitches
  • πŸ’‘Stuff both body and head firmly but not overly tight to maintain the cute rounded sheep shape
  • πŸ’‘Make invisible decreases for cleaner shaping and a more professional finished appearance
  • πŸ’‘Work stitches close together to prevent stuffing from showing through gaps in your work
  • πŸ’‘Practice bobble stitches on a swatch first if you're unfamiliar with this textured technique

This precious Little Sheep pattern brings farmyard charm to your crochet collection with its fluffy bobble stitch texture and sweet embroidered face. The compact size makes it perfect for using up yarn scraps while learning new techniques like color changes and bobble stitches. Whether you're making it for yourself or as a heartwarming gift, this little sheep is sure to bring smiles and comfort wherever it goes. The detailed instructions and helpful video links ensure your success every step of the way. πŸ‘ Happy crocheting! 🧢✨

You ask,

we answer.

FAQs

What if I don't have chunky yarn - can I use regular worsted weight?

Yes, you can use worsted weight yarn with a smaller hook (3.5mm), but your finished sheep will be smaller than the stated 7cm size. The texture will also be less fluffy.

Can I make this sheep without safety eyes for a baby?

Absolutely! Simply embroider the eyes using black yarn or thread with satin stitches. This makes the toy safe for babies and young children.

I'm having trouble with the bobble stitches - any tips?

Bobble stitches can be tricky! Make sure to yarn over and pull through all loops at the end. The video tutorial linked in the pattern shows the technique clearly.

How do I achieve the two-tone effect in the head?

The pattern starts with cream yarn for the face area, then switches to white for the fluffy top. Change colors at the specified round and carry the yarn up the back.

What's the best way to stuff this small amigurumi?

Use small amounts of fiberfill and push it in with the blunt end of a crochet hook or chopstick. Stuff firmly but don't overstuff or you'll distort the shape.