🧢 Beautiful ✨ Detailed πŸ’ Adorable

Loafie the Bread Loaf Amigurumi Pattern

Loafie the Bread Loaf Amigurumi Pattern
4.4β˜… Rating
3-4 Hours Time Needed
3.3K Made This
βœ‚οΈ

Intermediate Level

Ideal for those with basic knitting experience, featuring slightly more advanced stitches and techniques to expand your skills.

⏱️

Weekend Treat

Takes 5-7 hours, making it an enjoyable project to finish over a couple of days.

🧸

Cute Companion

An adorable friend to cherish, handcrafted with love to bring comfort and joy for years to come.

About This Loafie the Bread Loaf Amigurumi Pattern

This delightful Loafie pattern brings the comfort of fresh bread to life in amigurumi form! The design cleverly mimics a real bread slice with its golden tan crust border and cream-colored soft interior. The pattern uses bobble stitches to create realistic bread texture, while the simple facial features give Loafie an endearing personality. With cute little arms that can be positioned as desired, this pattern combines practical crochet techniques with whimsical design elements.

Loafie the Bread Loaf Amigurumi Pattern crochet pattern - detailed view of completed project

The construction method is particularly clever, working the front and back pieces separately before joining them together to create the dimensional loaf shape. This technique allows for easy stuffing and ensures the characteristic bread slice silhouette that makes Loafie so recognizable and charming.

Why You'll Love This Loafie the Bread Loaf Amigurumi Pattern

I absolutely love how this pattern transforms simple stitches into something so recognizable and endearing! The bobble stitches add such realistic texture that you can almost smell fresh bread baking. What makes this special is how the construction method teaches you dimensional shaping while creating something genuinely cute and functional. The color-changing technique from cream to tan creates that perfect bread crust effect, and those tiny arms just make you want to give Loafie the biggest hug!

Loafie the Bread Loaf Amigurumi Pattern step 1 - construction progress Loafie the Bread Loaf Amigurumi Pattern step 2 - assembly progress Loafie the Bread Loaf Amigurumi Pattern step 3 - details and accessories Loafie the Bread Loaf Amigurumi Pattern step 4 - final assembly and finishing

Switch Things Up

I love how versatile this Loafie pattern can be with just a few creative modifications! You could easily transform this into different types of bread by changing the colors - imagine a whole wheat version with darker brown yarn, or even a fun rainbow bread using multiple bright colors for a whimsical twist. I've experimented with adding small embroidered details like sesame seeds on top using tiny French knots, which gives Loafie an even more realistic bakery-fresh appearance.

For those who want to create an entire bread family, I suggest making multiple Loafies in different sizes using various hook sizes, from tiny dinner roll versions to full-sized loaf companions. You could even add small accessories like a tiny butter pat made from yellow felt, or create a whole breakfast scene with coordinating patterns. The construction technique from this pattern works beautifully as a foundation for other food-themed amigurumi projects too!

Common Mistakes & How to Fix Them

βœ— Not pushing bobble stitches out properly after completing them, leaving them inverted and flat instead of textured βœ— Changing colors too early or late in the border rounds, disrupting the realistic bread crust appearance βœ— Stuffing too firmly or not firmly enough, affecting the characteristic soft bread loaf shape and structure βœ— Misaligning the front and back pieces when sewing together, causing uneven edges and poor overall appearance

Loafie the Bread Loaf Amigurumi Pattern

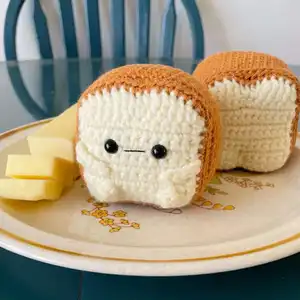
Create your own adorable Loafie the bread loaf with this charming amigurumi pattern! This sweet character features a realistic bread slice design with a golden tan crust and creamy white interior, complete with bobble stitches for texture and cute little arms. Perfect for beginners looking to expand their skills with simple shaping techniques and color changes. Loafie makes a delightful addition to any play kitchen or as a unique gift for bread lovers and amigurumi enthusiasts alike.

Intermediate 3-4 Hours

Materials Needed for Loafie the Bread Loaf Amigurumi Pattern

β€” Main Fabric

  • 01
    Worsted weight yarn in cream color for the bread interior
  • 02
    Worsted weight yarn in tan/brown color for the bread crust border

β€” Tools Required

  • 01
    3.5 mm crochet hook
  • 02
    8 mm safety eyes
  • 03
    Stitch marker
  • 04
    Scissors
  • 05
    Sewing needle
  • 06
    Fiber fill stuffing
  • 07
    Black thread for embroidery

Progress Tracker

0% Complete

β€” Arms :

Info :

Using cream, make 2. Starting with a long tail ch 6, slst in the 2nd ch from hook and in remaining ch spaces (5). f/o and leave a long tail for attaching

β€” Front of loaf :

Row 1 :

Starting with cream, ch 13, sc across starting in the 2nd ch from the hook (12) ch 1 and turn

Row 2 :

sc 2, BO, sc 6, BO, sc 2. ch 1 and turn

Row 3-10 :

sc across. (12) ch 1 and turn

Row 11 :

(top of the loaf) 2 HDC in one st, dc, dc, tr, tr, dc & HDC in one st, HDC and dc in one st, tr, tr, dc, dc, 2 HDC in last st (16)

Info :

Now you will crochet around the piece. ch 1 and put a st marker in the ch 1 (it counts as a st) then sc 9 down the side, inc in corner, sc 10 across bottom, inc in corner, sc 10 up the other side

Info :

Change to tan. To change to tan, before finishing your last st in cream pull the tan yarn through to finish the st. inc in the first st along the top, sc in the next 14 sts, inc in the last st

Info :

You are now back at the st marker, you are going to finish sc around the bread with tan. sc 10 down the side, inc in corner, sc 12 across the bottom, inc in corner, sc 10 up the other side (you will reach the tan yarn across the top. There should be 54 sts total around the entire breadβ€”do not fasten off.

Info :

Place safety eyes between rows 7&8, approx. 3 sts apart. Embroider mouth. Attach arms to edge of bread, between rows 5&6

Row 1 :

Still using tan, sc around in the BLO (54)

Row 2-10 :

sc around (54) f/o and weave in yarn tail

β€” Back of loaf :

Row 1 :

Starting with cream, ch 13, sc across starting in the 2nd ch from the hook (12) ch 1 and turn

Row 2-10 :

sc across. (12) ch 1 and turn

Row 11 :

(top of the loaf) 2 HDC in one st, dc, dc, tr, tr, dc & HDC in one st, HDC & dc in one st, tr, tr, dc, dc, 2 HDC in last st (16)

Info :

Now you will crochet around the piece. ch 1 and put a st marker in the ch 1 (it counts as a st) then sc 9 down the side, inc in corner, sc 10 across bottom, inc in corner, sc 10 up the other side

Info :

Change to tan, inc in the first st along the top, sc in the next 14 sts, inc in the last st. You are now back at the st marker, you are going to finish sc around the bread with tan. sc 10 down the side, inc in corner, sc 12 across the bottom, inc in corner, sc 10 up the other side (you will reach the tan yarn that is across the top of the loaf). There should be 54 sts total around the entire bread. F/O and leave a long tail for sewing.

β€” Assembly :

Info :

To attach, line up the front with the back and whip stich through the BLO of row 10 on the loaf and both loops on the back. Stuff as you go, as firmly as you prefer.
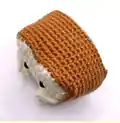
β€” Making Loafie's buns :

Info :

Poke the needle between rows 8&9 and up through the back through rows 4&5, centered. Repeat twice. Pull both tails tightβ€”but not too tight (you don't want to see fiber fill poking out). Tie ends together and knot at the bottom then weave in the tails

Assembly Instructions

  • Line up the front and back pieces carefully, ensuring the tan borders align properly for a clean bread crust appearance
  • Whip stitch through the back loop only of the front piece and both loops of the back piece when joining
  • Stuff firmly but not too tightly as you sew to maintain the soft bread loaf shape and prevent overstuffing
  • Ensure safety eyes are securely attached between rows 7&8, approximately 3 stitches apart for proper facial proportions
  • Attach arms to the edge between rows 5&6, positioning them as desired for the final look
  • Create Loafie's characteristic bun shape by threading yarn from rows 8&9 up through rows 4&5 and pulling gently to gather

Important Notes

  • πŸ’‘Always push bobble stitches out after completing them to ensure proper texture and dimension
  • πŸ’‘Use stitch markers to keep track of your position when working around the pieces
  • πŸ’‘Change colors carefully to maintain the realistic bread crust appearance throughout the border
  • πŸ’‘Ensure correct side is facing out when assembling - stitches should look like little v's
  • πŸ’‘If arms appear floppy, you can sew or glue them in your preferred position for stability

This charming Loafie the bread loaf pattern combines clever construction techniques with adorable design elements to create a truly unique amigurumi friend! The realistic bread slice appearance, complete with textured bobble stitches and perfect color transitions, makes this pattern both educational and delightfully whimsical. Whether you're expanding your amigurumi skills or looking for the perfect kitchen companion, Loafie brings warmth and personality to any space. The dimensional construction method teaches valuable shaping techniques while creating something genuinely huggable and sweet. 🍞 Happy crocheting! 🧢✨

You ask,

we answer.

FAQs

What if my bobble stitches look flat instead of textured?

Make sure to push the bobble stitches out toward the front of your work after completing each one. They naturally want to invert, so a gentle push with your hook or finger will pop them into the correct position.

How do I change from cream to tan color smoothly?

Before completing your last cream stitch, pull the tan yarn through to finish that stitch. This creates a clean color transition without visible gaps or bumps in your work.

Can I make Loafie larger or smaller?

Yes! Use a larger hook and thicker yarn for a bigger Loafie, or a smaller hook with thinner yarn for a mini version. Just ensure your safety eyes are proportionally sized to match.

What's the best way to stuff Loafie for the right shape?

Stuff firmly but not tightly - you want to maintain the soft, squishy feeling of bread while keeping the shape defined. The gathering technique for the buns helps create the characteristic loaf silhouette.

My front and back pieces don't line up perfectly when sewing. What should I do?

The easiest way to align them is to look at both pieces from above before sewing. Make sure the stitch counts match and pin them together if needed before whip stitching.