🧢 Beautiful ✨ Detailed πŸ’ Adorable

Adorable Rattle Bunny Amigurumi Pattern

Adorable Rattle Bunny Amigurumi Pattern
4.1β˜… Rating
4-5 Hours Time Needed
1.9K Made This
βœ‚οΈ

Intermediate Level

Ideal for those with basic knitting experience, featuring slightly more advanced stitches and techniques to expand your skills.

⏱️

Weekend Treat

Takes 5-7 hours, making it an enjoyable project to finish over a couple of days.

🧸

Cute Companion

An adorable friend to cherish, handcrafted with love to bring comfort and joy for years to come.

About This Adorable Rattle Bunny Amigurumi Pattern

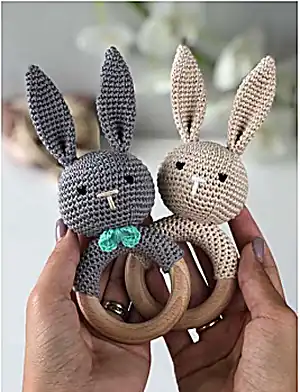
This charming rattle bunny pattern creates a perfect first toy for babies, combining safety and sensory play in one adorable package. The soft crocheted bunny head features embroidered facial details and long floppy ears that little ones love to touch and explore. Attached to a smooth wooden teething ring, this rattle provides gentle sounds and a natural texture that's perfect for soothing teething babies.

Adorable Rattle Bunny Amigurumi Pattern crochet pattern - detailed view of completed project

The pattern includes detailed photo instructions and two different methods for covering the wooden ring, making it accessible for crafters of varying skill levels. Every step is clearly explained to ensure your finished rattle is both beautiful and safe for baby.

Why You'll Love This Adorable Rattle Bunny Amigurumi Pattern

I absolutely love how this pattern combines functionality with pure cuteness - there's something so special about creating a toy that will become a baby's first treasured companion. The gentle rattle sound is just right for tiny ears, and I find the process of working around the wooden ring both challenging and rewarding. What makes my heart sing is knowing that this handmade gift will be cherished by both baby and parents, creating precious memories with every little shake and snuggle.

Adorable Rattle Bunny Amigurumi Pattern step 1 - construction progress Adorable Rattle Bunny Amigurumi Pattern step 2 - assembly progress Adorable Rattle Bunny Amigurumi Pattern step 3 - details and accessories Adorable Rattle Bunny Amigurumi Pattern step 4 - final assembly and finishing

Switch Things Up

I love experimenting with different color combinations for this sweet bunny - try soft pastels like mint green or dusty pink for a dreamy nursery vibe, or go bold with bright rainbow colors that will stimulate baby's developing vision. You can easily customize the bow with different colors or even add tiny crocheted flowers for extra charm.

For an extra special touch, I sometimes add a few drops of lavender essential oil to the stuffing (making sure it's baby-safe) to create a calming sensory experience. You could also experiment with different wooden ring sizes - smaller rings work great for tiny newborn hands, while larger ones are perfect for older babies who are developing their grip strength.

Common Mistakes & How to Fix Them

βœ— Working too loosely around the wooden ring causing the fabric to slide and move βœ— Forgetting to stuff the head before closing it completely, making it difficult to achieve proper shape βœ— Placing the facial features incorrectly without measuring the proper spacing between eyes and nose placement βœ— Not securing the rattle inside the head properly before final stuffing, causing it to rattle loose

Adorable Rattle Bunny Amigurumi Pattern

Create the most precious handmade baby gift with this delightful rattle bunny pattern! This sweet little companion combines the comfort of a soft toy with the engaging sound of a gentle rattle, making it perfect for tiny hands to grasp and explore. The pattern features an adorable bunny head with long ears and a charming bow, all attached to a natural wooden teething ring that's both safe and soothing for babies.

Intermediate 4-5 Hours

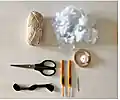
Materials Needed for Adorable Rattle Bunny Amigurumi Pattern

β€” Main Fabric

  • 01
    Vita Cotton Lily 100% cotton yarn, 1.75 oz/50g approximately 137yds/125m
  • 02
    Suggested substitute: Scheepjes Catona or Alpina Anabel cotton yarn
  • 03
    Yardage required: approximately 87yds/80m

β€” Tools Required

  • 01
    Crochet hook 2mm
  • 02
    Crochet hook 2.5mm
  • 03
    Wooden ring 2-3 inches/60-70mm diameter (beech recommended)
  • 04
    Small rattle 1 inch/24-30mm diameter
  • 05
    Stuffing
  • 06
    Scissors
  • 07
    Black embroidery floss or yarn
  • 08
    Tapestry needle
  • 09
    Stitch markers or contrasting yarn

Progress Tracker

0% Complete

β€” Working around the ring. Option 1:

Setup:

Chain 10 using hook 2.5mm, then work around the ring using hook 2mm

Method:

Join chain with sl st around the ring. Then sc in every st around. The first rnd is the most difficult

Continue:

Start to work in a continuous spiral, sc in each st. Pay attention to your tension, crochet around the ring tightly

Finish:

Cont to work until half or less than half of the ring is covered. End with sl st

β€” Working around the ring. Option 2:

Alternative Method:

Crochet a rectangle, working sc. For ring size, ch20 and work for 9 rows

Assembly:

When the rectangle is finished, fold it over the ring and sew it, the fabric should be tight around the ring

β€” Head:

Rnd 1:

6sc in magic ring = 6 sts

Rnd 2:

(inc) * 6 times= 12 sts

Rnd 3:

(inc, sc in next st) * 6 times = 18 sts

Rnd 4:

(inc, sc in next 2 sts) * 6 times = 24 sts

Rnd 5:

(inc, sc in next 3 sts) * 6 times = 30 sts

Rnd 6:

(inc, sc in next 4 sts) * 6 times = 36 sts

Rnd 7:

(inc, sc in next 5 sts) * 6 times = 42 sts

Rnd 8:

(inc, sc in next 6 sts) * 6 times = 48 sts

Rnds 9-15:

48sc (work even for 7 rnds)

Rnd 16:

(dec, sc in next 6 sts) * 6 times = 42 sts

Rnd 17:

(dec, sc in next 5 sts) * 6 times = 36 sts

Rnd 18:

(dec, sc in next 4 sts) * 6 times = 30 sts

Rnd 19:

(dec, sc in next 3 sts) * 6 times = 24 sts

Info:

Embroider eyes and nose, stuff the head in half and put the rattle inside

Rnd 20:

(dec, sc in next 2 sts) * 6 times = 18 sts

Info:

Stuff the head tightly, for your convenience you can use tweezers

Rnd 21:

(dec, sc in next st) * 6 times = 12 sts

Rnd 22:

(dec) * 6 times = 6 sts

Info:

Bind off rem 6 sts using a needle. Leave a long tail to sewing around a ring (approx 18-20in/45-50cm)

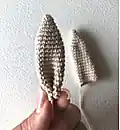
β€” Ears (Make 2):

Rnd 1:

4 sc into magic ring = 4 sts

Rnd 2:

(inc, sc in next st) * 2 times= 6 sts

Rnd 3:

(inc, sc in next 2 sts) * 2 times= 8 sts

Rnd 4:

(inc, sc in next 3 sts) * 2 times = 10 sts

Rnd 5:

(inc, sc in next 4 sts) * 2 times = 12 sts

Rnd 6:

(inc, sc in next 5 sts) * 2 times = 14 sts

Rnd 7:

(inc, sc in next 6 sts) * 2 times = 16 sts

Rnds 8-20:

sc in next 16 sts (work even for 13 rnds)

Finishing:

Sl st in next st, finish off leaving a long tail for sewing to the head. Fold the ear in half and sew it

β€” Bow:

Method:

In magic ring ch4, tr4, ch4, sl st into magic ring, ch4, tr4, ch4, sl st

Finishing:

Finish off leaving a long tail for sewing. Fasten off, tighten the magic ring and wrap it using a tail

Assembly Instructions

  • Embroider the eyes at level of row 3 or 4 after the last increase with 7 stitches between the eyes
  • Embroider the nose one row below the eyes using black embroidery floss
  • Sew the ears to the head at level of row 4 from the top of the head, sewing around twice for security
  • Sew the head to the ring, placing it directly in the middle and pressing it slightly as shown in photos
  • Sew the head to the ring around twice, paying attention to keep it centered in the middle
  • Attach the bow to the neck area for the finishing decorative touch

Important Notes

  • πŸ’‘All pieces are worked in a continuous spiral - do not join rounds, just work single crochet in the next stitch
  • πŸ’‘Use stitch markers or contrasting yarn to mark the beginning of each round
  • πŸ’‘When working around the wooden ring, use the smaller 2mm hook for easier handling
  • πŸ’‘Pay careful attention to tension when crocheting around the ring - it should be tight and secure
  • πŸ’‘Stuff the head firmly but not too tightly to maintain the proper rounded shape
  • πŸ’‘Leave long tails for sewing as specified in the pattern for secure assembly

This precious rattle bunny pattern brings together safety, sensory play, and pure adorableness in one perfect baby gift! The combination of soft crocheted textures, gentle rattle sounds, and natural wood creates a multi-sensory experience that babies absolutely love. Every stitch is worked with love to create a treasured companion that will be cherished through those precious early months. Happy crocheting! 🧢✨

You ask,

we answer.

FAQs

What size wooden ring should I use for this pattern?

Use a wooden ring that's 2-3 inches (60-70mm) in diameter. Beech wood rings are recommended as they're safe for babies and have a smooth finish.

Can I substitute different yarn for this pattern?

Yes! You can substitute with Scheepjes Catona or Alpina Anabel cotton yarn. Just ensure your substitute matches the original gauge of 26 sc x 25 rows = 4 inches (10cm).

How do I make sure the rattle sound isn't too loud for baby?

Choose a small rattle that's approximately 1 inch (24-30mm) in diameter. Test the sound level before inserting - it should be gentle and pleasant, not startling.

What's the best way to embroider the facial features?

Embroider the eyes at row level 3 or 4 after the last increase, spacing them 7 stitches apart. Place the nose one row below the eyes using black embroidery floss.

Is this pattern safe for newborns?

Yes, when made properly with secure stitching and quality materials. Always supervise babies during play and regularly check that all parts are securely attached.