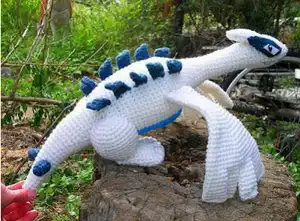
Create your own majestic Lugia Pokemon with this detailed amigurumi pattern! This legendary psychic-flying type comes to life through careful crocheting techniques, featuring distinctive blue markings, elegant wings, and that iconic head crest. Perfect for Pokemon fans and collectors who want to bring this beloved legendary creature into their crochet collection. This pattern requires intermediate skills due to the complex wing construction and assembly process.
Progress Tracker
0% Complete
— Head/Body/Tail :
Round 1 :
6 sc in magic ring (6)
Round 2 :
sc in next 2 sc, 2 sc in next sc, sc in next 2 sc, 2 sc in next sc (8)
Round 3 :
sc in next 3 sc, 3 sc in next sc, sc in next 3 sc, 3 sc in next sc (12)
Round 4 :
3 sc in next sc, sc in each of next 4 sc, 2 sc in each of next 2 sc, sc in each of next 4 sc, 3 sc in last sc (18)
Round 5 :
sc in each sc around (18)
Round 6 :
3 sc in next sc, sc in each of next 16 sc, 3 sc in last sc (22)
Round 7 :
sc in next 10 sc, 2 sc in each of next 2 sc, sc in last 10 sc (24)
Round 8-12 :
sc in each sc around (24)
Round 13 :
sc in next 2 sc, dec over next 2 sc around (18)
Info :
Stuff head at this point. Stuff firmly and shape while stuffing. Continue stuffing neck, body and tail as you progress through the pattern. The neck needs careful attention, as it needs to be stuffed quite firmly.
Round 14-16 :
sc in each sc around (18)
Round 17 :
sc in next 4 sc, dec over next 2 sc around (15)
Round 18-26 :
sc in each sc around (15)
Round 27 :
sc in next 4 sc, 2 sc in next sc around (18)
Round 28 :
sc in each sc around (18)
Round 29 :
sc in next 5 sc, 2 sc in next sc around (21)
Round 30 :
sc in each sc around (21)
Round 31 :
sc in next 6 sc, 2 sc in next sc around (24)
Round 32 :
sc in each sc around (24)
Round 33 :
sc in next 3 sc, 2 sc in next sc around (30)
Round 34 :
sc in each sc around (30)
Round 35 :
sc in next 4 sc, 2 sc in next sc around (36)
Round 36 :
sc in each sc around (36)
Round 37 :
sc in next 5 sc, 2 sc in next sc around (42)
Round 38 :
sc in each sc around (42)
Round 39 :
sc in next 6 sc, 2 sc in next sc around (48)
Round 40-50 :
sc in each sc around (48)
Round 51 :
sc in next 6 sc, dec over next 2 sc around (42)
Round 52 :
sc in each sc around (42)
Round 53 :
sc in next 5 sc, dec over next 2 sc around (36)
Round 54 :
sc in each sc around (36)
Round 55 :
sc in next 4 sc, dec over next 2 sc around (30)
Round 56 :
sc in each sc around (30)
Round 57 :
sc in next 13 sc, dec over next 2 sc, sc in next 13 sc, dec over last 2 sc (28)
Round 58 :
sc in each sc around (28)
Round 59 :
sc in next 12 sc, dec over next 2 sc, sc in next 12 sc, dec over last 2 sc (26)
Round 60 :
sc in each sc around (26)
Round 61 :
sc in next 11 sc, dec over next 2 sc, sc in next 11 sc, dec over last 2 sc (24)
Round 62 :
sc in each sc around (24)
Round 63 :
sc in next 10 sc, dec over next 2 sc, sc in next 10 sc, dec over last 2 sc (22)
Round 64 :
sc in each sc around (22)
Round 65 :
sc in next 9 sc, dec over next 2 sc, sc in next 9 sc, dec over last 2 sc (20)
Round 66 :
sc in each sc around (20)
Round 67 :
sc in next 8 sc, dec over next 2 sc, sc in next 8 sc, dec over last 2 sc (18)
Round 68 :
sc in each sc around (18)
Round 69 :
sc in next 7 sc, dec over next 2 sc, sc in next 7 sc, dec over last 2 sc (16)
Round 70 :
sc in each sc around (16)
Round 71 :
sc in next 6 sc, dec over next 2 sc, sc in next 6 sc, dec over last 2 sc (14)
Round 72 :
sc in each sc around (14)
Round 73 :
sc in next 5 sc, dec over next 2 sc, sc in next 5 sc, dec over last 2 sc (12)
Round 74 :
sc in each sc around (12)
Round 75 :
sc in next 4 sc, dec over next 2 sc, sc in next 4 sc, dec over last 2 sc (10)
Round 76 :
sc in each sc around (10)
Round 77 :
sc in next 3 sc, dec over next 2 sc, sc in next 3 sc, dec over last 2 sc (8)
Round 78 :
sc in each sc around (8)
Round 79 :
sc in next 2 sc, dec over next 2 sc, sc in next 2 sc, dec over last 2 sc (6)
Round 80 :
sc in each sc around (6)
Round 81 :
dec over next 2 sc around (3)
— Head Crest :
Round 1 :
4 sc in magic ring (4)
Round 2 :
sc in next sc, 2 sc in next sc, sc in next sc, 2 sc in last sc (6)
Round 3 :
sc in next 2 sc, 2 sc in next sc, sc in next 2 sc, 2 sc in last sc (8)
Round 4 :
sc in next 3 sc, 2 sc in next sc, sc in next 3 sc, 2 sc in last sc (10)
Round 5 :
sc in next 4 sc, 2 sc in next sc, sc in next 4 sc, 2 sc in last sc (12)
Round 6 :
sc in next 5 sc, 2 sc in next sc, sc in next 5 sc, 2 sc in last sc (14)
Round 7 :
sc in next 6 sc, 2 sc in next sc, sc in next 6 sc, 2 sc in last sc (16)
Round 8 :
sc in next 7 sc, 2 sc in next sc, sc in next 7 sc, 2 sc in last sc (18)
Round 9 :
sc in each sc around (18)
Info :
F/O and weave in ends. You can add a tiny bit of stuffing here if you wish to create more of a rounded crest for the head, or you can flatten the crest and pin in place to back of head in position desired
— Wings (Make 2) :
Info :
If you wish to add a wire frame to the wings, you will need to plan that frame to be introduced before crocheting the fingers. I recommend a wire frame that will go from wing tip to wing tip, through the 'body' of the doll.
Round 1 :
Chain 7. Sc in 2nd chain from hook and each chain across. Turn work and working down the 'unused' side of the foundation chain, sc in the same chain as the last sc of other side, and each remaining chain across. Join to first sc with slip stitch. (12 sc)
Round 2-6 :
sc in each sc around (12)
Round 7 :
sc in next 5 sc, 2 sc in next sc around (14)
Round 8 :
sc in each sc around (14)
Round 9 :
sc in next 6 sc, 2 sc in next sc around (16)
Round 10 :
sc in each sc around (16)
Round 11 :
sc in next 7 sc, 2 sc in next sc around (18)
Round 12 :
sc in each sc around (18)
Round 13 :
sc in next 5 sc, 2 sc in next sc around (21)
Round 14 :
sc in each sc around (21)
Round 15 :
sc in next 6 sc, 2 sc in next sc around (24)
Round 16 :
sc in each sc around (24)
Round 17 :
sc in next 5 sc, 2 sc in next sc around (28)
Round 18 :
sc in each sc around (28)
Round 19 :
sc in next 6 sc, 2 sc in next sc around (32)
Round 20 :
sc in each sc around (32)
Round 21 :
sc in next 7 sc, 2 sc in next sc around (36)
Round 22 :
sc in each sc around (36)
Round 23 :
sc in next 8 sc, 2 sc in next sc around (40)
Round 24-26 :
sc in each sc around (40)
Info :
Do not fasten off. Begin first 'finger': Flatten wing 'end' – matching up your sc stitches. You will be working through only one 'side' at a time, but using both sides for each finger.
First Finger Round 1 :
sc in next 5 sc. Turn work so that other side is now facing you, sc in next 5 sc of the other side of the wing and join with slip stitch to first sc of 'finger' (10 sc)
First Finger Round 2-8 :
sc in each sc around, joining each round with slip stitch in first sc around (10)
Info :
Flatten end of 'finger'. Working through all layers, 4 sc across, slip stitch in last sc. F/O. Weave in ends.
Remaining Fingers :
Attach yarn to first stitch immediately to 'left' of finger just completed. Sc in same stitch as joining and complete same as rounds 1-8 of first finger.
Thumb Round 1 :
Chain 6. Sc in second chain from hook and each chain across, turn and working down other side of foundation, sc in each chain across. Sl St to first sc of round (10)
Thumb Round 2-10 :
sc in each sc around (10)
Info :
Flatten end of thumb. Working through all layers, 4 sc across, slip stitch in last sc. F/O. Weave in ends. Pin and sew thumb to wing on underside, just below and between first and second finger. Wings were not stuffed. Wings are attached to side of body near base of neck as shown. Just pin for now.
— Legs (Make 2) :
Round 1 :
6 sc in magic ring (6)
Round 2 :
2 sc in each sc around (12)
Round 3 :
sc in next sc, 2 sc in next sc around (18)
Round 4 :
sc in next 2 sc, 2 sc in next sc around (24)
Round 5 :
sc in each sc around (24)
Round 6 :
sc in next 7 sc, 2 sc in next sc around (27)
Round 7-9 :
sc in each sc around (27)
Round 10 :
sc in next 7 sc, dec over next 2 sc around (24)
Round 11 :
sc in next 6 sc, dec over next 2 sc around (21)
Round 12 :
sc in next 5 sc, dec over next 2 sc around (18)
Round 13 :
sc in next sc, dec over next 2 sc around (12)
Round 14 :
sc in each sc around (12)
Info :
Stuff leg moderately. Leave opening. F/O weave in ends.
— Foot (Make 2) :
Round 1 :
8 sc in magic ring (8)
Round 2 :
2 sc in each sc around (16)
Round 3 :
sc in next sc, 2 sc in next sc around (24)
Round 4 :
sc in each sc around (24)
Round 5 :
sc in next 6 sc, dec over next 2 sc around (21)
Round 6 :
sc in next 5 sc, dec over next 2 sc around (18)
Round 7 :
sc in each sc around (18)
Round 8 :
sc in next 4 sc, dec over next 2 sc around (15)
Round 9 :
sc in each sc around (15)
Round 10 :
sc in next 3 sc, dec over next 2 sc around (12)
Round 11-12 :
sc in each sc around (12)
Round 13 :
sc in next 2 sc, dec over next 2 sc around (9)
Info :
Stuff foot moderately, but not too much. Just enough to allow it to hold the shape you desire. Using white thread, create the 'toes' by taking three large whipstitches over the 'ends' of the feet. Go back and do the same with black thread to create the 'toes'. Sew the foot to end of leg as shown.
— Belly Decoration :
Round 1 :
Using medium blue: 8 sc in magic ring (8)
Round 2 :
2 sc in each sc around (16)
Round 3 :
sc in next sc, 2 sc in next sc around (24)
Round 4 :
sc in next 2 sc, 2 sc in next sc around (32)
Round 5 :
sc in next 3 sc, 2 sc in next sc around (40)
Round 6 :
sc in next 4 sc, 2 sc in next sc around (48)
Begin Points Row 1 :
Sc in next 8 sc, turn (8)
Row 2 :
dec over first 2 sc, sc across to last 2 sc, dec over last 2 sc of row, turn (6)
Row 3 :
dec over first 2 sc, sc across to last 2 sc, dec over last 2 sc of row, turn (4)
Row 4 :
dec over first 2 sc, dec over last 2 sc, turn (2)
Info :
F/O. Weave in end. Attach yarn to first stitch to immediate left of point just made, sc in same stitch as joining and complete second point same as for first. Attach yarn to any stitch along side of plate. Sc in same stitch as joining, and evenly around outside – using three sc in the tip of each 'point'. Join with sl st to top of first sc made. F/O and weave in ends. Pin to body over chest/stomach area.
— Plates Along Back (Make 10) :
Foundation :
Using darker blue: Chain 7. Sc in second chain from hook and each chain across (6)
Rows 2&3 :
sc in each sc across (6)
Info :
F/O and weave in ends.
— Spikes on Tail :
Round 1 :
Using darker blue: 3 sc in magic ring (3)
Round 2 :
sc in first 2 sc, 2 sc in last sc (4)
Round 3 :
sc in first 3 sc, 2 sc in last sc (5)
Round 4 :
sc in first 4 sc, 2 sc in last sc (6)
Round 5 :
sc in first 5 sc, 2 sc in last sc (7)
Round 6 :
sc in each sc around (7)
Info :
F/O and stuff very lightly. Pin to tail as shown.
— Eye Feather (Make 2) :
Foundation :
Chain 11. Slip stitch in second chain from hook, sc in next 2 chs, hdc in next 2 chs, dc in next 2 chs, hdc in next ch, sc in next ch, slip stitch in last chain. Turn work and working back up the other side of the foundation chain: slip stitch in same ch as last slip stitch, sc in next, hdc in next, dc in next 2, hdc in next 2, sc in next 2, slip stitch in last.
Info :
F/O and weave in ends. Pin to head as shown in photos.
— Assembly :
Info :
All parts need to be pinned to the doll's body before sewing any on. With a doll this large, it's really important you get everything just the way you want it. Figuring out the part placement isn't very hard, just refer to the photos and get everything the way you want! Then you can sew it all down. Eyes are cut from pieces of felt in the shapes shown. Mouth is embroidered on last.
This majestic Lugia pattern brings the legendary Pokemon to life in stunning detail! From the intricate wing construction with individual fingers to the characteristic blue markings, every element captures the essence of this beloved psychic-flying type. While challenging to construct, the finished result is a breathtaking display piece that any Pokemon enthusiast will treasure. Perfect for experienced crocheters ready to tackle their next legendary project! 🧶 Happy crocheting! ✨