🧢 Beautiful ✨ Detailed πŸ’ Adorable

Magic Potion Bottle Crochet Pattern

Magic Potion Bottle Crochet Pattern
4.2β˜… Rating
3-4 Hours Time Needed
1.8K Made This
βœ‚οΈ

Intermediate Level

Ideal for those with basic knitting experience, featuring slightly more advanced stitches and techniques to expand your skills.

⏱️

Weekend Treat

Takes 5-7 hours, making it an enjoyable project to finish over a couple of days.

πŸŽ„

Holiday Cheer

Festive fun for the season, bringing handmade magic to celebrations and creating new family traditions.

About This Magic Potion Bottle Crochet Pattern

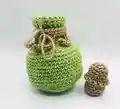
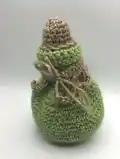
This enchanting magic potion bottle pattern captures the mystique of ancient apothecaries and magical brewing chambers. The design features a realistic bottle shape with a wide, rounded base that gradually narrows toward the neck, creating authentic proportions that any potion master would recognize. The pattern uses strategic increases and decreases to achieve the classic bulbous bottle silhouette, while the front loop only technique in the neck area creates a natural ridge that mimics the look of vintage glass bottles.

Magic Potion Bottle Crochet Pattern crochet pattern - detailed view of completed project

The cork stopper is ingeniously constructed with back loop techniques that create natural ridges, and includes detailed shaping instructions for achieving that perfect tapered cork appearance. The decorative elements include rustic twine-like trim around the cork and charming hanging tendrils that add movement and authentic potion bottle character.

Why You'll Love This Magic Potion Bottle Crochet Pattern

I'm absolutely captivated by how this pattern transforms simple stitches into something truly magical! What excites me most is the brilliant use of front and back loop techniques to create those realistic bottle ridges and cork textures - it's such a clever way to add authentic details without complicated colorwork. I love how the bottle's proportions are so perfectly balanced, creating that classic apothecary look that immediately says 'magic potion.' The hanging tendril decorations are pure genius, adding that perfect touch of mystical charm that makes this piece feel like it belongs in a real wizard's workshop. This pattern teaches valuable shaping techniques while creating something absolutely enchanting!

Magic Potion Bottle Crochet Pattern step 1 - construction progress Magic Potion Bottle Crochet Pattern step 2 - assembly progress Magic Potion Bottle Crochet Pattern step 3 - details and accessories Magic Potion Bottle Crochet Pattern step 4 - final assembly and finishing

Switch Things Up

I love experimenting with different potion themes when making this bottle! For a love potion, I use soft pink or deep burgundy yarn and add tiny red heart charms to the tendril decorations. A wisdom potion looks stunning in deep purple or midnight blue, while a healing potion in soft mint green with silver accents creates a beautiful ethereal effect.

For seasonal variations, I've made autumn harvest potions using burnt orange and golden yellow yarns, complete with tiny crocheted leaves attached to the tendrils. Halloween versions in black with glow-in-the-dark yarn create spooky bottles that literally glow in the dark! I've also created a whole apothecary collection by making bottles in different sizes and colors, each labeled with handmade tags indicating different magical properties.

The decoration possibilities are endless - I've added tiny bells for sound effects, used metallic threads for magical sparkle, and even incorporated small LED tea lights inside translucent bottles for an enchanting glow. Some of my favorites include adding small crystal chips or beads to represent magical ingredients, or using variegated yarn to create swirled potion effects.

Common Mistakes & How to Fix Them

βœ— Not maintaining consistent tension during the bottle shaping, which can cause the curves to look uneven or the bottle to lean βœ— Overstuffing the cork, making it too thick to fit properly in the bottle neck opening βœ— Forgetting to test-fit the cork in the bottle during construction, resulting in sizing issues at the end βœ— Rushing through the front loops only section without understanding how it creates the neck ridge detail

Magic Potion Bottle Crochet Pattern

Brew up some enchantment with this mystical magic potion bottle pattern! This whimsical design creates an authentic-looking apothecary bottle complete with a cork stopper and rustic twine decorations. Measuring 6 inches tall and 4 inches wide, this magical vessel features a bulbous jade-green base that tapers to a narrow neck, topped with a realistic cork and adorned with hanging tendril decorations that give it that perfect witchy aesthetic.

Intermediate 3-4 Hours

Materials Needed for Magic Potion Bottle Crochet Pattern

β€” Main Fabric

  • 01
    Sheepjes Stonewash XL in Canada Jade (or any medium/worsted yarn) for the bottle
  • 02
    Sheepjes Stonewash XL in Boulder Opal (or any medium/worsted yarn) for cork and decorations

β€” Tools Required

  • 01
    3.5mm crochet hook
  • 02
    Yarn scissors
  • 03
    Polyfill stuffing for cork
  • 04
    Tapestry needle
  • 05
    Stitch markers

Progress Tracker

0% Complete

β€” Bottle :

Round 1 :

With Canada Jade yarn, 6 sc in magic circle

Round 2 :

Inc in all 6 st (12)

Round 3 :

(inc in next st, sc in next st) repeat 6 times (18)

Round 4 :

(inc in next st, sc in next 2 st) repeat 6 times (24)

Round 5 :

(sc in next 2 st, inc in next st, sc in next st) repeat 6 times (30)

Round 6 :

(inc in next st, sc in next 4 st) repeat 6 times (36)

Round 7 :

(sc in next 3 st, inc in next st, sc in next 2 st) repeat 6 times (42)

Round 8 :

(inc in next st, sc in next 6 st) repeat 6 times (48)

Rounds 9-19 :

sc in all 48 st (48)

Round 20 :

(dec in next st, sc in next 6 st) repeat 6 times (42)

Round 21 :

(sc in next 3 st, dec in next st, sc in next 2 st) repeat 6 times (36)

Round 22 :

(dec in next st, sc in next 4 st) repeat 6 times (30)

Round 23 :

(sc in next st, dec in next st, sc in next 2 st) repeat 6 times (24)

Round 24 :

(sc in next 6 st, dec in next st) repeat 3 times (21)

Rounds 25-30 :

sc in all 21 st (21)

Round 31 :

sc in FLO of all 21 st (21)

Rounds 32-34 :

sc in all 21 st (21)

Info :

Fasten off and weave in end, roll down top of bottle

β€” Cork :

Round 1 :

With Boulder Opal yarn, 6 sc in magic circle (6)

Round 2 :

Inc in all 6 st (12)

Rounds 3-4 :

sc in all 12 st (12)

Round 5 :

(sc in next 4 st, inc in next st) repeat 2 times, sc in last 2 st (14)

Round 6 :

sc in all 14 st (14)

Rounds 7-8 :

sc in BLO in all 14 st (14)

Round 9 :

sc in all 14 st (14)

Info :

Stuff as you go, test-fit cork in bottle and adjust stuffing for good fit

Rounds 10-11 :

repeat rounds 7-8 (14)

Round 12 :

dec in all 14 st (7)

Info :

Fasten off leaving long tail, weave through front loops and pull to close. Pull tail through center bottom to top for flat appearance

Cork Decoration :

Make slip knot, insert hook in back loop sc rounds near top, ch 1 to anchor, sc around in each st, slip st to join and fasten off

β€” Bottle Decoration :

Row 1 :

With Boulder Opal yarn, ch 26, starting in second chain from hook HDC in all 25 st, ch 1 and turn (25)

Row 2 :

Create hanging tendrils: sl st in first st, in same st ch 10, sl st back along all 9 st and sl st into next 4 st, repeat 5 times total

Info :

Pull yarn through last sl st, use needle to thread through and either sew ends together around bottle neck or tie in bow

Assembly Instructions

  • Complete the bottle construction ensuring the front loops only round creates a visible ridge at the neck
  • Test-fit the cork during construction, adjusting stuffing as needed for proper fit in bottle opening
  • Create the cork decoration by working single crochet around the back loop ridges near the top
  • Construct the decorative band with hanging tendrils using the chain and slip stitch technique
  • Attach the decoration around the bottle neck, either sewing ends together or tying in a rustic bow
  • Ensure the bottle opening is properly shaped by rolling down the top edge as instructed
  • Final fitting of cork should be snug but removable for that authentic potion bottle functionality

Important Notes

  • πŸ’‘Use stitch markers to track your progress, especially during the bottle shaping rounds
  • πŸ’‘Test-fit the cork in the bottle during construction to ensure proper sizing
  • πŸ’‘The front loops only technique in round 31 creates an important ridge detail for authenticity
  • πŸ’‘Stuff the cork carefully - too much stuffing will make it too large for the bottle opening
  • πŸ’‘Leave long tails for the decoration to create the bow or sewing attachment
  • πŸ’‘The back loops only rounds in the cork create the realistic cork ridge texture

This magical potion bottle pattern brings a touch of enchantment to any space! With its authentic apothecary shape, realistic cork stopper, and charming rustic details, it's perfect for Halloween decorations, fantasy room dΓ©cor, or as a unique gift for anyone who loves a bit of magic in their life. The clever construction techniques create realistic textures and proportions that make this bottle look like it could have come straight from a medieval apothecary. Brew up some crafting magic and create your own mystical masterpiece! πŸ§™β€β™€οΈ Happy crocheting! ✨

You ask,

we answer.

FAQs

What if my cork doesn't fit properly in the bottle?

Test-fit the cork during construction as instructed. If it's too large, reduce stuffing; if too small, add more stuffing or adjust your tension. The pattern includes specific notes about testing fit as you work.

Can I use different colors for a different type of potion?

Absolutely! Try purple for a love potion, blue for a wisdom potion, or red for a strength potion. The construction remains the same regardless of color choices.

How do I create the hanging tendrils evenly?

The pattern specifies slip stitching into the next 4 stitches between each tendril. Count carefully and use stitch markers if needed to ensure even spacing.

What's the purpose of the front loops only round?

This creates a visible ridge that mimics the look of vintage glass bottles where different sections were joined, adding authentic detail to your potion bottle.

Can I make the bottle larger or smaller?

Yes, but you'll need to adjust the cork size proportionally. For a larger bottle, add more increase rounds; for smaller, use fewer. Remember to adjust the cork pattern accordingly.