๐Ÿงถ Beautiful โœจ Detailed ๐Ÿ’ Adorable

Mel the Snowman Amigurumi Pattern

Mel the Snowman Amigurumi Pattern
4.0โ˜… Rating
4-5 Hours Time Needed
3.6K Made This
โœ‚๏ธ

Beginner Friendly Level

Perfect for those just starting their sewing journey, with clear instructions and simple techniques

โฑ๏ธ

Weekend Treat

Takes 5-7 hours, making it an enjoyable project to finish over a couple of days.

โ„๏ธ

Winter Warmth

Cozy layers for chilly nights that combine practical warmth with beautiful, intricate stitch patterns.

About This Mel the Snowman Amigurumi Pattern

This adorable Mel the Snowman pattern brings winter magic to life through simple crochet techniques and charming details. The design features a traditional snowman silhouette with modern amigurumi styling, complete with stick arms, coal buttons, and a festive red scarf. Working from the top down, you'll create both head and body in one continuous piece, making assembly easier and more secure. The finished snowman stands proudly at 6 inches tall, perfect for holiday displays or as a cuddly companion.

Mel the Snowman Amigurumi Pattern crochet pattern - detailed view of completed project

Designed by Ilaria Caliri for Paintbox Yarns, this pattern showcases classic winter colors and textures. The combination of champagne white, granite gray, blood orange, coffee bean, and red wine creates a timeless seasonal aesthetic that complements any winter decor.

Why You'll Love This Mel the Snowman Amigurumi Pattern

I absolutely love how this pattern captures the essence of childhood winter memories in such a compact, huggable form. The joy of creating Mel comes from watching his personality emerge with each added detail - from his cheerful orange nose to his cozy red scarf. What makes this pattern special is how the simple techniques create such expressive results, and I find the process of building him from head to toe incredibly satisfying. The finished snowman has such character that you can't help but smile every time you see him!

Mel the Snowman Amigurumi Pattern step 1 - construction progress Mel the Snowman Amigurumi Pattern step 2 - assembly progress Mel the Snowman Amigurumi Pattern step 3 - details and accessories Mel the Snowman Amigurumi Pattern step 4 - final assembly and finishing

Switch Things Up

I love how versatile this little snowman pattern can be when you start experimenting with different elements! Try switching up the scarf colors to match your holiday decor, or create a whole family of snowmen in varying sizes by adjusting your hook size.

For a more rustic look, I sometimes replace the crocheted buttons with actual wooden buttons, which gives Mel such authentic charm. You could even add a tiny jingle bell to his hat for a festive sound element that children absolutely adore.

I've discovered that using variegated yarn for the scarf creates beautiful striped effects without any color changes, and metallic threads worked alongside the regular yarn add a magical sparkle that catches the light beautifully.

Consider making seasonal variations too - swap the red scarf for pastels in spring, or use autumn colors for a harvest snowman. I've even created beach-themed versions using sandy beige yarn with a bright tropical scarf for summer fun!

Common Mistakes & How to Fix Them

โœ— Forgetting to stuff the head before closing can result in a flat, shapeless snowman โœ— Placing safety eyes too close together makes the snowman look cross-eyed instead of friendly โœ— Not maintaining consistent tension throughout can create uneven body proportions and visible holes โœ— Skipping stitch markers during increases and decreases often leads to misshapen rounds and counting errors

Mel the Snowman Amigurumi Pattern

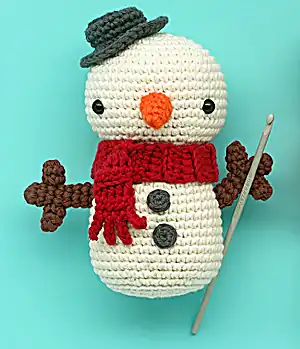
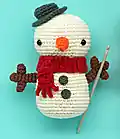
Create your own adorable winter companion with this charming Mel the Snowman amigurumi pattern! This delightful snowman features a classic design with a cozy red scarf, distinctive gray hat, and cheerful orange carrot nose. Standing at 6 inches tall, Mel makes the perfect seasonal decoration or gift for loved ones during the winter months. The pattern includes detailed instructions for creating all components including the head, body, hat, scarf, arms, and finishing touches.

Beginner Friendly 4-5 Hours

Materials Needed for Mel the Snowman Amigurumi Pattern

โ€” Main Fabric

  • 01
    Paintbox Yarns Cotton Aran in Champagne White (1 ball)
  • 02
    Paintbox Yarns Cotton Aran in Granite Grey (1 ball)
  • 03
    Paintbox Yarns Cotton Aran in Blood Orange (1 ball)
  • 04
    Paintbox Yarns Cotton Aran in Coffee Bean (1 ball)
  • 05
    Paintbox Yarns Cotton Aran in Red Wine (1 ball)

โ€” Tools Required

  • 01
    US E/4 (3.5mm) crochet hook
  • 02
    Pair of 3/8in/9mm safety eyes
  • 03
    Tapestry needle
  • 04
    Pins
  • 05
    Stitch markers
  • 06
    Toy stuffing

Progress Tracker

0% Complete

โ€” Head and Body :

1st round :

6 sc in adjustable ring (6)

2nd round :

Inc in each st around (12)

3rd round :

[Inc in next st, 1 sc] 6 times (18)

4th round :

[Inc in next st, 2 sc] 6 times (24)

5th round :

[Inc in next st, 3 sc] 6 times (30)

6th round :

[Inc in next st, 4 sc] 6 times (36)

7th round :

[Inc in next st, 5 sc] 6 times (42)

8th round :

[Inc in next st, 6 sc] 6 times (48)

9-15th round :

Sc around (48)

16th round :

[Dec, 6 sc] 6 times (42)

17th round :

[Dec, 5 sc] 6 times (36)

18th round :

[Dec, 1 sc] 12 times (24)

Info :

Add safety eyes between rounds 13 and 14, approx 12 sts apart. Add toy stuffing to head and continue as you go.

19th round :

Sc around (24)

20th round :

[Inc in next st, 7 sc] 3 times (27)

21st round :

[Inc in next st, 8 sc] 3 times (30)

22nd round :

[Inc in next st, 9 sc] 3 times (33)

23rd round :

[Inc in next st, 10 sc] 3 times (36)

24th round :

[Inc in next st, 11 sc] 3 times (39)

25th round :

[Inc in next st, 12 sc] 3 times (42)

26-35th round :

Sc around (42)

36th round :

[Dec, 5 sc] 6 times (36)

37th round :

Sl st in each st around (36)

38th round :

Sc blo around (36)

39th round :

[Dec] 18 times (18)

40th round :

[Dec, 1 sc] 6 times (12)

41st round :

Dec 6 times (6)

Info :

Fasten off, leave a tail. Use a tapestry needle to pick up all front loops from the last round and pull tight to close. Weave in end.

โ€” Hat :

1st round :

6 sc in adjustable ring (6)

2nd round :

Inc in each st around (12)

3rd round :

[Inc in next st, 1 sc] 6 times (18)

4th round :

Sc blo around (18)

5-7th round :

Sc around (18)

8th round :

Working in blo, inc in each st around (36)

9th round :

Sc around (36)

Info :

Fasten off, leave a tail for sewing.

โ€” Nose :

1st round :

4 sc in adjustable ring (4)

2nd round :

[Inc in next st, 3 sc] (5)

3rd round :

[Inc in next st, 4 sc] (6)

4th round :

[Inc in next st, 5 sc] (7)

5th round :

[Inc in next st, 6 sc] (8)

Info :

Fasten off, leave a tail for sewing. Add a little bit of toy stuffing.

โ€” Arms (Make 2) :

Main part (make 2) :

1st round: 6 sc in adjustable ring (6)

2-8th round :

Sc around (6)

Info :

Fasten off, leave a tail for sewing.

Short pieces (make 4) :

1st round: 6 sc in adjustable ring (6)

2-3rd round :

Sc around (6)

Info :

Fasten off, leave a tail for sewing 2 short pieces on to main part of each arm.

โ€” Buttons (Make 2) :

1st round :

5 sc in adjustable ring (5)

Info :

Fasten off, leave a tail for sewing.

โ€” Scarf :

Info :

Leave a long tail before starting, that will be used for sewing, ch 6.

1st row :

Skip 2 ch from hook, hdc in each of next 4 ch, turn (4)

2-28th row :

Ch 2, 4 hdc blo, turn (4)

29th row :

[Ch 4, skip first ch from hook, sl st in each of next 3 ch, sl st in next st of row] 4 times (4 fringes)

Info :

Fasten off and weave in ends.

Assembly Instructions

  • Use sewing pins to check position of all pieces before sewing them in place
  • Sew hat on to head in your preferred position
  • Sew nose between eyes for a centered, friendly expression
  • Sew arms to sides of body, positioning them across rounds 26 and 27
  • Attach buttons to front of body for the classic snowman look
  • Wrap scarf around neck and fold the side with the fringe, then stitch securely in place

Important Notes

  • ๐Ÿ’กUse stitch markers to keep track of your rounds, especially during increases and decreases
  • ๐Ÿ’กStuff firmly but not too tightly to maintain the proper snowman shape
  • ๐Ÿ’กPosition safety eyes carefully between rounds 13-14, approximately 12 stitches apart for best expression
  • ๐Ÿ’กPin all pieces in place before final sewing to ensure proper positioning and proportions

This charming Mel the Snowman pattern captures all the magic of winter in a delightfully huggable 6-inch companion. With his cozy red scarf, distinctive gray hat, and cheerful orange carrot nose, Mel brings warmth and joy to any space during the chilly season. The pattern combines simple techniques with thoughtful details to create a character brimming with personality and winter charm. Perfect for seasonal decorating or as a heartwarming handmade gift that will be treasured for years to come. ๐Ÿงถ Happy crocheting! โ„๏ธโœจ

You ask,

we answer.

FAQs

Can I use different yarn weights for this pattern?

While the pattern is designed for Aran weight yarn, you can substitute with similar weight yarns. Just be aware that using different weights may change the finished size and you may need to adjust your hook size accordingly.

What size will my snowman be if I use a different hook size?

The pattern creates a 6-inch tall snowman with a 3.5mm hook. Using a larger hook will make Mel bigger, while a smaller hook will create a more compact version.

Can I make the scarf longer or shorter?

Absolutely! Simply add or reduce the number of rows in the scarf section. The pattern calls for 28 rows, but you can adjust this to your preference.

Is it safe to give this to small children?

The pattern uses safety eyes, but for very small children, you might want to embroider the eyes instead to eliminate any choking hazards.

Can I make multiple snowmen in different colors?

Yes! Try experimenting with different colored scarves, hats, or even pastel yarns for spring snowmen. The construction remains the same regardless of color choices.