🧢 Beautiful ✨ Detailed πŸ’ Adorable

Mini Milk Cow Amigurumi Pattern

Mini Milk Cow Amigurumi Pattern
4.2β˜… Rating
3-4 Hours Time Needed
3.0K Made This
βœ‚οΈ

Beginner Friendly Level

Perfect for those just starting their sewing journey, with clear instructions and simple techniques

⏱️

Bite-Sized Project

Complete in under 2 hoursβ€”quick, fun, and perfect for a little creative escape.

🧸

Cute Companion

An adorable friend to cherish, handcrafted with love to bring comfort and joy for years to come.

About This Mini Milk Cow Amigurumi Pattern

This delightful mini milk cow brings farmyard charm to your crochet collection. Standing at just 5.9 inches tall, this sweet amigurumi features classic cow markings with black spots on a white body, complete with a pink snout and brown horns. The pattern includes detailed instructions for creating the main body, arms, snout, horns, ears, and a charming collar with a metal bell.

Mini Milk Cow Amigurumi Pattern crochet pattern - detailed view of completed project

The pattern uses basic amigurumi techniques including magic rings, single crochet, increases, and decreases. Color changes are clearly marked throughout the pattern for easy following.

Why You'll Love This Mini Milk Cow Amigurumi Pattern

I absolutely love this pattern because it's the perfect introduction to working with multiple colors in amigurumi! The cow's classic black and white design makes it so satisfying to see come together, and that little bell on the collar adds the sweetest finishing touch. What I find especially rewarding is how quickly this project works up - you can start in the morning and have an adorable new friend by afternoon!

Mini Milk Cow Amigurumi Pattern step 1 - construction progress Mini Milk Cow Amigurumi Pattern step 2 - assembly progress Mini Milk Cow Amigurumi Pattern step 3 - details and accessories Mini Milk Cow Amigurumi Pattern step 4 - final assembly and finishing

Switch Things Up

I love how versatile this little cow pattern can be with just a few creative tweaks! Sometimes I switch up the color scheme - imagine a brown and cream Holstein cow, or even go wild with rainbow spots for a whimsical twist. I've experimented with different yarn weights too; using chunky yarn creates an adorably oversized version that's perfect for snuggles.

One of my favorite modifications is adding a little flower crown instead of the collar for a more feminine touch, or creating tiny overalls for a farmer cow look. I've also made seasonal versions - adding a small Santa hat for Christmas or tiny sunglasses for summer vibes.

The beauty of this pattern lies in its simplicity, which makes it perfect for customization. I encourage you to play with different textures too - maybe try a fuzzy yarn for the white parts to give your cow a softer, more cuddly feel. The possibilities are endless when you let your creativity moo-ve you!

Common Mistakes & How to Fix Them

βœ— Not maintaining consistent tension when switching between black and white yarn colors βœ— Forgetting to stuff the head and body firmly enough before closing the rounds βœ— Placing safety eyes incorrectly - they should be positioned between rounds 13-14 βœ— Rushing through the collar attachment without proper centering on the cow's face

Mini Milk Cow Amigurumi Pattern

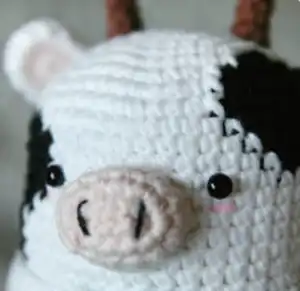
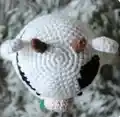
Create your own adorable mini milk cow with this charming amigurumi pattern! This sweet little companion features classic black and white cow spots, a cute pink snout, and a delightful green collar with a tiny bell. Perfect for beginners who want to practice color changes and basic shaping techniques while making something truly special.

Beginner Friendly 3-4 Hours

Materials Needed for Mini Milk Cow Amigurumi Pattern

β€” Main Fabric

  • 01
    Worsted weight yarn in white, black, light peach, beige, sky blue, light yellow, and green colors
  • 02
    Alternative fingering weight yarn option for smaller 15cm finished size

β€” Tools Required

  • 01
    5/0 (3mm) crochet hook
  • 02
    5mm black plastic safety eyes x2
  • 03
    6mm metal bell
  • 04
    Yarn needle
  • 05
    Fiberfill stuffing
  • 06
    Fabric glue
  • 07
    Stitch markers

Progress Tracker

0% Complete

β€” Head / Body / Legs :

Round 1 :

scx6 in the yarn loop, tighten the loop [6 sts]

Round 2 :

(2-sc inc) x 6 [12]

Round 3 :

(scx1, 2-sc inc) x 6 [18]

Round 4 :

(scx2, 2-sc inc) x 6 [24]

Round 5 :

(scx3, 2-sc inc) x 6 [30]

Round 6 :

(scx4, 2-sc inc) x 6 [36]

Round 7 :

(scx5, 2-sc inc) x 6 [42]

Round 8 :

(scx6, 2-sc inc) x 6 [48]

Round 9-19 :

sc in all 48 st [48]

Round 20 :

sctbl in all 48 st [48]

Round 21-36 :

sc in all 48 st [48]

Round 37-40 :

sc in all 18 st [18]

Round 41 :

(scx1, sc2tog) x 6 [12]

Round 42 :

(sc2tog) x 6 [6]

Info :

Fasten off, leaving a long tail. Stuff the leg. Using a yarn needle, weave the yarn tail through the front loop of each remaining st and pull tight to close.

β€” Arms (Make 2) :

Round 1 :

scx5 in the yarn loop, tighten the loop [5 sts]

Round 2 :

(2-sc inc) x 5 [10]

Round 3-4 :

sc in all 10 st [10]

Round 5 :

sctbl in all 10 st [10]

Round 6-11 :

sc in all 10 st [10]

Info :

Fasten off, leaving a long tail for sewing. Flatten the ARM, do not stuff.

β€” Snout :

Chain :

Make 4 chains with light peach yarn

Round 1 :

scx1 in second ch from hook, scx2 in the next chain, scx3 in the bottom chain, working up the other side-scx2, scx2 in the next chain, slst [10 sts]

Round 2 :

ch 1, scx4, 3-sc inc, scx4, 3-sc inc, slst [14]

Round 3-4 :

ch 1, sc in all 14 st, slst [14]

Info :

Fasten off, leaving a long tail for sewing. Fill in some stuffing to the snout and make nose and mouth.
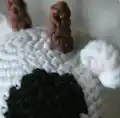
β€” Horns (Make 2) :

Round 1 :

scx4 in the yarn loop, tighten the loop [4 sts]

Round 2 :

sc in all 4 st [4]

Round 3 :

2-sc inc, scx3 [5]

Round 4 :

2-sc inc, scx4 [6]

Info :

Fasten off, leaving a long tail for sewing. Do not stuff.
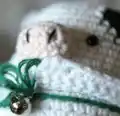
β€” Collar :

Chain :

Make 49 chains with white yarn

Round 1 :

scx1 in second ch from hook, scx47 [48 sts]

Round 2 :

ch 3, turn, dc2tog in second & third st, hdc, scx40, hdc, dc3tog [48]

Info :

Fasten off, leaving a long tail for sewing. Hang a metal bell on the green yarn and tie the ribbon.

β€” Ears (Make 4 - 2 light peach, 2 white) :

Round 1 :

scx6 in the yarn loop, tighten the loop [6 sts]

Round 2 :

(2-sc inc) x 6 [12]

Round 3 :

Locate light peach colored ear part on the white ear, and then SC together with white yarn [12]

Info :

Fasten off, leaving a long tail for sewing.

Assembly Instructions

  • Attach safety eyes between rounds 13-14, positioned with proper spacing as shown in pattern photos
  • Sew the light peach snout to the face and embroider nose and mouth details with black yarn
  • Attach the brown horns to the top of the head, positioning them symmetrically
  • Sew the completed ears (light peach inside, white outside) to the sides of the head
  • Attach arms between rounds 20-21 on each side of the body
  • Sew the collar around round 20, centering it on the cow's face and attaching 6 stitches to each side
  • Add final stuffing to ensure the cow maintains its shape and stands properly

Important Notes

  • πŸ’‘Change yarn colors according to the symbol patterns shown in the instructions
  • πŸ’‘Use stitch markers to help identify leg divisions and maintain stitch counts
  • πŸ’‘Stuff firmly but not too tightly to maintain the cow's cute rounded shape
  • πŸ’‘Position safety eyes carefully before securing as they are difficult to reposition
  • πŸ’‘Keep consistent tension when switching between colors for clean color changes

This adorable mini milk cow pattern brings farmyard charm straight to your hook! With its classic black and white spots, sweet pink snout, and tiny jingling bell, this little cow is sure to moo-ve its way into your heart. The pattern combines simple techniques with delightful details to create a character full of personality. Perfect for gifting or adding to your own collection! πŸ„ Happy crocheting! 🧢✨

You ask,

we answer.

FAQs

What size will my finished cow be?

Using worsted weight yarn with a 3mm hook, your cow will be approximately 15cm (5.9 inches) tall. If you use fingering weight yarn, it will be smaller.

Can I make this pattern without the bell?

Absolutely! The bell is optional and can be omitted if making this for very young children or if you prefer a quieter version.

Do I need to stuff all the parts?

No, only stuff the head, body, and legs. The arms should be flattened without stuffing, and the horns and ears remain unstuffed.

Can I use different colors?

Yes! While this pattern creates a classic black and white cow, you can experiment with different color combinations for a unique look.

How do I attach the safety eyes securely?

Place the eyes between rounds 13-14 as indicated, then secure with the washers on the inside before adding final stuffing.