🧢 Beautiful ✨ Detailed πŸ’ Adorable

Mini Pumpkin Man Amigurumi Pattern

Mini Pumpkin Man Amigurumi Pattern
4.0β˜… Rating
3-4 Hours Time Needed
3.7K Made This
βœ‚οΈ

Intermediate Level

Ideal for those with basic knitting experience, featuring slightly more advanced stitches and techniques to expand your skills.

⏱️

Bite-Sized Project

Complete in under 2 hoursβ€”quick, fun, and perfect for a little creative escape.

πŸŽƒ

Seasonal Charm

Perfect Halloween decoration with authentic pumpkin ridges and adorable character details for festive autumn crafting.

About This Mini Pumpkin Man Amigurumi Pattern

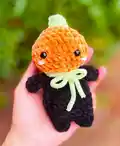
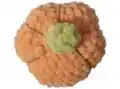
This Mini Pumpkin Man pattern combines traditional amigurumi techniques with creative character design. The pattern features an oval-shaped head that creates the perfect pumpkin proportions, complete with detailed instructions for forming authentic ridged lines. The black body contrasts beautifully with the orange head, while the light green stem adds the perfect finishing touch.

Mini Pumpkin Man Amigurumi Pattern crochet pattern - detailed view of completed project

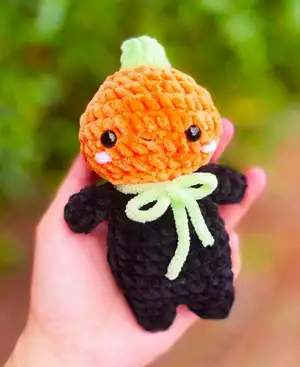
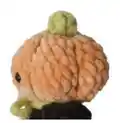
What makes this pattern special is the unique technique for creating pumpkin ridges using threading methods. The finished piece measures approximately 4-5 inches tall, making it perfect for display or gifting.

Why You'll Love This Mini Pumpkin Man Amigurumi Pattern

I absolutely love how this pattern brings together seasonal charm with fundamental amigurumi skills. The ridge-making technique is so satisfying to create, and watching the flat oval transform into a dimensional pumpkin shape is pure magic. The contrast between the orange velvet yarn and black body creates such visual appeal, and the tiny details like the V-shaped mouth and blush marks give this little guy so much personality.

Mini Pumpkin Man Amigurumi Pattern step 1 - construction progress Mini Pumpkin Man Amigurumi Pattern step 2 - assembly progress Mini Pumpkin Man Amigurumi Pattern step 3 - details and accessories Mini Pumpkin Man Amigurumi Pattern step 4 - final assembly and finishing

Switch Things Up

I love how versatile this little pumpkin character can be with just a few creative modifications! You could easily transform him into different seasonal characters by changing the color palette - imagine a soft pink version for spring or a rich burgundy for a more elegant autumn look. I've found that adding tiny accessories like a miniature hat or scarf can completely change his personality.

For those wanting to challenge themselves further, I suggest experimenting with different ridge patterns or adding embroidered details like leaves or vines. You could even create a whole pumpkin patch family by making multiple versions in varying sizes - just adjust your hook size and yarn weight accordingly.

The stem offers another opportunity for creativity - try making it longer and adding wire inside for a more dramatic curved effect, or create multiple small stems for a unique crown-like appearance. I particularly enjoy adding subtle shading with different orange tones to create more depth and dimension in the finished piece.

Common Mistakes & How to Fix Them

βœ— Forgetting to stuff the head before creating ridges can make the threading process difficult and uneven βœ— Placing safety eyes incorrectly on the short side instead of the long side of the oval head βœ— Not pulling tight enough when creating pumpkin ridges, resulting in loose, undefined sections βœ— Overstuffing the arms and stem pieces which should remain flat for proper assembly and proportions

Mini Pumpkin Man Amigurumi Pattern

Create your own adorable mini pumpkin character with this charming amigurumi pattern! This delightful design features a sweet orange pumpkin head with characteristic ridged details, a black body, and a cute green stem on top. Perfect for Halloween decorations, fall crafts, or as a gift for crochet enthusiasts. The pattern includes detailed instructions for creating the distinctive pumpkin ridges and assembly techniques to bring this little character to life.

Intermediate 3-4 Hours

Materials Needed for Mini Pumpkin Man Amigurumi Pattern

β€” Main Fabric

  • 01
    Velvet yarn in orange, black, light green, and light pink colors
  • 02
    Alternative: chenille yarn in the same color palette for different texture

β€” Tools Required

  • 01
    4.5mm crochet hook
  • 02
    8mm safety eyes
  • 03
    Fiber filling
  • 04
    Yarn needle
  • 05
    Scissors
  • 06
    Sport weight yarn in black and light brown for details

Progress Tracker

0% Complete

β€” Head (in orange) :

R1 :

6ch, begin in 2nd chain from hook 4sc, inc in last chain, 4sc on the other side of the chain, inc (12)

R2 :

(sc, inc) x6 (18)

R3 :

(sc, inc, sc) x6 (24)

R4 :

sc around (24)

R5 :

(2sc, inc, sc) x6 (30)

R6 :

(2sc, inc, 2sc) x6 (36)

R7 :

sc around (36)

R8 :

(2sc, dec, 2sc) x6 (30)

R9 :

(2sc, dec, sc) x6 (24)

Info :

Insert eyes between R7-R8, 5 stitches apart, while looking from the top, place them on the long side of the R1 oval. Begin stuffing

R10 :

(sc, dec, sc) x6 (18)

R11 :

(sc, dec) x6 (12)

Info :

Finish stuffing the head, sl st and fasten off, leave a long tail for sewing

β€” Legs - make 2 (in black) + Body :

R1 :

6sc in MR (6)

R2 :

sc around (6)

R3 :

(sc, inc) x3 (9)

Info :

After finishing the first leg, cut off the yarn. When making the second leg, do not fasten off and attach it to the first leg by doing 1 sc on any of the stitches of leg 1

R4 :

counting the previous sc, sc around both legs (18)

R5 :

(sc, inc, sc) x6 (24)

R6-R7 :

sc around (24 x2)

R8 :

(4sc, dec) x4 (20)

R9 :

(8sc, dec) x2 (18)

Info :

Stuff the legs and body

R10-R11 :

sc around (18 x2)

R12 :

(sc, dec) x6 (12)

Info :

Finish stuffing, sl st and fasten off

β€” Arms - make 2 (in black) :

R1 :

6sc in MR (6)

R2-R4 :

sc around (6 x3)

Info :

Do not stuff the arms

R5 :

fold the arms in half and 3sc through both sides of the stitches (3)

Info :

Sl st and fasten off. Leave a long tail for sewing

β€” Little stem (in light green) :

R1 :

6sc in MR (6)

R2-R3 :

sc around (6Γ—2)

Info :

Sl st and fasten off. Leave a long tail for sewing

Assembly Instructions

  • Before sewing head to body, create 5 pumpkin ridges by threading orange velvet yarn from top to bottom of head
  • Start sewing ridges from colored dots in diagram, making front section wider (2 stitches from eyes to each side)
  • Thread brown sport weight yarn over each ridge to create defining lines
  • Align eyes with legs properly and sew head to body using yarn tail from head
  • Position arms right under head and sew to last row of body on both sides
  • Sew little green stem on top of head at R1
  • Add V-shaped mouth using black sport weight yarn and blush lines beside each eye

Important Notes

  • πŸ’‘Pattern is worked in continuous rounds throughout the entire project
  • πŸ’‘Use 4.5mm hook specifically to achieve proper gauge and structure
  • πŸ’‘Place safety eyes on long side of oval head, not the short side
  • πŸ’‘Pull yarn tight when creating ridges to form proper pumpkin dents
  • πŸ’‘Do not stuff arms or stem pieces - they should remain flat
  • πŸ’‘Make sure front section of pumpkin is wider than other ridge sections

This adorable Mini Pumpkin Man pattern brings autumn charm to your crochet collection with its sweet personality and detailed construction. The unique ridge-making technique creates an authentic pumpkin texture that makes this little character truly special. Perfect for Halloween displays, fall decorations, or as a thoughtful handmade gift. The combination of velvet yarn textures and careful color placement creates a professional-looking finished piece that's sure to bring smiles wherever it's displayed. Happy crocheting!

You ask,

we answer.

FAQs

Can I use regular yarn instead of velvet yarn?

Yes, you can substitute with regular worsted weight yarn, but the texture will be different. Velvet or chenille yarn gives the pumpkin its distinctive soft, plush appearance.

How do I create the pumpkin ridges without them looking uneven?

The key is to stuff the head firmly before creating ridges, then pull the threading yarn tight and consistent with each pass. Follow the diagram carefully for proper placement.

What size will my finished pumpkin be?

The finished Mini Pumpkin Man measures approximately 4-5 inches tall, making it perfect for desktop displays or small decorations.

Can I make this pattern larger?

Yes, you can use a larger hook and thicker yarn to scale up the pattern, but you'll need to adjust the safety eye size accordingly.

Is this pattern suitable for beginners?

This is an intermediate pattern due to the ridge-making technique and assembly requirements. Beginners should be comfortable with basic amigurumi techniques first.