🧢 Beautiful ✨ Detailed πŸ’ Adorable

Xander The Zebra Amigurumi Pattern

Xander The Zebra Amigurumi Pattern
4.1β˜… Rating
8-10 Hours Time Needed
2.1K Made This
βœ‚οΈ

Intermediate Level

Ideal for those with basic knitting experience, featuring slightly more advanced stitches and techniques to expand your skills.

⏱️

All-Day Adventure

Requires 8-10 hours, ideal for a full day of immersive knitting.

🧸

Cute Companion

An adorable friend to cherish, handcrafted with love to bring comfort and joy for years to come.

About This Xander The Zebra Amigurumi Pattern

This delightful zebra pattern combines classic amigurumi techniques with professional finishing details. Xander features realistic proportions, movable joints for posability, and beautiful stripe work that creates an authentic zebra appearance. The pattern includes comprehensive instructions for creating the distinctive mane and tail using yarn fringe techniques.

Xander The Zebra Amigurumi Pattern crochet pattern - detailed view of completed project

Standing at 32cm tall, this zebra makes a perfect display piece or cuddly companion. The intermediate techniques used will help you develop your color-changing and shaping skills.

Why You'll Love This Xander The Zebra Amigurumi Pattern

I absolutely love how this pattern teaches you professional jointing techniques that make your amigurumi truly special. The satisfaction of watching those perfect stripes emerge as you work is incredible, and the detailed instructions for the mane and tail give Xander such character. You'll gain confidence with color changes and learn techniques you can use in future projects.

Xander The Zebra Amigurumi Pattern step 1 - construction progress Xander The Zebra Amigurumi Pattern step 2 - assembly progress Xander The Zebra Amigurumi Pattern step 3 - details and accessories Xander The Zebra Amigurumi Pattern step 4 - final assembly and finishing

Switch Things Up

I love how versatile this zebra pattern can be with just a few creative modifications! You could easily turn Xander into a unicorn by adding a twisted horn and some sparkly details to the mane. For a more whimsical approach, try making him in rainbow stripes instead of traditional black and white - kids absolutely love colorful zebras! If you want to make him extra special, consider adding a small saddle or bridle using felt and ribbon.

The joint system also opens up so many possibilities - you could pose Xander in different positions for photos or even create a whole herd with slight variations in size using different hook sizes. Some makers love adding embroidered flowers to the mane for a feminine touch, while others prefer a more realistic approach with carefully brushed yarn for texture.

Don't be afraid to experiment with the facial features either - slightly different eye placement can give each zebra its own unique personality!

Common Mistakes & How to Fix Them

βœ— Forgetting to place stitch markers when changing colors can cause stripe misalignment βœ— Not stuffing firmly enough before attaching joints can cause limbs to become loose over time βœ— Pulling yarn too tightly during color changes can cause puckering in the striped sections βœ— Skipping the back post single crochet round can affect the shape and structure of limbs

Xander The Zebra Amigurumi Pattern

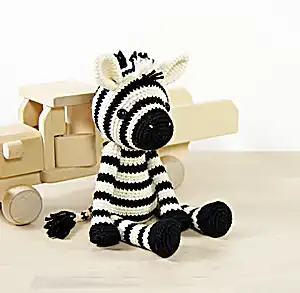
Create your own adorable striped friend with this charming zebra amigurumi pattern! Xander stands 32cm tall and features classic black and white stripes, movable limbs with joints, and a sweet mane and tail. This intermediate pattern includes detailed instructions for color changes, shaping techniques, and professional finishing touches. Perfect for creating a special gift or adding a safari friend to your collection.

Intermediate 8-10 Hours

Materials Needed for Xander The Zebra Amigurumi Pattern

β€” Main Fabric

  • 01
    DK weight alpaca and wool blend yarn (Lana Gatto 'Super Aplaca' recommended)
  • 02
    About 60g of white yarn and 50g of black yarn
  • 03
    115m=50g (126yd=50g) / 8 ply / 11 wpi / 3: light weight

β€” Tools Required

  • 01
    2.50 - 3.00mm crochet hook (US size 2/C - 3/D)
  • 02
    Polyester fiberfill for stuffing
  • 03
    12mm (1/2") safety eyes
  • 04
    Two 20mm (4/5") doll joints
  • 05
    Two 25mm (1") doll joints
  • 06
    White cotton embroidery floss
  • 07
    Yarn needle
  • 08
    Scissors
  • 09
    Stitch marker

Progress Tracker

0% Complete

β€” HEAD :

Round 1 :

mr, sc 6 (6)

Round 2 :

inc x 6 (12)

Round 3 :

(sc, inc) x 6 (18)

Round 4 :

(inc, sc 2) x 6 (24)

Round 5 :

(sc 7, inc) x 3 (27)

Round 6 :

sc in each st (27)

Round 7 :

sc 3, inc, (sc 8, inc) x 2, sc 5 (30)

Round 8 :

sc in each st (30)

Info :

Switch to white yarn

Round 9 :

(sc 9, inc) x 3 (33)

Round 10 :

sc in each st (33)

Info :

Switch to black yarn

Round 11 :

sc 4, inc, (sc 10, inc) x 2, sc 6 (36)

Round 12 :

sc 2, inc, (sc 5, inc) x 5, sc 3 (42)

Info :

On round 13 place a stitch marker in the 24th stitch to mark center of face

Info :

Switch to white yarn

Round 13 :

(sc 6, inc) x 6 (48)

Round 14 :

sc 18, inc, sc 8, inc, sc 20 (50)

Round 15 :

sc 21, inc, sc 5, inc, sc 22 (52)

Info :

Switch to black yarn

Round 16 :

(sc 25, inc) x 2 (54)

Round 17 :

sc 23, inc, sc 4, inc, sc 25 (56)

Info :

Attach safety eyes between rows 13 and 14, leaving 16 stitches between them

Info :

Switch to white yarn

Round 18-20 :

sc in each st (56)

Info :

Switch to black yarn

Round 21-22 :

sc in each st (56)

Info :

Switch to white yarn

Round 23-24 :

sc in each st (56)

Round 25 :

sc 5, dec, (sc 12, dec) x 3, sc 7 (52)

Info :

Switch to black yarn

Round 26 :

(sc 11, dec) x 4 (48)

Round 27 :

sc 4, dec, (sc 10, dec) x 3, sc 6 (44)

Info :

Start stuffing the head firmly

Info :

Switch to white yarn

Round 28 :

(sc 9, dec) x 4 (40)

Round 29 :

sc 3, dec, (sc 8, dec) x 3, sc 5 (36)

Round 30 :

(sc 7, dec) x 4 (32)

Info :

Switch to black yarn

Round 31 :

sc 2, dec, (sc 6, dec) x 3, sc 4 (28)

Round 32 :

(sc 5, dec) x 4 (24)

Info :

Switch to white yarn

Round 33 :

(dec, sc 2) x 6 (18)

Round 34 :

(sc, dec) x 6 (12)

Round 35 :

dec x 6 (6)

Info :

Finish stuffing and close opening

β€” EARS (make 2) :

Round 1 :

mr, sc 6 (6)

Round 2 :

(inc, sc) x 3 (9)

Round 3 :

(sc 2, inc) x 3 (12)

Round 4 :

sc, inc, (sc 3, inc) x 2, sc 2 (15)

Round 5 :

(sc 4, inc) x 3 (18)

Round 6 :

sc 2, inc, (sc 5, inc) x 2, sc 3 (21)

Round 7-11 :

sc in each st (21)

Round 12 :

sc 5, dec, sc 14 (20)

Round 13 :

sc in each st (20)

Info :

Sl st in next stitch, fasten off. Do not stuff ears

β€” LEFT ARM :

Round 1 :

mr, sc 7 (7)

Round 2 :

inc x 7 (14)

Round 3 :

(sc, inc) x 7 (21)

Round 4 :

bpsc in each st (21)

Round 5 :

sc 9, dec, sc 4, dec, sc 4 (19)

Round 6 :

sc 11, dec, sc 6 (18)

Round 7 :

sc 6, dec, sc 7, dec, sc (16)

Info :

Start stuffing the arm firmly, switch to white yarn

Round 8 :

sc 8, dec, sc, dec, sc 3 (14)

Round 9 :

sc in each st (14)

Round 10 :

sc 9, dec, sc 3 (13)

Info :

Switch to black yarn

Round 11 :

sc in each st (13)

Round 12 :

sc 9, dec, sc 2 (12)

Info :

Switch to white yarn

Round 13-15 :

sc in each st (12)

Info :

Switch to black yarn

Round 16-17 :

sc in each st (12)

Info :

Switch to white yarn

Round 18-20 :

sc in each st (12)

Info :

Switch to black yarn

Round 21-22 :

sc in each st (12)

Info :

Switch to white yarn

Round 23-25 :

sc in each st (12)

Info :

Switch to black yarn

Round 26-27 :

sc in each st (12)

Info :

Switch to white yarn

Round 28-30 :

sc in each st (12)

Info :

Attach joint between rows 28 and 29

Round 31 :

sc 2, dec x 5 (7)

Info :

Finish stuffing and close opening

β€” RIGHT ARM :

Round 1 :

mr, sc 7 (7)

Round 2 :

inc x 7 (14)

Round 3 :

(sc, inc) x 7 (21)

Round 4 :

bpsc in each st (21)

Round 5 :

sc 3, dec, sc 4, dec, sc 10 (19)

Round 6 :

sc 5, dec, sc 12 (18)

Round 7 :

(dec, sc 7) x 2 (16)

Info :

Start stuffing the arm firmly, switch to white yarn

Round 8 :

sc 2, dec, sc, dec, sc 9 (14)

Round 9 :

sc in each st (14)

Round 10 :

sc 3, dec, sc 9 (13)

Info :

Switch to black yarn

Round 11 :

sc in each st (13)

Round 12 :

sc 3, dec, sc 8 (12)

Info :

Continue with same stripe pattern as left arm

Round 31 :

sc 2, dec x 5 (7)

Info :

Finish stuffing and close opening

β€” LEFT LEG :

Round 1 :

mr, sc 7 (7)

Round 2 :

inc x 7 (14)

Round 3 :

(sc, inc) x 7 (21)

Round 4 :

(inc, sc 2) x 7 (28)

Round 5 :

bpsc in each st (28)

Round 6 :

sc 15, dec, sc 4, dec, sc 5 (26)

Round 7 :

sc 12, dec, (sc 3, dec) x 2, sc 2 (23)

Round 8 :

dec, sc 6, dec, sc 13 (21)

Round 9 :

sc 11, dec, sc 4, dec, sc 2 (19)

Info :

Start stuffing the leg firmly, switch to white yarn

Round 10 :

sc, (dec, sc 4) x 3 (16)

Round 11 :

sc in each st (16)

Round 12 :

sc 11, dec, sc 3 (15)

Info :

Continue with striped pattern following color changes

Round 33 :

sc 2, dec, sc 5, dec, sc 3 (12)

Round 34 :

sc 2, dec x 5 (7)

Info :

Finish stuffing and close opening

β€” RIGHT LEG :

Info :

Follow same pattern as left leg with mirrored decreases

β€” BODY :

Round 1 :

mr, sc 6 (6)

Round 2 :

inc x 6 (12)

Round 3 :

(sc, inc) x 6 (18)

Round 4 :

inc, sc, with black yarn: sc, (inc, sc 2) x 5 (24)

Round 5 :

(sc 3, inc) x 6 (30)

Round 6 :

sc, inc, sc 3, with white yarn: sc, inc, (sc 4, inc) x 4, sc 3 (36)

Round 7 :

sc 3, inc, (sc 8, inc) x 3, sc 5 (40)

Round 8 :

(sc 9, inc) x 4 (44)

Info :

Continue with striped pattern and attach limbs as indicated

Round 32 :

sc in each st (20)

Info :

Sl st in next stitch, fasten off

β€” TAIL :

Round 1 :

mr, sc 5 (5)

Round 2-4 :

sc in each st (5)

Info :

Start stuffing lightly, switch to black yarn

Round 5 :

sc 2, inc, sc 2 (6)

Info :

Continue with striped pattern

Round 11 :

sc in each st (7)

Info :

Sl st in next stitch, fasten off and finish stuffing

Assembly Instructions

  • Sew ears to head just behind round 19, leaving 11-12 stitches between them in a V-shape
  • Attach arms to sides of body between rounds 28 and 29 using joints or sewing method
  • Attach legs to sides of body between rounds 9 and 10 using joints or sewing method
  • Sew head to body placing front edge just behind round 14 of the head
  • Add extra stuffing before closing the head-to-body seam
  • Flatten tail slightly and sew to round 9 of the body using whip or mattress stitch
  • Create mane by attaching yarn pieces around head and down back following stripe pattern

Important Notes

  • πŸ’‘Use stitch markers when changing colors to maintain proper stripe alignment
  • πŸ’‘Work in continuous spiral without joining rounds unless specifically instructed
  • πŸ’‘Stuff all pieces firmly but not too tightly for best shape and structure
  • πŸ’‘When using joints, ensure stems face straight toward the body for proper positioning
  • πŸ’‘Test eye placement before securing safety eyes permanently
  • πŸ’‘Cut mane yarn pieces 2.5 times longer than desired finished length

This beautiful Xander the Zebra pattern brings the African savanna to your home with stunning stripe work and professional finishing techniques. The movable joints make him perfect for posing and play, while the detailed mane and tail give him incredible personality. Whether you're expanding your amigurumi menagerie or creating a special gift, Xander will gallop straight into your heart! πŸ¦“ Happy crocheting! 🧢✨

You ask,

we answer.

FAQs

Can I make this zebra without the joints?

Yes! You can sew the limbs directly to the body using the same attachment points. The zebra won't be posable but will still be adorable and sturdy.

What if I can't find the exact yarn recommended?

Any DK weight yarn will work well. The key is maintaining consistent tension and having good color contrast between your black and white yarns.

How do I keep my stripes neat during color changes?

Use the color change technique shown in the pattern, always change colors on the last yarn over of the previous stitch, and keep consistent tension throughout.

Can I make the zebra larger or smaller?

Yes, use a larger or smaller hook and heavier or lighter weight yarn. Remember to adjust your safety eye size and joint sizes accordingly.

How do I attach the mane evenly?

Follow the stripe pattern on the head and work systematically around, keeping the mane about 3 stitches wide as shown in the instructions.