🧢 Beautiful ✨ Detailed πŸ’ Adorable

Mini Rabbit Amigurumi Pattern

Mini Rabbit Amigurumi Pattern
4.4β˜… Rating
4-5 Hours Time Needed
2.0K Made This
βœ‚οΈ

Beginner Friendly Level

Perfect for those just starting their sewing journey, with clear instructions and simple techniques

⏱️

Weekend Treat

Takes 5-7 hours, making it an enjoyable project to finish over a couple of days.

🧸

Cute Companion

An adorable friend to cherish, handcrafted with love to bring comfort and joy for years to come.

About This Mini Rabbit Amigurumi Pattern

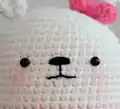
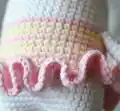
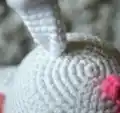
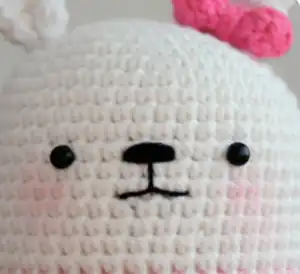
This mini rabbit amigurumi pattern creates a sweet 15cm tall companion featuring a colorful striped body and charming details. The design incorporates multiple yarn colors including light pink, hot pink, white, light yellow, and black to create beautiful color transitions throughout the body and skirt. With its adorable bow ribbon and expressive safety eyes, this rabbit makes a perfect gift or decorative piece for any crochet enthusiast.

Mini Rabbit Amigurumi Pattern crochet pattern - detailed view of completed project

The pattern uses worsted weight yarn and a 3mm crochet hook, making it accessible for beginners while still creating a polished finished product. Clear round-by-round instructions ensure success with every stitch.

Why You'll Love This Mini Rabbit Amigurumi Pattern

I absolutely love this pattern because it combines simplicity with stunning visual impact through its beautiful color changes. The satisfaction of watching this sweet rabbit come to life round by round is incredibly rewarding, and the finished result is so charming that you'll want to make one for everyone you know. The clear instructions make it stress-free to create, while the colorful striped design adds just enough visual interest to keep the project engaging from start to finish.

Mini Rabbit Amigurumi Pattern step 1 - construction progress Mini Rabbit Amigurumi Pattern step 2 - assembly progress Mini Rabbit Amigurumi Pattern step 3 - details and accessories Mini Rabbit Amigurumi Pattern step 4 - final assembly and finishing

Switch Things Up

I love how versatile this little rabbit pattern can be with just a few creative tweaks! You could easily make this bunny in pastel Easter colors - soft lavender, mint green, and cream would be absolutely stunning. Or go bold with bright rainbow stripes for a more vibrant look.

I've found that changing the bow color completely transforms the personality - try a deep burgundy for an autumn feel, or sparkly gold yarn for something special. You could even add tiny embroidered flowers to the skirt or create a matching carrot accessory.

For advanced makers, I'd suggest adding wire to the ears so they can be posed, or creating a whole family with different sizes by adjusting your hook size. The possibilities are endless with this sweet foundation pattern!

Common Mistakes & How to Fix Them

βœ— Forgetting to change yarn colors at the specified rounds - always check the symbol pattern guide βœ— Overstuffing the body and limbs which can distort the shape and make assembly difficult βœ— Placing safety eyes incorrectly - they should go between rounds 13-14 with proper spacing βœ— Not using stitch markers to track rounds, especially during color changes and decreases

Mini Rabbit Amigurumi Pattern

Create this adorable mini rabbit amigurumi that measures approximately 15cm (5.9 inches) tall. This delightful pattern features a sweet rabbit dressed in a colorful striped skirt with a charming hot pink bow ribbon. Perfect for beginners looking to create their first amigurumi friend, this project combines basic crochet techniques with color changes to create a whimsical character. The pattern includes detailed instructions for the head, body, arms, legs, ears, skirt, and decorative bow, making it a complete project that will result in an enchanting handmade companion.

Beginner Friendly 4-5 Hours

Materials Needed for Mini Rabbit Amigurumi Pattern

β€” Main Fabric

  • 01
    Worsted weight yarn in light pink, hot pink, white, light yellow, and black colors

β€” Tools Required

  • 01
    Crochet hook 5/0 (3mm)
  • 02
    Safety eyes 5mm black plastic x2
  • 03
    Yarn needle
  • 04
    Stuffing fiberfill
  • 05
    Glue for attaching eyes
  • 06
    Stitch markers

Progress Tracker

0% Complete

β€” Head/Body/Legs :

Round 1 :

sc x6 in magic ring, tighten the loop [6 sts]

Round 2 :

(2-sc inc) x 6 [12]

Round 3 :

(sc x1, 2-sc inc) x 6 [18]

Round 4 :

(sc x2, 2-sc inc) x 6 [24]

Round 5 :

(sc x3, 2-sc inc) x 6 [30]

Round 6 :

(sc x4, 2-sc inc) x 6 [36]

Round 7 :

(sc x5, 2-sc inc) x 6 [42]

Round 8 :

(sc x6, 2-sc inc) x 6 [48]

Rounds 9-28 :

sc in all 48 st [48]

Round 29 :

sctbl in all 48 st [48]

Rounds 30-36 :

sc in all 48 st [48]

Info :

Divide legs: identify center space between legs by 6 stitches, each leg by 18 stitches

Rounds 37-40 :

sc in all 18 st [18] (first leg)

Round 41 :

(sc x1, sc2tog) x 6 [12]

Round 42 :

(sc2tog) x 6 [6]

Info :

Fasten off, stuff leg, weave through front loops and pull tight to close

β€” Arms (Make 2) :

Round 1 :

sc x5 in magic ring, tighten the loop [5 sts]

Round 2 :

(2-sc inc) x 5 [10]

Rounds 3-11 :

sc in all 10 st [10]

Info :

Fasten off, leave long tail for sewing, flatten arm, do not stuff

β€” Skirt :

Info :

Use light pink yarn to combine skirt and body at first stitch of Round 29

Round 1 :

(ch3, dc x1) in first st, (2-dc inc) x 47, slst [96 sts]

Round 2 :

(ch3, dc x1) in first st, (2-dc inc) x 95, slst [192]

Info :

Fasten off and weave in yarn end

β€” Ribbon :

Step 1 :

Using hot pink yarn, make 14 chains

Step 2 :

slst in the first ch [14 sts]

Step 3 :

ch1, (sc, hdc, dc x3, hdc, sc) x 2, slst [14]

Step 4 :

make 6 chains, wind around and slst in first ch

Info :

Fasten off, leave long tail for sewing

β€” Ears (Make 2) :

Round 1 :

sc x6 in magic ring, tighten the loop [6 sts]

Round 2 :

(sc x2, 2-sc inc) x 2 [8]

Round 3 :

(sc x3, 2-sc inc) x 2 [10]

Rounds 4-14 :

sc in all 10 st [10]

Info :

Fasten off, leave long tail for sewing, flatten ear, do not stuff

Assembly Instructions

  • Attach safety eyes between rounds 13-14, separated by proper distance as shown in pattern
  • Sew ears to the top of the head, folding them slightly for natural shape
  • Attach arms to the body between rounds 20-21 on each side
  • Sew the ribbon bow to the bottom of the left ear as decoration
  • Embroider the nose and mouth using black yarn for facial features
  • Use yarn needle to sew the 6 stitches between the legs to close the gap

Important Notes

  • πŸ’‘Use stitch markers to keep track of rounds, especially during color changes
  • πŸ’‘Change yarn colors according to the symbol pattern guide on page 1
  • πŸ’‘Stuff firmly but not too tightly to maintain proper shape
  • πŸ’‘Place safety eyes before closing the head completely
  • πŸ’‘Follow the assembly diagram for correct positioning of all parts

This adorable Mini Rabbit pattern creates a sweet 15cm companion that's perfect for beginners and experienced crocheters alike! The charming color combinations and delightful bow detail make this little friend irresistible. With clear instructions and helpful diagrams, you'll enjoy every stitch of this rewarding project. Happy crocheting! 🧢✨

You ask,

we answer.

FAQs

What size will my finished rabbit be?

The finished rabbit measures approximately 15cm (5.9 inches) tall when using worsted weight yarn with a 3mm hook.

Can I use different colors than specified?

Absolutely! Feel free to customize the colors to your preference while following the same color change pattern.

What if I don't have safety eyes?

You can embroider the eyes using black yarn or use black buttons as an alternative.

Is this pattern suitable for complete beginners?

Yes! This pattern uses basic stitches and includes detailed instructions perfect for beginners.

How do I change colors smoothly?

Follow the symbol pattern guide and change colors by completing the last stitch of the old color with the new color yarn.