๐Ÿงถ Beautiful โœจ Detailed ๐Ÿ’ Adorable

Monster Surprise Mr. Love Amigurumi Pattern

Monster Surprise Mr. Love Amigurumi Pattern
4.4โ˜… Rating
8-10 Hours Time Needed
2.7K Made This
โœ‚๏ธ

Intermediate Level

Ideal for those with basic knitting experience, featuring slightly more advanced stitches and techniques to expand your skills.

โฑ๏ธ

All-Day Adventure

Requires 8-10 hours, ideal for a full day of immersive knitting.

๐Ÿงธ

Cute Companion

An adorable friend to cherish, handcrafted with love to bring comfort and joy for years to come.

About This Monster Surprise Mr. Love Amigurumi Pattern

This delightful Monster Surprise pattern creates a loveable purple creature with personality plus! Standing 38cm tall, Mr. Love features a secret belly pouch perfect for hiding special notes, small gifts, or surprises. The pattern includes comprehensive instructions for creating the main monster body with attached mouth cavity, removable belly patch, sturdy legs and arms, plus adorable accessories like colorful hearts and striped candies.

Monster Surprise Mr. Love Amigurumi Pattern crochet pattern - detailed view of completed project

The unique construction technique involves creating an internal mouth structure and belly compartment that makes this monster truly interactive. Perfect for children who love surprises or as a heartfelt gift for someone special.

Why You'll Love This Monster Surprise Mr. Love Amigurumi Pattern

I absolutely love how this pattern combines functionality with cuteness! The secret belly compartment adds such a magical element that makes this more than just a typical amigurumi. I find the construction technique fascinating - the way the mouth and belly are engineered creates such a professional finish. The size is perfect for cuddling, and the bright color combination always makes me smile.

Monster Surprise Mr. Love Amigurumi Pattern step 1 - construction progress Monster Surprise Mr. Love Amigurumi Pattern step 2 - assembly progress Monster Surprise Mr. Love Amigurumi Pattern step 3 - details and accessories Monster Surprise Mr. Love Amigurumi Pattern step 4 - final assembly and finishing

Switch Things Up

I love how versatile this Monster Surprise pattern can be when you let your creativity run wild! You could easily transform Mr. Love into different characters by changing the color scheme - imagine a green dragon version with gold spikes, or a pink unicorn monster with a sparkly horn instead of spikes. I often experiment with different sizes too; making mini versions using thinner yarn creates adorable keychains or bag charms.

The secret compartment opens up so many possibilities beyond just hiding notes. I've filled them with small toys, emergency snacks for kids, or even engagement rings for the most memorable proposals! You could also add additional features like embroidered patterns on the belly patch, different textured yarns for contrast, or even LED lights inside for a magical glow effect. The beauty of this pattern lies in how it adapts to your personal vision while maintaining that irresistible charm.

Common Mistakes & How to Fix Them

โœ— Overstuffing the head can interfere with proper mouth cavity placement and functionality โœ— Forgetting to leave the belly patch opening can eliminate the surprise compartment feature completely โœ— Not maintaining proper tension during color changes can create visible gaps in striped sections โœ— Sewing pieces without proper positioning can affect the monster's stability and sitting ability

Monster Surprise Mr. Love Amigurumi Pattern

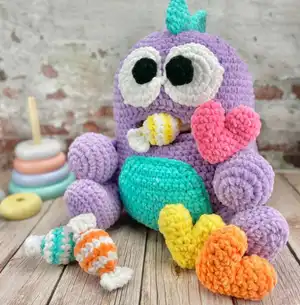
Create an adorable purple monster friend with a secret belly pouch for hidden surprises! This charming amigurumi features turquoise spikes, googly eyes, and colorful hearts and candies that tuck inside. Perfect for gift-giving or creating magical moments with loved ones. The pattern includes detailed instructions for the main monster body, belly patch with secret compartment, and all the delightful accessories.

Intermediate 8-10 Hours

Materials Needed for Monster Surprise Mr. Love Amigurumi Pattern

โ€” Main Fabric

  • 01
    Hobbii Honey Bunny yarn: 330g lilac (63), 60g turquoise (94), 15g peach (33), 15g candyfloss (45), 15g lemon curd (22), 35g white (01), 4g black (124)

โ€” Tools Required

  • 01
    Crochet hook 6.5mm
  • 02
    Yarn needle
  • 03
    Stuffing
  • 04
    Scissors
  • 05
    Stitch markers

Progress Tracker

0% Complete

โ€” Inside of Mouth (Lilac) :

R1 :

6 sc in mr (6)

R2 :

6 inc (12)

R3 :

12 inc (24)

R4 :

(inc - 3 sc) x 6 (30)

R5 :

(inc - 4 sc) x 6 (36)

R6 :

(inc - 5 sc) x 6 (42)

R7-13 :

42 sc (42)

R14 :

(dec - 5 sc) x 6 (36)

R15 :

36 sc (36)

R16 :

(dec - 4 sc) x 6 (30)

R17-19 :

30 sc (30)

R20 :

(dec - 3 sc) x 6 (24)

Info :

Fasten off and turn the inside out. The yarn tail will be hidden inside the monster when the mouth is crocheted onto the monster.

โ€” Inside of Monster (Lilac) :

R1 :

6 sc in mr (6)

R2 :

6 inc (12)

R3 :

12 inc (24)

R4 :

(inc - 3 sc) x 6 (30)

R5 :

(inc - 4 sc) x 6 (36)

R6-18 :

36 sc (36)

R19 :

(dec - 4 sc) x 6 (30)

R20 :

(dec - 3 sc) x 6 (24)

Info :

Fasten off and turn the inside out. The yarn tail will be hidden inside the monster when the inside of the monster is crocheted onto the monster.

โ€” Monster (Lilac) :

Info :

Start with the head.

R1 :

6 sc in mr (6)

R2 :

6 inc (12)

R3 :

12 inc (24)

R4 :

(inc - 3 sc) x 6 (30)

R5 :

(inc - 4 sc) x 6 (36)

R6 :

(inc - 5 sc) x 6 (42)

R7 :

(inc - 6 sc) x 6 (48)

R8 :

(inc - 7 sc) x 6 (54)

R9 :

(inc - 8 sc) x 6 (60)

R10 :

(inc - 9 sc) x 6 (66)

R11-19 :

66 sc (66)

Info :

The inside of the mouth is crocheted onto the monster over the next 3 rounds.

R20 :

27 sc - 12 sc in both the monster + the inside of the mouth (you're inserting the hook in the next st of the monster and then through the inside of the mouth) - 27 sc (66)

R21 :

27 sc - 12 sc in flo of the remaining 12 sts of the inside of the mouth - 27 sc (66)

R22 :

27 sc - 12 sc in blo of the remaining 12 sts of the inside of the mouth - 27 sc (66)

R23-25 :

66 sc (66)

Info :

Now make the body.

R26 :

(inc - 10 sc) x 6 (72)

R27 :

(inc - 11 sc) x 6 (78)

R28-35 :

78 sc (78)

Info :

Fill the head with stuffing. Put your hand inside the mouth to make sure that you don't fill too much stuffing in the head (the inside of the mouth should be horizontal).

R36 :

(dec - 11 sc) x 6 (72)

R37 :

(dec - 10 sc) x 6 (66)

R38 :

(dec - 9 sc) x 6 (60)

R39 :

(dec - 8 sc) x 6 (54)

R40 :

(dec - 7 sc) x 6 (48)

R41 :

(dec - 6 sc) x 6 (42)

R42 :

(dec - 5 sc) x 6 (36)

R43 :

(dec - 4 sc) x 6 (30)

R44 :

(dec - 3 sc) x 6 (24)

Info :

Fill the body with stuffing. You can put your hand inside the mouth to even it out. Make a hole inside the stuffing and put the inside of the monster in the hole.

R45 :

(dec in both the monster + the inside of the monster - 2 sc in both the monster + the inside of the monster) x 6 (18)

R46 :

18 slst (18)

Info :

Fasten off and sew in yarn tail.

โ€” Belly Patch (Turquoise) :

Info :

The belly patch is made in rows. Chain 14 and start 1st row in the 2nd chain from the hook.

RW1 :

inc - 11 sc - inc - ch - turn (15)

RW2-8 :

skip ch - 15 sc - ch - turn (15)

RW9 :

skip ch - dec - 11 sc - dec - ch - turn (13)

RW10 :

skip ch - 13 sc - ch - turn (13)

RW11 :

skip ch - dec - 9 sc - dec - ch - turn (11)

RW12 :

skip ch - dec - 7 sc - dec - ch - turn (9)

RW13 :

skip ch - dec - 2 sc - dec - sc - dec (6)

Info :

Do not turn, but sc all around the edge of the belly piece. Sew the belly piece onto the monster with the first rows facing down, but DO NOT sew the 6 top stitches - leave this part open for secret letters.

โ€” Leg (Make 2) (Lilac) :

Info :

Chain 8 and start 1st row in the 2nd chain from the hook.

R1 :

6 sc - [3 sc] in the last st - now crochet down the other side of the chains - 5 sc - inc (16)

R2 :

inc - 5 sc - 3 inc - 6 sc - inc (21)

R3 :

2 inc - 4 sc - hdc - [2 hdc] x 7 - hdc - 6 sc (30)

R4 :

30 sc in blo (30)

R5 :

sc - dec - 13 sc - dec - 12 sc (28)

R6 :

11 sc - 9 hdc - 8 sc (28)

R7 :

10 sc - 6 dec - 6 sc (22)

R8 :

8 sc - 5 dec - 4 sc (17)

R9 :

10 sc - dec - 5 sc (16)

R10-11 :

16 sc (16)

Info :

Fasten off leaving a long tail for sewing. Fill with stuffing and sew the legs onto the body.

โ€” Arm (Make 2) (Lilac) :

R1 :

6 sc in mr (6)

R2 :

6 inc (12)

R3 :

12 inc (24)

R4-7 :

24 sc (24)

R8 :

(dec - 2 sc) x 6 (18)

R9-10 :

18 sc (18)

R11 :

(dec - sc) x 6 (12)

R12 :

12 sc (12)

Info :

Fasten off leaving a long tail for sewing. Sew the arms onto the body.

โ€” Tail (Lilac) :

R1 :

4 sc in mr (4)

R2 :

(inc - sc) x 2 (6)

R3 :

(inc - sc) x 3 (9)

R4 :

(inc - 2 sc) x 3 (12)

R5 :

(inc - 3 sc) x 3 (15)

R6 :

(inc - 4 sc) x 3 (18)

R7 :

(inc - 2 sc) x 6 (24)

R8 :

(inc - 7 sc) x 3 (27)

R9 :

(inc - 8 sc) x 3 (30)

R10 :

(inc - 4 sc) x 6 (36)

R11 :

(inc - 11 sc) x 3 (39)

R12 :

(inc - 12 sc) x 3 (42)

R13 :

(inc - 6 sc) x 6 (48)

R14 :

(inc - 15 sc) x 3 (51)

R15 :

(inc - 16 sc) x 3 (54)

R16 :

(inc - 8 sc) x 6 (60)

R17 :

(inc - 19 sc) x 3 (63)

R18 :

(inc - 20 sc) x 3 (66)

R19 :

66 sc (66)

Info :

Fasten off leaving a long tail for sewing. Fill with stuffing and sew the tail onto the body 3 rounds from the hole.

โ€” Spike (Make 5) (Turquoise) :

R1 :

4 sc in mr (4)

R2 :

(inc - sc) x 2 (6)

R3 :

(inc - sc) x 3 (9)

R4 :

(inc - 2 sc) x 3 (12)

R5 :

(inc - 3 sc) x 3 (15)

R6 :

(inc - 4 sc) x 3 (18)

R7 :

18 sc (18)

Info :

Fasten off leaving a long tail for sewing. Sew the spikes onto the body.

โ€” Eye (Make 2) (White) :

R1 :

6 sc in mr (6)

R2 :

6 inc (12)

R3 :

12 inc (24)

R4 :

(inc - 3 sc) x 6 (30)

Info :

Fasten off leaving a long tail for sewing.

โ€” Pupil (Make 2) (Black) :

R1 :

5 sc in mr (5)

R2 :

5 inc (10)

Info :

Fasten off leaving a long tail for sewing. Sew the pupil onto the eye. Sew the eyes onto the monster.

โ€” Heart (Make 4 in Different Colors) :

R1 :

6 sc in mr (6)

R2 :

6 inc (12)

R3-4 :

12 sc (12)

Info :

Fasten off (1st piece). Repeat R1-4 but do not fasten off (2nd piece). Crochet the two pieces together:

R5 :

sc in 1st piece - dec - 6 sc - dec - sc - sc in 2nd piece - dec - 6 sc - dec - sc (20)

R6 :

(dec - 3 sc) x 4 (16)

R7 :

16 sc (16)

R8 :

(dec - 2 sc) x 4 (12)

R9 :

12 sc (12)

Info :

Fill with stuffing

R10 :

6 dec (6)

Info :

Close off and weave in yarn end. If there's a hole between the arches of the heart, sew it together.

โ€” Candy (Make 4 in Different Colors) :

R1 :

6 sc in mr - change color to white (6)

R2 :

6 inc in blo - change color to the other color (12)

R3 :

(inc - 2 sc) x 4 - change color to white (16)

R4 :

16 sc - change color to the other color (16)

R5 :

16 sc - change color to white (16)

R6 :

(dec - 2 sc) x 4 - change color to the other color (12)

Info :

Fill with stuffing.

R7 :

6 dec (6)

Info :

Fasten off in blo - do NOT use the front loops. Sew in the yarn tail.

โ€” Ends (White) :

Info :

The ends are made in rows in the 6 front loops from R1 and R7. Press the sides together and crochet them together 2 and 2.

RW1 :

Press the sides together and pull the yarn through 2 x front loops - 2 ch - hdc in the same front loops you pulled the yarn through - hdc in the next 2 x front loops - hdc in the last 2 x front loops - 2 ch - turn (3)

Info :

If it's hard to insert the hook in the front loops, you can use a needle or a smaller hook to loosen them.

RW2 :

skip 2 ch - [hdc - sc] - dec - [sc - hdc] (6)

Info :

Fasten off and sew in the yarn tails.

Assembly Instructions

  • Sew the belly patch onto the monster with first rows facing down, leaving top 6 stitches open for secret compartment
  • Fill legs with stuffing and attach securely to the body base for proper sitting stability
  • Attach arms to the body sides ensuring they are positioned symmetrically for balanced appearance
  • Sew the tail onto the body 3 rounds from the hole for optimal proportion and stability
  • Position and sew 5 turquoise spikes evenly along the back and head for the signature monster look
  • Attach white eyes with black pupils to the head, ensuring proper spacing for the friendly expression
  • Place colorful hearts and striped candies inside the secret belly compartment for surprise element

Important Notes

  • ๐Ÿ’กUse your hand inside the mouth cavity to check stuffing density and maintain horizontal mouth positioning
  • ๐Ÿ’กKeep the belly patch opening unsewn at the top to preserve the secret compartment functionality
  • ๐Ÿ’กMaintain consistent tension during color changes to prevent gaps in the striped candy patterns
  • ๐Ÿ’กPin all pieces in place before final sewing to ensure proper positioning and proportions
  • ๐Ÿ’กTurn inside pieces inside out as specified to hide yarn tails and create clean finishes

This enchanting Monster Surprise pattern brings together functionality and charm in one irresistible package! Mr. Love stands ready to guard secrets in his special belly pouch while spreading joy with his colorful personality. The combination of technical construction and adorable details makes this pattern both challenging and rewarding. Perfect for creating magical moments and treasured memories! ๐Ÿงถ Happy crocheting! ๐Ÿ’œโœจ

You ask,

we answer.

FAQs

How do I prevent the mouth cavity from collapsing when stuffing?

Put your hand inside the mouth while stuffing to maintain the horizontal shape and prevent overfilling the head area.

Can I make the secret belly compartment larger?

Yes, you can increase the belly patch size by adding more rows in the middle section, but maintain the shaping at top and bottom.

What size hook should I use for a smaller monster?

Use a 4.5mm or 5mm hook with DK weight yarn to create a smaller version, approximately 25-28cm tall.

How do I keep the striped candies from unraveling?

Secure color changes by carrying yarn through a few stitches and weave ends carefully through the back loops only.

Can I add more spikes to the design?

Absolutely! You can make additional spikes and arrange them along the back, tail, or arms for a more dramatic monster appearance.