🧢 Beautiful ✨ Detailed πŸ’ Adorable

Monstera Leaf Crochet Coaster Pattern

Monstera Leaf Crochet Coaster Pattern
4.2β˜… Rating
1-2 Hours Time Needed
2.8K Made This
βœ‚οΈ

Intermediate Level

Ideal for those with basic knitting experience, featuring slightly more advanced stitches and techniques to expand your skills.

⏱️

Bite-Sized Project

Complete in under 2 hoursβ€”quick, fun, and perfect for a little creative escape.

β˜•

Warm Welcome

A comforting piece for home or gifts that brings handmade warmth to everyday moments and special occasions.

About This Monstera Leaf Crochet Coaster Pattern

This original coaster pattern takes its inspiration from the sage-green monstera leaf in the photograph, with an outlined edge, open spaces, a raised center vein, and a short stem. Two matching halves are worked flat in single crochet, with increases and decreases creating their tapered outlines and chain spaces forming the leaf openings. The halves are sewn together before a simple border and surface detail bring the design together. Cotton yarn gives the stitches definition and makes a useful, absorbent coaster, while comfortable tension helps the openwork lie flat.
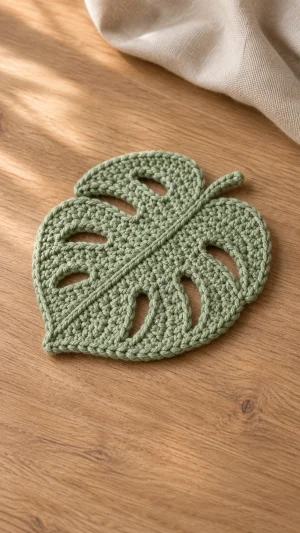
Monstera Leaf Crochet Coaster Pattern crochet pattern - detailed view of completed project

The pattern uses US crochet terms and assumes you can identify the first and last stitch of a row, work into chain spaces, and sew pieces together. The finished size depends on your yarn, hook, and tension, so check the coaster against your mug before making a set.

Why You'll Love This Monstera Leaf Crochet Coaster Pattern

I love how this little leaf turns a familiar coaster into something that feels like a plant-filled tabletop accent. Each half begins with a few stitches, so you can settle into the shaping before working the openings, and the second half gives you a chance to repeat what you have learned. I also like that the project uses one main color: a soft sage keeps the raised vein subtle, while a deeper green gives the same details more contrast against a light table. Joining, edging, and adding the vein take a little care, but each is a manageable finishing stage. Make one for your desk, work a coordinated set for guests, or tie a few together as a thoughtful handmade gift.

Monstera Leaf Crochet Coaster Pattern step 1 - construction progress Monstera Leaf Crochet Coaster Pattern step 2 - assembly progress Monstera Leaf Crochet Coaster Pattern step 3 - details and accessories Monstera Leaf Crochet Coaster Pattern step 4 - final assembly and finishing

Switch Things Up

I would start by exploring different greens: pale sage gives the leaf a quiet look like the photograph, while forest green makes a richer accent on a light table. For a coordinated set, I would use the same cotton yarn in several shades, keeping the hook and row instructions consistent so the coasters remain similar in size. A variegated green can suggest changing foliage, although short color changes may draw attention away from the openings and center vein. If I wanted the vein to stand out, I would use a second green for the surface slip stitches and leave the leaf halves and border in the main shade.

I would also consider the setting before choosing yarn: smooth cotton shows the holes and edging clearly, and a washable cotton is practical beside a mug. To make a larger decorative leaf, I would choose a thicker yarn and a suitable hook rather than changing the stitch counts, then check that the fabric still lies flat. For a smaller accent, I would try a finer yarn and matching hook while keeping the same rows and opening placements; the finished piece may be too small for some mugs. I would make a swatch or one complete leaf first, because changing yarn weight also changes the size and amount of yarn needed.

For a simple table setting, I would make several leaves in one color and arrange their stems in different directions, letting the texture provide the interest. A single leaf could also become a wall accent by adding a hanging loop after the stem, provided the loop is secured firmly and the piece is supported when displayed. Whatever variation I choose, I would keep the two halves matched, place the chain spaces as written, and join their corresponding row ends so the openings stay balanced around the vein.

Common Mistakes & How to Fix Them

βœ— If one half grows wider than the other, an edge increase may have been missed or added twice. Count each row as you work, and compare the two halves before joining them.βœ— If an opening closes up or shifts sideways, the skipped stitches or chain space may have been missed. Rework that row and check that each opening spans two skipped stitches.βœ— If the leaf curls after the border is added, the edging may be too tight or contain too few stitches. Add stitches around tight curves, then lay the leaf flat to check it.βœ— If the two halves pucker along the center, the joining stitches may be pulled too tightly or row ends may be mismatched. Rejoin loosely, matching row to row, and smooth the seam flat.βœ— If the raised vein pulls the leaf out of shape, the surface slip stitches are probably too tight. Redo them with relaxed loops and check that the center seam can still stretch naturally.βœ— If the stem twists or feels stiff, the return slip stitches may be too tight. Work them loosely or use a larger hook for the stem, then check that it lies flat.

Monstera Leaf Crochet Coaster Pattern

Bring a little greenery to your table with a sage-colored crochet monstera leaf inspired by the photographed coaster. You will make two shaped halves with openwork details, join them along a central vein, and finish the leaf with a short stem. The compact project is a lovely way to use cotton yarn and make a practical accent for your favorite mug.

Intermediate 1-2 Hours

Materials Needed for Monstera Leaf Crochet Coaster Pattern

β€” Main Fabric

  • 01
    Worsted-weight cotton yarn in sage green or another leaf color; a small amount is needed for one coaster.

β€” Tools Required

  • 01
    4 mm crochet hook, or a size suitable for your yarn and tension
  • 02
    Yarn needle
  • 03
    Scissors
  • 04
    Stitch markers or removable pins
  • 05
    Blocking pins and a mat, optional

Progress Tracker

0% Complete

β€” Leaf Halves :

Info :

Make 2 matching halves. Work in turned rows. Ch 1 at the start of each row does not count as a stitch. Work 2 sc in the same stitch for each increase.

Row 1 :

Ch 4. Sc in the second ch from the hook and in each remaining ch; turn. (3 sc)

Row 2 :

Ch 1, 2 sc in first st, sc in next st, 2 sc in last st; turn. (5 sc)

Row 3 :

Ch 1, 2 sc in first st, sc in next 3 sts, 2 sc in last st; turn. (7 sc)

Row 4 :

Ch 1, 2 sc in first st, sc in next 5 sts, 2 sc in last st; turn. (9 sc)

Row 5 :

Ch 1, 2 sc in first st, sc in next 7 sts, 2 sc in last st; turn. (11 sc)

Row 6 :

Ch 1, 2 sc in first st, sc in next 9 sts, 2 sc in last st; turn. (13 sc)

Row 7 :

Ch 1, 2 sc in first st, sc in next 11 sts, 2 sc in last st; turn. (15 sc)

Row 8 :

Ch 1, sc in next 5 sts, ch 2, skip next 2 sts, sc in remaining 8 sts; turn. (13 sc and 1 ch-2 space)

Row 9 :

Ch 1, sc in next 8 sts, work 2 sc into the ch-2 space, sc in remaining 5 sts; turn. (15 sc)

Row 10 :

Ch 1, sc in next 8 sts, ch 2, skip next 2 sts, sc in remaining 5 sts; turn. (13 sc and 1 ch-2 space)

Row 11 :

Ch 1, sc in next 5 sts, work 2 sc into the ch-2 space, sc in remaining 8 sts; turn. (15 sc)

Row 12 :

Ch 1, sc2tog, sc in next 11 sts, sc2tog; turn. (13 sc)

Row 13 :

Ch 1, sc2tog, sc in next 9 sts, sc2tog; turn. (11 sc)

Row 14 :

Ch 1, sc2tog, sc in next 7 sts, sc2tog; turn. (9 sc)

Row 15 :

Ch 1, sc2tog, sc in next 5 sts, sc2tog; turn. (7 sc)

Row 16 :

Ch 1, sc2tog, sc in next 3 sts, sc2tog; turn. (5 sc)

Row 17 :

Ch 1, sc2tog, sc in next st, sc2tog. (3 sc)

Finishing :

Fasten off each half, leaving a long tail on one half for joining.

β€” Joining and Edging :

Join :

Place the halves side by side with one flipped over so their openings mirror each other. Match one long row-end edge of each half, with Row 1 aligned to Row 1 and Row 17 aligned to Row 17. Using the long tail and a yarn needle, sew the matched row ends together loosely; leave the other long edges free.

Border :

Join yarn at one end of the center seam. Work sc evenly around the outside edge of the entire leaf, placing extra stitches where needed at the points and curves so the edge lies flat. Do not crochet into the openings. Join with a sl st to the first sc.

Stem :

At the border join, ch 9. Sl st in the second ch from the hook and in each remaining ch back toward the leaf. Sl st into the border at the base of the stem. (8 stem sl sts)

Center vein :

Fasten off the border yarn. With the leaf facing up, join yarn at the stem base and work relaxed surface sl sts along the center seam to the opposite tip, inserting the hook through the fabric and drawing up the yarn from underneath. Fasten off.

Finishing :

Weave in all ends on the reverse. Smooth the leaf and gently block if needed, following the yarn label.

Assembly Instructions

  • Flip one leaf half over and place it beside the other so the openings mirror each other.
  • Match the row ends along one long edge of each half, aligning the first and last rows.
  • Sew the matched edges together loosely with the yarn tail to form the center seam.
  • Crochet the outside border and stem as directed in the pattern.
  • Add the raised center vein with surface slip stitches along the seam.
  • Weave in the ends and gently shape the finished leaf.

Important Notes

  • πŸ’‘The pattern is an original design inspired by the photographs; the exact construction and appearance will differ.
  • πŸ’‘The starting chain of each row does not count as a stitch.
  • πŸ’‘Both halves use the same instructions; flip one over before joining to mirror the openings.
  • πŸ’‘Keep the seam, border, and surface stitches relaxed so the coaster lies flat.
  • πŸ’‘Finished size varies with yarn, hook, and tension; check it against the intended mug.
  • πŸ’‘Use the yarn label's washing and drying instructions when caring for the finished coaster.

This monstera leaf coaster brings a touch of greenery to a desk, coffee table, or handmade gift bundle. Once both halves are joined, take a moment to smooth the border and open each little window before adding the center vein. Check the finished leaf against your favorite mug, then make more in coordinating shades if you like. Enjoy creating your own small patch of crochet greenery!

You ask,

we answer.

FAQs

What yarn is best for a crochet coaster?

Smooth cotton yarn is a practical choice because it absorbs moisture and shows the leaf's stitches and openings clearly. Choose a yarn you can wash according to its label, especially if the coaster will be used daily. The pattern suggests worsted weight, but another weight can work with a suitable hook and will change the finished size.

How do I keep the leaf halves symmetrical?

Make both halves using the same hook, yarn, and row counts, and try to maintain a similar tension. Before sewing, flip one half over and align the matching row ends from the first row to the last. Removable pins can hold the edges together while you check that the openings mirror each other.

Why is my leaf edge curling?

A tight border or too few border stitches can pull the shaped edge inward. Remove the affected section and work the single crochet stitches more loosely, adding a stitch where a curve needs room. Lay the leaf flat as you go; gentle blocking can help settle the finished fabric if the yarn allows it.

Can I make the coaster larger?

Yes. Try a thicker cotton yarn with a hook suited to it and follow the same stitch counts and rows. This changes the overall scale without changing the opening placement. Make one leaf first and check it against your mug, since yarn thickness and your tension determine the final dimensions.

How do I add the raised center vein?

After joining and edging the leaf, bring the yarn up from the back at the stem base. Insert the hook through the fabric along the seam, catch the yarn underneath, and draw it through the loop on the hook to make each surface slip stitch. Keep the stitches loose enough for the leaf to lie flat.

How should I wash the finished coaster?

Follow the care instructions on your cotton yarn label, since washing temperatures and drying methods vary. If the leaf becomes misshapen, gently smooth it back into shape while damp and let it dry flat. Avoid pulling hard on the stem or openwork when handling the wet fabric.