🧢 Beautiful ✨ Detailed πŸ’ Adorable

Mushroom Pendant with Gnome Crochet Pattern

Mushroom Pendant with Gnome Crochet Pattern
4.8β˜… Rating
3-4 Hours Time Needed
2.9K Made This
βœ‚οΈ

Intermediate Level

Ideal for those with basic knitting experience, featuring slightly more advanced stitches and techniques to expand your skills.

⏱️

Bite-Sized Project

Complete in under 2 hoursβ€”quick, fun, and perfect for a little creative escape.

🧸

Tiny Treasure

Small, sweet, and gift-worthy creations that fit perfectly in the palm of your hand with detailed charm.

About This Mushroom Pendant with Gnome Crochet Pattern

This enchanting mushroom pendant pattern brings fairy tale magic to life in miniature form. The design features a classic toadstool cap with an adorable gnome tucked safely inside the stem, creating a whimsical piece that's both decorative and wearable. The pattern uses fine cotton yarn and tight stitches to ensure the pendant maintains its shape and durability for everyday wear.

Mushroom Pendant with Gnome Crochet Pattern crochet pattern - detailed view of completed project

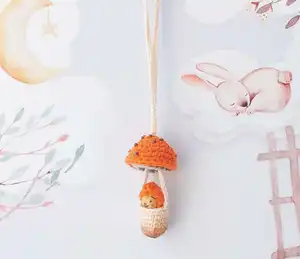
Perfect for adding a touch of woodland charm to any outfit, this pendant can be customized with your preferred chain length. The tiny gnome can be personalized with painted features or embroidered details to make each piece uniquely yours.

Why You'll Love This Mushroom Pendant with Gnome Crochet Pattern

I absolutely love how this pattern combines storytelling with craftsmanship! There's something magical about creating a tiny world that you can wear close to your heart. The satisfaction of watching the mushroom take shape and then adding that precious little gnome companion is incredibly rewarding. It's the perfect project when you want to create something meaningful but don't have weeks to invest - you'll have a finished treasure in just a few hours that will spark conversations and bring smiles wherever you go.

Mushroom Pendant with Gnome Crochet Pattern step 1 - construction progress Mushroom Pendant with Gnome Crochet Pattern step 2 - assembly progress Mushroom Pendant with Gnome Crochet Pattern step 3 - details and accessories Mushroom Pendant with Gnome Crochet Pattern step 4 - final assembly and finishing

Switch Things Up

I love how versatile this little mushroom pendant can be! You could easily create an entire fairy garden collection by making multiple mushrooms in different sizes and colors. Try experimenting with variegated yarns for a more natural, organic look, or go bold with bright, fantastical colors for a more whimsical approach.

I've found that adding small embroidered details like tiny flowers or leaves around the stem base really brings the piece to life. You could also create seasonal versions - maybe autumn colors with tiny acorns, or spring pastels with miniature flower buds.

For those who want to take it further, consider making matching earrings using the same technique but skipping the chain. The gnome could even be given different expressions or tiny accessories like a miniature hat or scarf. I particularly enjoy the idea of creating a whole story around each pendant - maybe this gnome has a name and a personality that influences the color choices and decorative elements you add.

Common Mistakes & How to Fix Them

βœ— Working too loosely - the pendant needs tight stitches to maintain its structural integrity and shape βœ— Forgetting to stuff the gnome body before closing - always stuff lightly before completing the final rows βœ— Threading the chain incorrectly through the cap center - use a thick hook to guide the chain smoothly βœ— Painting the gnome face after assembly - it's easier to add facial features before attaching to the body

Mushroom Pendant with Gnome Crochet Pattern

Create an enchanting miniature world with this adorable mushroom pendant featuring a tiny gnome companion! This delightful pattern combines whimsical charm with practical wearability, perfect for nature lovers who want to carry a piece of magic wherever they go. The finished pendant measures approximately 2 inches in height and comes with a custom chain length of your choice, making it ideal for everyday wear or as a special handmade gift that captures the essence of fairy tale wonder.

Intermediate 3-4 Hours

Materials Needed for Mushroom Pendant with Gnome Crochet Pattern

β€” Main Fabric

  • 01
    100% cotton yarn 100g/200m (3.5 oz/218 yds) in various colors for mushroom cap and stem
  • 02
    Fine weight yarn corresponding to yarn weight #2 - DK/fine yarn for tight, structured stitches

β€” Tools Required

  • 01
    1.75mm crochet hook (US steel/thread hook 4 or UK steel/thread hook 2)
  • 02
    Scissors
  • 03
    Wooden bead for gnome's head (10-14mm)
  • 04
    Tapestry needle with wide eye for yarn
  • 05
    Small amount of toy stuffing
  • 06
    Textile markers or acrylic paints with brush for decoration
  • 07
    Pastels for tinting stem
  • 08
    Contrast color thread for row markers
  • 09
    Optional: beads for mushroom cap decoration

Progress Tracker

0% Complete

β€” Mushroom Stem :

Magic Loop :

Make a magic loop (adjustable ring) or ch 2, insert hook into 1st ch

Row 1 :

sc 6 (6) - try to hide the tail of yarn inside while crocheting

Row 2 :

inc 6 (12)

Row 3 :

[inc, sc 2] x 4 (16)

Rows 4-8 :

sc in each stitch (16), ch 250 (this would be approx. 65 cm strand to hang on neck as a necklace; you may ch as many as you wish), sl st into sc 7 of last row (into the middle of last row), fasten off, weave in the tail

β€” Mushroom Cap Top Part :

Magic Loop :

Make a magic loop (adjustable ring) or ch 2, insert hook into 1st ch

Row 1 :

sc 6 (6) - try to hide the tail of yarn inside while crocheting

Row 2 :

inc 6 (12)

Row 3 :

[inc, sc 2] x 4 (16)

Row 4 :

into front loop only [inc, sc 3] x 4 (20)

Row 5 :

[inc, sc 4] x 4 (24)

Rows 6-7 :

sc in each stitch (24), fasten off, weave in the tail

Info :

If you wish to sew the beads to the cap top, it would be more comfortable to make it before next step

β€” Mushroom Cap Inner Part :

Info :

Turn the top part of cap inner side out

Row 1 :

sc into each back loop of top part row 3 (16)

Row 2 :

sc in each stitch (16)

Row 3 :

[dc inc, dc 3] x 4 (20), fasten off, weave in the tail

Info :

Pull the stem chain through the center of cap (I use thick hook for this purpose)

β€” Gnome :

Magic Loop :

Make a magic loop (adjustable ring) or ch 2, insert hook into 1st ch

Row 1 :

sc 6 (6)

Row 2 :

[inc, sc] x 3 (9)

Rows 3-5 :

sc into each stitch (9)

Rows 6-8 :

ch 1, turn, sc 6 (6); stuff it. Fold the borders

Row 9 :

sl st 3 through both borders. Fasten off, leaving long tail to sew the bead

Info :

Pull the tail with a needle through the bead as showed and fix it. To make a quiff I let small tail of yarn left after sewing the bead remain on the outside. Otherwise just hide the tail inside. Make face features with textile marker/acrylic paint

β€” Alternative Crochet Head :

Info :

Wooden bead may be replaced with crochet ball in suitable color of same yarn and hook. Crochet inner side out

Row 1 :

sc 6 in a magic ring (6)

Row 2 :

sc into each stitch (6)

Row 3 :

dec 3 (3). Fasten off, hide the tail inside

Info :

You may embroider face with sewing thread (for me it's easier to make a face after joining with body)

Assembly Instructions

  • Pull the stem chain through the center of the mushroom cap using a thick crochet hook for easier threading
  • Attach the completed gnome to the stem by positioning it inside the mushroom stem opening
  • Secure the gnome in place by sewing through both the gnome body and stem walls with matching thread
  • If using a wooden bead for the head, thread the yarn tail through the bead and secure with a knot inside
  • Add facial features to the gnome using textile markers or acrylic paint before final assembly
  • Adjust the chain length as desired and secure the connection point with slip stitches

Important Notes

  • πŸ’‘Work with tight tension throughout the pattern to ensure the pendant maintains its shape and structure
  • πŸ’‘Use stitch markers to keep track of rounds, especially when working the cap construction
  • πŸ’‘The finished size depends on yarn weight and hook size - adjust accordingly for desired pendant size
  • πŸ’‘Paint or add gnome facial features before attaching the head to avoid accidentally coloring the surrounding yarn
  • πŸ’‘Allow any paint or markers to fully dry before handling or wearing the pendant

This charming mushroom pendant with gnome pattern brings a touch of woodland magic to your jewelry collection! The intricate design combines functionality with whimsy, creating a wearable piece of art that tells its own little story. Perfect for nature enthusiasts, fairy tale lovers, or anyone who appreciates handcrafted details, this pendant makes a thoughtful gift or a delightful personal accessory. The small scale and quick completion time make it an ideal project for trying new techniques while creating something truly special. πŸ„βœ¨

You ask,

we answer.

FAQs

Can I use different yarn weights for this pattern?

Yes, but remember that using thicker or thinner yarn will change the final size of your pendant. Adjust your hook size accordingly and maintain tight tension for structural integrity.

What if I don't have a wooden bead for the gnome's head?

The pattern includes instructions for crocheting a small ball as an alternative to the wooden bead. This option gives you more color control and keeps the entire project yarn-based.

How do I make the mushroom cap spots?

You can sew on small beads, paint dots with acrylic paint, or crochet tiny white circles and attach them. The pattern suggests quicker decoration methods like painting for convenience.

Can I make the chain longer or shorter?

Absolutely! The pattern suggests 250 chains (about 65cm), but you can adjust this to any length you prefer. Just chain the desired length before slip stitching back into the stem.

Is this pattern suitable for beginners?

This is an intermediate pattern requiring knowledge of basic stitches, working in rounds, and some assembly skills. Beginners should be comfortable with single crochet, increases, and decreases before attempting this project.