🧶 Beautiful ✨ Detailed 💝 Adorable

Owl Granny Square Crochet Pattern

Owl Granny Square Crochet Pattern
4.1★ Rating
3-4 Hours Time Needed
2.9K Made This
✂️

Intermediate Level

Ideal for those with basic knitting experience, featuring slightly more advanced stitches and techniques to expand your skills.

⏱️

Weekend Treat

Takes 5-7 hours, making it an enjoyable project to finish over a couple of days.

🦉

Charming Critter

Delightful animal designs with sweet details that capture the essence of your favorite woodland creatures.

About This Owl Granny Square Crochet Pattern

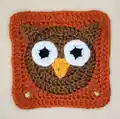
This enchanting owl granny square pattern combines the beloved traditional granny square technique with adorable character design. Starting with a brown center worked in continuous rounds, you'll create the owl's face using classic double crochet increases. The pattern then transitions to vibrant orange yarn for the outer square border, creating beautiful contrast. Each component - from the triangular ears to the star-shaped eyes - is worked separately and then carefully assembled.

Owl Granny Square Crochet Pattern crochet pattern - detailed view of completed project

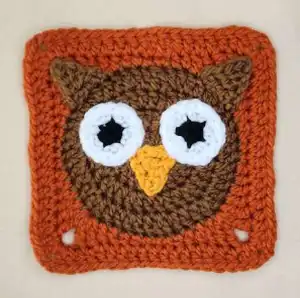
The finished square measures a perfect 11cm x 11cm, making it ideal for joining with other squares in larger projects. The pattern includes detailed assembly instructions and helpful photos to ensure your owl comes together beautifully.

Why You'll Love This Owl Granny Square Crochet Pattern

I absolutely adore how this pattern transforms a simple granny square into something so full of personality! There's something magical about watching the owl's character emerge as you work through each round, and the satisfaction of perfectly positioning those bright white eyes is unmatched. What I find most rewarding is how this pattern teaches you advanced granny square techniques while creating something so charming - it's both educational and utterly delightful to make!

Owl Granny Square Crochet Pattern step 1 - construction progress Owl Granny Square Crochet Pattern step 2 - assembly progress Owl Granny Square Crochet Pattern step 3 - details and accessories Owl Granny Square Crochet Pattern step 4 - final assembly and finishing

Switch Things Up

I love experimenting with different color combinations to create unique owl personalities! While the classic brown and orange combination is absolutely perfect, I've had wonderful results using gray and cream for a more sophisticated look, or even bright blues and greens for a whimsical fantasy owl. The beauty of this pattern is how versatile it is for color play.

Another fun variation I enjoy is changing the eye colors - using different shades for the outer ring creates interesting effects. Sometimes I use navy blue instead of black, or even deep purple for a mystical appearance. You can also experiment with the beak colors using different shades of yellow or orange to match your owl's personality.

For those who want to add extra texture, I sometimes work the center circle in a fuzzy yarn while keeping the outer square in smooth acrylic. This creates a lovely tactile contrast that makes the owl face really pop. The possibilities are endless - each color combination creates a completely different owl character!

Common Mistakes & How to Fix Them

✗ Not maintaining consistent tension during color changes can create uneven square edges and distorted owl face ✗ Positioning the ears incorrectly outside the corner ch2 spaces results in a lopsided owl appearance ✗ Rushing through the eye construction without proper increases leads to flat or misshapen circular eyes ✗ Forgetting to leave long tails for assembly makes stitching the components extremely difficult and frustrating

Owl Granny Square Crochet Pattern

Create an adorable owl granny square with this charming crochet pattern! This delightful 11cm x 11cm square features a sweet brown owl face with bright white eyes, a tiny orange beak, and cute little ears. Perfect for blankets, pillows, or decorative projects, this granny square combines traditional techniques with whimsical character design. Using lightweight acrylic yarn in five beautiful colors, you'll master color changes, appliqué techniques, and classic granny square construction while bringing this wise little owl to life.

Intermediate 3-4 Hours

Materials Needed for Owl Granny Square Crochet Pattern

— Main Fabric

  • 01
    Lightweight acrylic yarn in Brown
  • 02
    Lightweight acrylic yarn in Black
  • 03
    Lightweight acrylic yarn in White
  • 04
    Lightweight acrylic yarn in Light Orange
  • 05
    Lightweight acrylic yarn in Dark Orange

— Tools Required

  • 01
    4mm crochet hook
  • 02
    Yarn needle
  • 03
    Scissors

Progress Tracker

0% Complete

— Square :

Using the brown yarn

Round 1 :

MR, ch2, 12dc inside MR (12)

Info :

Tighten the MR by pulling on the tail and then sl st in the 1st dc (skip the ch2)

Round 2 :

ch2, *dc inc* all around (24)

Round 3 :

ch2, *dc, dc inc* all around (36)

Round 4 :

ch2, *2dc, dc inc* all around (48)

Info :

Color Change: at the end of Round 4, you will need to do a color change. Method 1: change color at the last dc of Round 4. Method 2: finish off with an invisible stitch and then attach the new color

Round 5 :

ch1, *3sc, 2hdc, 2dc, [2tc + ch2 + 2tc] in the same stitch, 2dc, 2hdc* all around (68)

Info :

Sl st in the first sc that you did at the beginning of Round 5

Round 6 :

ch2, *dc* all around and [2dc + ch2 + 2dc] in the ch2 space (84)

Info :

At the end of the round, finish off and weave in any excess yarn. You can finish off using the invisible stitch method or sl st in the 1st dc

— Ears x2 :

Using the brown yarn

Row 1 :

sl knot, ch5, sc in the 2nd ch away from the hook, hdc, dc, tc (4)

Info :

Cut the yarn and finish off. Leave a long tail for stitching

— Beak :

Using the light orange yarn

Row 1 :

sl knot, ch5, sc in the 2nd ch away from the hook, hdc, dc, tc (4)

Info :

Cut the yarn and finish off. Leave a long tail for stitching

— Eyes x2 :

Using the black yarn

Round 1 :

MR, ch1, 5sc in MR (5)

Info :

Change to white at the last sc and tighten the MR. The eyes are worked in continuous rounds; continue to the next round without slip stitching or connecting the Rounds

Round 2 :

*inc* all around (10)

Round 3 :

*sc, inc* all around (15)

Info :

Cut the yarn and finish off. Leave a long tail for stitching

Assembly Instructions

  • Place the face components on the completed square using positioning guides
  • Position the ears in the corner stitches of the granny square (the ones with [2tc + ch2 + 2tc] from Round 5)
  • Stitch the beak between the eyes with the tip (the sc) facing downwards
  • Attach the eyes symmetrically on the brown center circle
  • Use the long tails from each component for secure stitching
  • Weave in all excess yarn ends after assembly is complete

Important Notes

  • 💡Work through both loops of each stitch unless stated otherwise
  • 💡The ch1 or ch2 at the beginning of rounds do not count as stitches unless specified
  • 💡You can use any yarn weight - smaller hook and yarn will create a smaller square
  • 💡Use either invisible stitch method or slip stitch method for cleaner color changes
  • 💡The eyes are worked in continuous rounds without joining between rounds

This delightful owl granny square pattern brings woodland charm to your crochet projects with its sweet character design and classic construction techniques. The combination of traditional granny square methods with adorable appliqué details creates a perfect learning project that's both functional and utterly charming. Whether you're making a baby blanket, decorative pillow, or cozy throw, this wise little owl will add personality and warmth to any creation. Get ready to fall in love with granny squares all over again! 🦉✨

You ask,

we answer.

FAQs

What size will my finished owl square be?

Using lightweight acrylic yarn and a 4mm hook, your finished square will measure 11cm x 11cm (approximately 4.3 inches square).

Can I use different yarn weights for this pattern?

Yes! You can use any yarn weight, but remember to adjust your hook size accordingly. Smaller yarn and hooks will create a smaller square.

Which color change method should I use?

Both methods work well. The invisible stitch provides a cleaner finish, but the standard color change method is quicker. Choose based on your skill level and desired finish quality.

How do I properly position the ears?

The ears should be placed in the corner stitches of the granny square - specifically in the spots with [2tc + ch2 + 2tc] from Round 5.

Can I make multiple squares for a blanket?

Absolutely! This square is perfect for joining with others to create larger projects like baby blankets, throws, or pillow covers.