๐Ÿงถ Beautiful โœจ Detailed ๐Ÿ’ Adorable

Popping Lizard Coaster Crochet Pattern

Popping Lizard Coaster Crochet Pattern
4.0โ˜… Rating
5-7 Hours Time Needed
3.9K Made This
โœ‚๏ธ

Intermediate Level

Ideal for those with basic knitting experience, featuring slightly more advanced stitches and techniques to expand your skills.

โฑ๏ธ

Weekend Treat

Takes 5-7 hours, making it an enjoyable project to finish over a couple of days.

โ˜•

Warm Welcome

A comforting piece for home or gifts that brings handmade warmth to everyday moments and special occasions.

About This Popping Lizard Coaster Crochet Pattern

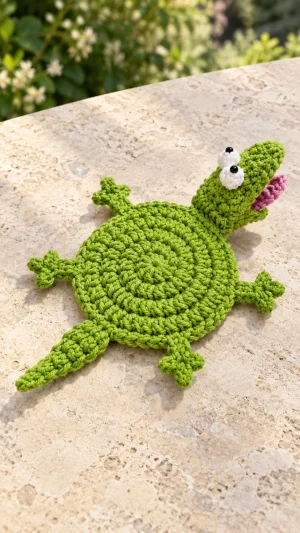
This lizard coaster combines a circular, bobble-textured body with four narrow legs, three-toed feet, and a flat tapered tail. The raised head is crocheted separately in continuous rounds, while a small oval lower jaw and pink tongue create an open-mouth expression similar to the photographed design. Cotton gives the body useful absorbency and helps the little toes hold their shape, while restrained stuffing supports the snout without making the whole coaster bulky. You will practice regular increases, bobble stitches, simple decreases, oval crochet, and careful attachment of small parts, with the central body left unstuffed.

Popping Lizard Coaster Crochet Pattern crochet pattern - detailed view of completed project

The instructions below are an original interpretation of the pictured lizard, with a separate construction chosen to make each component manageable. Because the belly has raised texture, check that your intended mug sits securely before using the finished piece, and keep the head, feet, and tail outside its base.

Why You'll Love This Popping Lizard Coaster Crochet Pattern

I love how this project gives a familiar round coaster a little personality through parts you can make one at a time. I would begin with the belly, enjoy the rhythm of its textured rounds, and leave the smaller pieces for a second session when I can concentrate on their placement. The eyes and open mouth offer plenty of expression without complicated embroidery, while the flat tail and narrow legs keep the outline recognizable. I also like that the body needs no stuffing, so most of the yarn becomes useful fabric. Finishing does deserve some patience: I would pin the face and limbs before sewing, then check the coaster with an empty mug. It makes a playful desk accessory or a thoughtful handmade gift for someone who enjoys reptiles.

Popping Lizard Coaster Crochet Pattern step 1 - construction progress Popping Lizard Coaster Crochet Pattern step 2 - assembly progress Popping Lizard Coaster Crochet Pattern step 3 - details and accessories Popping Lizard Coaster Crochet Pattern step 4 - final assembly and finishing

Switch Things Up

I would start with color when making this lizard my own, choosing leafy green for the photographed look or olive cotton for a quieter desk accessory while keeping every stitch count unchanged. I could use a deeper green for the tail and feet, which would emphasize their shapes without adding more texture to the surface supporting a cup. For a coordinated gift set, I would make several lizards in different greens and repeat the same pink tongue and white eyes so the collection feels connected. If I wanted a gentler expression, I would embroider smaller black pupils slightly toward the front of each white eye, checking their direction with both eyes pinned in place.

I would choose embroidered pupils for a washable household coaster because there are no rigid pupil pieces to work around when squeezing out water or reshaping the face. To adjust the overall scale, I would change yarn thickness and hook together, preserve all the written counts, and assess the finished belly against the actual mug rather than assume a particular diameter. I would keep smooth cotton for the main body even if I used a small contrasting cotton scrap for the tongue, since matching fiber behavior makes washing and drying more predictable. For a flatter version intended for a narrow-based cup, I would replace each bobble with one single crochet, leaving the increases, round totals, and attachment positions exactly as written.

I could angle the tail slightly sideways during assembly to suggest movement, but I would keep its broad base fully sewn to the rim so it does not twist away from the body. Before committing to any variation, I would arrange all the parts around the finished circle, place an empty mug in the center, and move decorative pieces outward until the base rests securely.

Common Mistakes & How to Fix Them

โœ— A ruffled belly usually means an extra increase has slipped into a round. Count each completed round against its stated total, undo the affected section, and check that each repeat contains exactly one increase.โœ— A cupped body can result from tight tension around the bobbles. Loosen the closing loop slightly and check the circle on a flat surface after each round; persistent cupping may need a larger hook and a restarted body.โœ— Bobbles can disappear onto the underside when their clusters are pushed away from the intended face. Nudge each completed bobble toward the right side with your fingertip, then check that all textured rounds face the same direction.โœ— Extra stitches around the bobbles come from treating their closing loops as additional stitches. Each bobble counts as one stitch; mark its top if needed and confirm the round total before continuing.โœ— A floppy or crowded mouth often comes from stuffing the entire neck or attaching the jaw too far forward. Keep the neck unstuffed, pin the jaw beneath it, and check that the pink tongue remains visible between the two green pieces.โœ— Twisted feet usually mean the leg was sewn down without checking its orientation. Lay each leg and all three toes flat before attaching its base, then turn the coaster over to confirm the attachment has not pulled the rim upward.โœ— An unstable mug may be resting on a bobble, a raised seam, or part of the head. Keep attachments outside the central resting area, reshape the body, and check with an empty mug; use the plain-stitch variation if the base still rocks.โœ— Loose eyes can develop when stitches catch only one small point of the white sphere. Sew around several stitches at each eye base, secure the ends inside the head, and gently tug each eye to check the attachment.

Popping Lizard Coaster Crochet Pattern

Crochet a cheerful green lizard coaster with a textured round belly, four three-toed feet, and a tapered tail that gives your tabletop a playful visitor. Work the body in rounds, then make the raised head, white eyes, lower jaw, and pink tongue separately before sewing the pieces together. This original photo-inspired cotton project offers manageable stages, with a final mug-balance check to help you put your finished coaster to practical use.

Intermediate 5-7 Hours

Materials Needed for Popping Lizard Coaster Crochet Pattern

โ€” Main Fabric

  • 01
    Smooth worsted-weight cotton yarn in bright green for the body, head, lower jaw, tail, and four legs; allow approximately 70-90 g.
  • 02
    White cotton yarn of the same weight for two eyes; approximately 5 g.
  • 03
    Pink cotton yarn of the same weight for the tongue; approximately 3-5 g.
  • 04
    A short length of black cotton yarn for embroidered pupils.

โ€” Tools Required

  • 01
    3.5 mm crochet hook, adjusting if necessary to obtain firm but flexible fabric.
  • 02
    Locking stitch markers.
  • 03
    Tapestry needle for assembly and embroidery.
  • 04
    Scissors.
  • 05
    Pins for arranging the separate pieces.
  • 06
    A small amount of washable polyester stuffing for the snout and eyes.
  • 07
    A flat blocking surface and rustproof pins.

Progress Tracker

0% Complete

โ€” Before You Begin :

Pattern notes :

This is an original pattern inspired by the pictured green lizard coaster. Use green unless another color is specified. Work circular pieces in continuous rounds without joining, marking the first stitch of each round. Work through both loops unless instructed otherwise. Starting and turning chains do not count as stitches. Numbers in parentheses are completed stitch totals.

Special stitch โ€” bobble :

Yarn over, insert the hook into the indicated stitch, yarn over and draw up a loop, yarn over and draw through 2 loops. Repeat this unfinished dc action 3 more times into the same stitch, leaving 5 loops on the hook. Yarn over and draw through all 5 loops. Do not add a closing chain. Push the cluster toward the RS. One bo uses one base stitch and counts as one completed stitch.

Size and fabric check :

No fixed finished size is specified. Make the complete body and check it against your intended mug before assembling the lizard. The mug base must fit within the body and rest securely on its texture. For a flatter surface, substitute 1 sc for every bo throughout the body, preserving all stitch totals.

โ€” Textured Body :

Round 1 :

6 sc in MR. Tighten the ring. (6)

Round 2 :

Inc in each st around. (12)

Round 3 :

(1 sc, inc) ร— 6. (18)

Round 4 :

(1 bo, 1 sc, inc) ร— 6. (24)

Round 5 :

(3 sc, inc) ร— 6. (30)

Round 6 :

(1 bo, 3 sc, inc) ร— 6. (36)

Round 7 :

(5 sc, inc) ร— 6. (42)

Round 8 :

(1 bo, 5 sc, inc) ร— 6. (48)

Round 9 :

(7 sc, inc) ร— 6. (54)

Round 10 :

(1 bo, 7 sc, inc) ร— 6. (60)

Round 11 :

1 sc in each st around. (60)

Body finishing :

Sl st in the next st, fasten off, and weave in both ends on the underside. Do not stuff the body.

Body shaping :

Dampen the body and gently spread it into a flat circle with the bobbles facing up. Pin only as needed without stretching the rim, and let it dry completely before assembly.

โ€” Upper Head and Neck :

Info :

Begin at the snout tip. The wider section forms the upper head, and the narrower final rounds form an unstuffed neck tab for attachment.

Round 1 :

6 sc in MR. Tighten the ring. (6)

Round 2 :

Inc in each st around. (12)

Round 3 :

(1 sc, inc) ร— 6. (18)

Round 4 :

1 sc in each st around. (18)

Round 5 :

1 sc in each st around. (18)

Round 6 :

1 sc in each st around. (18)

Round 7 :

1 sc in each st around. (18)

Round 8 :

1 sc in each st around. (18)

Stuffing :

Add a small amount of stuffing to the snout and wider head section. Shape it into a softly flattened oval rather than a firm ball, and keep stuffing clear of the neck.

Round 9 :

(1 sc, dec) ร— 6. (12)

Round 10 :

1 sc in each st around. (12)

Round 11 :

1 sc in each st around. (12)

Neck closure :

Flatten the opening so 6 stitches on the front align with 6 stitches on the back. Work 6 sc through both layers, pairing one front stitch with one back stitch for each sc. This makes a closed attachment edge of 6 sc.

Head finishing :

Fasten off, leaving a long sewing tail. Keep the neck tab unstuffed.

โ€” Lower Jaw :

Foundation :

Ch 7. Work the first round around both sides of this chain.

Round 1 :

Beginning in the second ch from the hook, sc in each of the next 5 ch, work 3 sc in the last ch, rotate to the unused side of the foundation, sc in each of the next 4 ch, then work 2 sc in the same foundation ch as the first sc. (14)

Round 2 :

Inc in the first st, 4 sc, inc in each of the next 3 sts, 4 sc, inc in each of the last 2 sts. (20)

Jaw finishing :

Sl st in the next st and fasten off, leaving a long sewing tail. Keep the oval flat and unstuffed. Choose one rounded end as its base and mark the 4 central edge stitches at that end for attachment.

โ€” Pink Tongue :

Foundation :

With pink, ch 7.

Round 1 :

Beginning in the second ch from the hook, sc in each of the next 5 ch, work 3 sc in the last ch, rotate to the unused side of the foundation, sc in each of the next 4 ch, then work 2 sc in the same foundation ch as the first sc. (14)

Tongue finishing :

Sl st in the next st and fasten off, leaving a sewing tail. Weave the starting end into the underside. Keep the tongue flat and unstuffed.

โ€” White Eyes :

Info :

Make 2 with white. Use black yarn for the pupils so rigid eye fittings are unnecessary.

Round 1 :

6 sc in MR. Tighten the ring. (6)

Round 2 :

Inc in each st around. (12)

Round 3 :

1 sc in each st around. (12)

Pupil embroidery :

With black yarn, make several short overlapping stitches over one small area between Rounds 2 and 3. Keep the pupil compact and secure both black ends inside the eye.

Eye stuffing :

Add a small pinch of stuffing, keeping it behind the white stitches and clear of the working edge.

Round 4 :

Dec ร— 6. (6)

Eye closure :

Fasten off with a long tail. Thread the tail through the front loop of each remaining stitch, draw closed, and retain the tail for attaching the eye.

โ€” Flat Tapered Tail :

Foundation :

With green, ch 9. Begin at the broad attachment end and work toward the tip.

Row 1 :

Sc in the second ch from the hook and in each remaining ch. (8)

Row 2 :

Ch 1, turn, 1 sc in each st. (8)

Row 3 :

Ch 1, turn, dec, 4 sc, dec. (6)

Row 4 :

Ch 1, turn, 1 sc in each st. (6)

Row 5 :

Ch 1, turn, dec, 2 sc, dec. (4)

Row 6 :

Ch 1, turn, 1 sc in each st. (4)

Row 7 :

Ch 1, turn, dec twice. (2)

Row 8 :

Ch 1, turn, 1 sc in each st. (2)

Row 9 :

Ch 1, turn, dec. (1)

Row 10 :

Ch 1, turn, 1 sc. (1)

Tail finishing :

Fasten off and weave in the tip end. Keep the tail unstuffed. Use a separate length of green yarn to sew its broad foundation edge to the body during assembly.

โ€” Legs and Three-Toed Feet :

Info :

Make 4 identical pieces with green. Each leg is a narrow strip with three chain toes worked from its distal end.

Foundation :

Ch 7, leaving a long starting tail for attachment to the body.

Row 1 :

Sc in the second ch from the hook and in each remaining ch. The last sc is the foot junction. (6)

Toe 1 :

Ch 4. Beginning in the second ch from the hook, sl st in each of the 3 chains, then sl st into the foot-junction sc.

Toe 2 :

Ch 4. Beginning in the second ch from the hook, sl st in each of the 3 chains, then sl st into the same foot-junction sc.

Toe 3 :

Ch 4. Beginning in the second ch from the hook, sl st in each of the 3 chains, then sl st into the same foot-junction sc.

Leg finishing :

Fasten off and weave the finishing end along the underside of the leg. Preserve the long starting tail at the end opposite the toes for sewing.

โ€” Assembly and Final Finishing :

Arrange the pieces :

Place the body RS up. Treat the top as 12 o'clock and the bottom as 6 o'clock. Pin the head at 12 o'clock, tail at 6 o'clock, front legs near 10 and 2 o'clock, and hind legs near 8 and 4 o'clock. Keep all appendages outside the central mug-resting area.

Attach the tail :

Sew the broad 8-stitch foundation edge of the tail to 8 adjacent body-rim stitches centered at 6 o'clock. Keep the tail pointing outward and secure the seam without gathering the rim.

Attach the legs :

Using each starting tail, sew the proximal end of one leg to 2 neighboring rim stitches at its pinned position. Catch the foundation chain and nearby leg stitch for a secure base, and keep all three toes facing upward and spread outward.

Attach the upper head :

Sew the 6-stitch neck closure to 6 adjacent rim stitches centered at 12 o'clock. Angle the snout upward and outward. Add a few short anchoring stitches between the underside of head Round 9 and the same rim area to support the angle, avoiding the center of the body.

Attach the lower jaw :

With its upper surface facing the underside of the snout, sew only the 4 marked base stitches of the lower jaw to the underside of the neck attachment. Let the free end project forward below the snout, leaving a visible open mouth.

Attach the tongue :

Center the pink oval on the upper surface of the lower jaw. Sew its base and side edges to the jaw without sewing through the upper head. Leave the forward rounded tip free so it can lift slightly within the open mouth.

Attach the eyes :

Pin both eyes on top of the head around Rounds 6-8, leaving approximately 2 head stitches between their bases. Turn the pupils toward the snout, then sew around each white base securely without flattening the eye.

Secure the ends :

Weave every remaining yarn end through several stitches on the underside or inside its component. Check each seam with a gentle tug and trim only after it feels secure.

Final shaping :

Lightly dampen any distorted flat components, spread the toes, straighten the tail, and let the entire piece dry completely. Avoid pressing the raised head or eyes flat.

Use check :

Place an empty mug on the body on a level surface. Confirm that its base sits securely without touching the head or attachment seams before using the coaster with a drink.

Assembly Instructions

  • Lay the body right side up and pin the head at 12 o'clock, tail at 6 o'clock, and paired legs near 10, 2, 8, and 4 o'clock.
  • Sew the broad 8-stitch tail foundation to 8 rim stitches centered at 6 o'clock, keeping the seam flat.
  • Attach each leg base across 2 neighboring rim stitches at its pinned position, with all three toes spread outward.
  • Sew the flattened 6-stitch neck closure to the rim at 12 o'clock; anchor the underside of head Round 9 to the same rim area to support the raised angle.
  • Sew the 4 marked base stitches of the lower jaw beneath the neck attachment, leaving its forward end free to form the open mouth.
  • Sew the pink tongue onto the upper surface of the lower jaw along its base and sides, leaving the forward tip free.
  • Sew both eyes over head Rounds 6-8 with approximately 2 head stitches between their bases; secure all ends, reshape the components, dry completely, and check stability with an empty mug.

Important Notes

  • ๐Ÿ’กThe reference image supplies a project title and photograph rather than readable crochet instructions; this pattern is an original interpretation of the pictured design for Hook Vibes.
  • ๐Ÿ’กYarn quantities and completion time are planning estimates. Individual tension, yarn, and finishing pace will affect the result.
  • ๐Ÿ’กThe body, lower jaw, tongue, legs, and tail remain unstuffed; use only light stuffing in the upper head and eyes.
  • ๐Ÿ’กEach bobble replaces one single crochet position and counts as one stitch. Do not add an extra closing chain.
  • ๐Ÿ’กA flat circle does not automatically provide a stable surface for every mug. Check your intended mug, and use the plain-stitch variation if the textured surface causes rocking.
  • ๐Ÿ’กThe raised head and all attachment seams should remain outside the area beneath the mug base.
  • ๐Ÿ’กHand wash according to the yarn label, reshape gently, and allow the stuffed details to dry fully before storing or using.
  • ๐Ÿ’กThis decorative coaster is intended for cups and glasses; do not use it as a holder for cookware.

Your lizard takes shape when the little parts meet the textured belly, so give that final arrangement a few unhurried minutes. Pin the eyes, spread the feet, and check that the tongue peeks out without crowding the mouth. Once the seams are secure, reshape the cotton gently and let every part dry completely. I would finish by choosing a favorite mug and checking its balance on the center before putting this cheerful coaster to work.
You ask,

we answer.

FAQs

Can I make the coaster without bobbles?

Yes. Replace every bobble with one single crochet and leave all increases exactly where they appear. Each round will retain its written stitch total, and the body will have a smoother surface for a mug. I would choose this version when making the coaster for a cup with a small or narrow foot, then still check its balance before use.

What yarn works best for this lizard coaster?

Smooth cotton is a practical choice because it absorbs condensation and shows the stitches clearly. Use the same weight for the green components, white eyes, and pink tongue so their proportions remain compatible. Check the yarn label for care instructions, and avoid fluffy yarn that hides stitch tops or makes the toes difficult to shape.

How do I keep the raised head from falling forward?

Keep the final neck rounds unstuffed so the attachment tab can lie against the rim. After sewing its closed edge in place, add the described anchoring stitches from the underside of head Round 9 to the same rim area. Use only light stuffing in the snout, and check the angle before securing the sewing tail.

How can I tell whether the body is large enough for my mug?

Finish and shape the body before attaching any parts, then place your intended mug on the dry circle. Its entire base should fit comfortably inside the rim, with room for the head attachment outside it. If the body is too small, remake it using thicker cotton and a suitable larger hook while retaining the written counts.

Do I need plastic safety eyes for this project?

No. The pattern uses small stuffed white eyes with black embroidered pupils, giving the raised expression without rigid fittings. Embroider the pupils while each eye is still open so you can secure the black ends inside. When attaching the finished eyes, sew around several base stitches rather than relying on a single fastening point.

What should I do if my circular body curls or waves?

First count the stitches, since missed or extra increases change the shape quickly. If the totals are correct, check whether the bobbles have tightened the surrounding fabric. Gentle damp shaping may settle slight unevenness; pronounced cupping or ruffling usually calls for adjusted tension or hook size and a restarted body before any components are sewn on.

How should I wash and dry the finished coaster?

Follow the care instructions for all the yarns used. A gentle hand wash lets you support the raised head and eyes while cleaning the body. Press out water in a towel without twisting, spread the body and toes into shape, and dry flat with air circulating around the stuffed details. Wait until those details are completely dry before storage.