🧢 Beautiful ✨ Detailed πŸ’ Adorable

Pusheen Cat with Ice Cream Amigurumi Pattern

Pusheen Cat with Ice Cream Amigurumi Pattern
4.3β˜… Rating
8-10 Hours Time Needed
1.4K Made This
βœ‚οΈ

Intermediate Level

Ideal for those with basic knitting experience, featuring slightly more advanced stitches and techniques to expand your skills.

⏱️

All-Day Adventure

Requires 8-10 hours, ideal for a full day of immersive knitting.

🧸

Cute Companion

An adorable friend to cherish, handcrafted with love to bring comfort and joy for years to come.

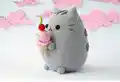
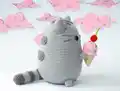
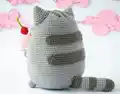
About This Pusheen Cat with Ice Cream Amigurumi Pattern

This enchanting Pusheen amigurumi pattern captures the beloved internet cat's signature charm with incredible attention to detail. From the distinctive striped pattern on the back to the tiny ice cream cone complete with a cherry on top, every element has been thoughtfully designed. The pattern uses continuous spiral rounds and includes detailed instructions for creating Pusheen's characteristic plump body, pointed ears, and sweet facial features.

Pusheen Cat with Ice Cream Amigurumi Pattern crochet pattern - detailed view of completed project

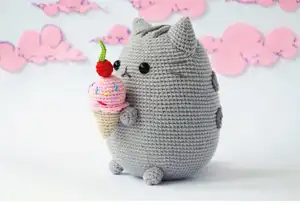
The ice cream accessory adds an extra touch of whimsy with its textured surface and colorful sprinkles. This pattern is perfect for creating gifts or adding kawaii charm to any space.

Why You'll Love This Pusheen Cat with Ice Cream Amigurumi Pattern

I absolutely love how this pattern brings such an iconic character to life through crochet! The way the stripes are created separately and sewn on gives Pusheen that authentic tabby cat look that made her famous. I'm particularly fond of the clever construction method where the head and body are worked as one piece, making assembly so much easier. The little ice cream cone with its detailed cherry on top is just the perfect finishing touch that makes this amigurumi extra special and photo-worthy!

Pusheen Cat with Ice Cream Amigurumi Pattern step 1 - construction progress Pusheen Cat with Ice Cream Amigurumi Pattern step 2 - assembly progress Pusheen Cat with Ice Cream Amigurumi Pattern step 3 - details and accessories Pusheen Cat with Ice Cream Amigurumi Pattern step 4 - final assembly and finishing

Switch Things Up

I love how versatile this Pusheen pattern can be with just a few creative tweaks! Instead of the ice cream, I've experimented with making tiny books, phones, or even little sushi pieces for Pusheen to hold. You could easily change up the color scheme too - imagine a calico Pusheen with orange and white patches, or even a black cat version with white paws.

For seasonal variations, I've added tiny santa hats for Christmas or small flower crowns for spring. The stripe pattern on the back could be modified to create different tabby markings, or you could even skip them entirely for a solid-colored version. The beauty of this pattern is in its simplicity - once you master the basic construction, the possibilities for customization are endless!

Common Mistakes & How to Fix Them

βœ— Forgetting to use stitch markers can cause you to lose track of rounds and create uneven shaping βœ— Not stuffing firmly enough will result in a floppy cat that won't hold its adorable shape properly βœ— Placing safety eyes too far apart or too close together will affect Pusheen's characteristic sweet expression βœ— Sewing the stripes on crooked or at wrong angles will ruin the authentic tabby cat appearance

Pusheen Cat with Ice Cream Amigurumi Pattern

Create the most adorable Pusheen cat holding a sweet ice cream cone! This charming amigurumi pattern brings everyone's favorite internet cat to life in soft, cuddly form. Perfect for cat lovers and anime fans alike, this delightful project combines simple crochet techniques with irresistible kawaii charm. Your finished Pusheen will be approximately 17cm tall and ready to melt hearts with its sweet expression and tiny ice cream treat.

Intermediate 8-10 Hours

Materials Needed for Pusheen Cat with Ice Cream Amigurumi Pattern

β€” Main Fabric

  • 01
    100-150g light grey DK weight yarn (number 3 yarn)
  • 02
    Less than 50g dark grey DK weight yarn
  • 03
    Sport/baby yarn in light brown, rosΓ©, red, and green for ice cream details (number 2 yarn)

β€” Tools Required

  • 01
    Crochet hook size 4/2.5mm
  • 02
    Safety eyes 12mm
  • 03
    Embroidery needle
  • 04
    Pin-needles
  • 05
    Stitch markers
  • 06
    Yarn needle
  • 07
    Scissors
  • 08
    Stuffing
  • 09
    Black or dark grey embroidery thread

Progress Tracker

0% Complete

β€” Head/Body :

R1 :

6 sc in magic ring (6)

R2 :

2 sc in each stitch around (12)

R3 :

(1 sc, inc) x6 (18)

R4 :

(2 sc, inc) x6 (24)

R5 :

(3 sc, inc) x6 (30)

R6 :

(4 sc, inc) x6 (36)

R7 :

(5 sc, inc) x6 (42)

R8 :

(6 sc, inc) x6 (48)

R9 :

(7 sc, inc) x6 (54)

R10 :

(8 sc, inc) x6 (60)

R11 :

(9 sc, inc) x6 (66)

R12 :

(10 sc, inc) x6 (72)

R13 :

(11 sc, inc) x6 (78)

R14 :

(12 sc, inc) x6 (84)

R15 :

(13 sc, inc) x6 (90)

R16 :

(14 sc, inc) x6 (96)

R17-30 :

sc around (96)

R31 :

14 sc, invdec (90)

R32-35 :

sc around (90)

R36 :

(13 sc, invdec) x6 (84)

R37-40 :

sc around (84)

R41 :

(12 sc, invdec) x6 (78)

R42-43 :

sc around (78)

Info :

Add safety eyes between round 42 and 43 with 11 stitches in between. Stuff as you go.

R44 :

(11 sc, invdec) x6 (72)

R45-48 :

sc around (72)

R49 :

(10 sc, invdec) x6 (66)

R50 :

(9 sc, invdec) x6 (60)

R51 :

(8 sc, invdec) x6 (54)

R52 :

(7 sc, invdec) x6 (48)

R53 :

(6 sc, invdec) x6 (42)

R54 :

(5 sc, invdec) x6 (36)

R55 :

(4 sc, invdec) x6 (30)

R56 :

(3 sc, invdec) x6 (24)

R57 :

(2 sc, invdec) x6 (18)

R58 :

(1 sc, invdec) x6 (12)

R59 :

invdec around (6)

Info :

Cut yarn, leaving yarn end. With yarn-needle go into outer loops from inside out, pull tight to close hole.

β€” Ears (2x) :

R1 :

6 sc in magic ring (6)

R2 :

(1 sc, inc) x3 (9)

R3 :

sc around (9)

R4 :

(1 sc, inc) x3, 3 sc (12)

R5 :

(1 sc, inc) x6 (18)

R6 :

sc around (18)

R7 :

(1 sc, inc) x6, 6 sc (24)

R8 :

sc around (24)

R9 :

(2 sc, inc) x6, 6 sc (30)

β€” Stripes on the back :

Smaller stripe R1 :

ch 26, beginning in second ch from hook 25 sc, ch1, turn

R2 :

25 sc, ch 1, turn

R3 :

25 sc, (inc) x3, 22 sc, (inc) x3, slst (60)

Bigger stripe R1 :

ch 29, beginning in second ch from hook 28 sc, ch 1, turn

R2 :

29 sc, ch 1, turn

R3 :

27 sc, (inc) x3, 26 sc, (inc) x3, 1 sc, slst (67)

β€” Tail :

R1 :

6 sc in magic ring (6)

R2 :

2 sc in each stitch around (12)

R3-4 :

sc around (12)

R4-7 :

Color change to light-grey, sc around (12)

R7-10 :

Change to dark-grey, sc around (12)

R11-14 :

Change to light-grey, sc around (12)

R15-18 :

Change to dark grey, sc around (12)

β€” Hands/Feet (x4) :

R1 :

6 sc in magic ring (6)

R2 :

2 sc in each stitch around (12)

R3-4 :

sc around (12)

R5 :

(1 sc, invdec) x3, 3 sc (9)

β€” Ice Cream :

R1 :

6 sc in magic ring (6)

R2 :

2 sc in each stitch around (12)

R3 :

(1 sc, inc) x6 (18)

R4 :

(2 sc, inc) x6 (24)

R5 :

(3 sc, inc) x6 (30)

R6-10 :

sc around (30)

R11 :

(3 sc, invdec) x6 (24)

R12 :

in FLO: [(hdc + sc) x3, slst in next stitch, skip one stitch] repeat around

R13 :

in BLO sc around (24)

R14-15 :

Color change to brown, Sc around (24)

R16 :

(3 sc, invdec) x5 (20)

R17 :

sc around (20)

R18 :

(2 sc, invdec) x5 (16)

R19 :

sc around (16)

R20 :

(1 sc, invdec) x5 (10)

R21 :

sc around (10)

R22 :

Invdec around (5)

β€” Cherry :

R1 :

6 sc in magic ring (6)

R2 :

2 sc in each stitch around (12)

R3-4 :

sc around (12)

R4 :

invdec around (6)

Cherry stem :

With green yarn, Ch 11, beginning in second ch from hook slst 10

Assembly Instructions

  • Sew ears onto the head positioning them at an angle for that characteristic Pusheen look
  • Attach the tail to the back of the body ensuring it curves naturally and allows the cat to stand
  • Position and sew the four paws to the bottom of the body so Pusheen can sit properly
  • Sew the smaller stripe on top of the larger stripe, then attach both to the back
  • Embroider hair details by taking yarn double and going over each stripe twice
  • Embroider nose and mouth with dark grey or black yarn between the safety eyes
  • Position ice cream in Pusheen's hands and sew hands to body, then secure ice cream to hands

Important Notes

  • πŸ’‘Use stitch markers consistently to track rounds, especially during the complex shaping sections
  • πŸ’‘Stuff firmly but not too tightly to maintain the proper rounded Pusheen shape
  • πŸ’‘When positioning safety eyes, count stitches carefully for the authentic sweet expression
  • πŸ’‘The pattern is worked in continuous spiral rounds without closing off with slip stitches
  • πŸ’‘Feel free to use different yarn weights but remember this will change the final size proportionally

This delightful Pusheen amigurumi pattern perfectly captures the internet's favorite chubby cat in all her kawaii glory! Complete with her signature striped markings and an adorable ice cream cone, this pattern combines beginner-friendly techniques with charming details. The finished piece makes a perfect gift for cat lovers, anime fans, or anyone who appreciates cute handmade treasures. Get ready to fall in love with your very own crocheted Pusheen! 🐱🍦✨

You ask,

we answer.

FAQs

Can I use different yarn weights for this pattern?

Yes! The pattern designer mentions you can use any yarn weight with a matching hook, but remember your finished Pusheen will be larger or smaller while keeping the same proportions.

How do I make sure the stripes look authentic?

The key is sewing the smaller stripe on top of the larger one, and then embroidering hair details by going over each stripe twice with doubled yarn.

What if I can't find 12mm safety eyes?

You can substitute with 10mm or 14mm eyes, but adjust the spacing accordingly. Larger eyes might need 12-13 stitches between them instead of 11.

Can I make this pattern without the ice cream?

Absolutely! You can create just the Pusheen cat and position the hands differently, or create other small accessories like a phone or book.

How do I prevent the cat from falling over?

Make sure to position the tail and feet so they create a stable base, and stuff the bottom portion firmly enough to provide good weight distribution.