๐Ÿงถ Beautiful โœจ Detailed ๐Ÿ’ Adorable

Race Track Mat Crochet Pattern

Race Track Mat Crochet Pattern
4.4โ˜… Rating
6-8 Hours Time Needed
1.2K Made This
โœ‚๏ธ

Intermediate Level

Ideal for those with basic knitting experience, featuring slightly more advanced stitches and techniques to expand your skills.

โฑ๏ธ

All-Day Adventure

Requires 8-10 hours, ideal for a full day of immersive knitting.

๐Ÿก

Cozy Accent

A warm touch for your space that transforms ordinary corners into inviting nooks filled with handmade charm.

About This Race Track Mat Crochet Pattern

This dynamic race track mat pattern recreates the excitement of a real racing circuit in crochet form. The oval design features multiple color zones that create an authentic racing experience - from the grass infield center to the black asphalt track with its distinctive white dashed lane dividers. The pattern uses strategic color changes and increases to maintain the oval shape while building up layers of racing atmosphere. The finale is a classic red-and-white checkered border that captures the iconic finish line aesthetic.

Race Track Mat Crochet Pattern crochet pattern - detailed view of completed project

Measuring approximately 22 inches by 14 inches when completed, this mat is perfectly sized for tabletop racing or floor play. The pattern includes helpful photos and detailed instructions for color changes and maintaining proper oval shaping throughout the construction process.

Why You'll Love This Race Track Mat Crochet Pattern

I absolutely love how this pattern combines practical crafting skills with pure fun! There's something incredibly satisfying about watching the racing theme come together as you work through each colored section. What really excites me is how the strategic color placement creates such a realistic racing environment - the way the yellow lane markers pop against the black track and how that checkered border just screams 'finish line!' I'm particularly fond of how this project teaches advanced techniques like color carrying and oval shaping while creating something that will bring hours of imaginative play.

Race Track Mat Crochet Pattern step 1 - construction progress Race Track Mat Crochet Pattern step 2 - assembly progress Race Track Mat Crochet Pattern step 3 - details and accessories Race Track Mat Crochet Pattern step 4 - final assembly and finishing

Switch Things Up

I love experimenting with different racing themes when making this mat! Instead of the classic red and white checkered pattern, I've tried using team colors like blue and yellow for a more personalized touch. Sometimes I'll add extra details like crocheting small traffic cones or even working in sponsor logos using tapestry crochet techniques.

For a more realistic look, I've experimented with adding texture to the grass center section by using a different stitch pattern like bobble stitches or popcorn stitches to simulate uneven terrain. The track itself can be enhanced with subtle shading using different tones of gray and black to create depth.

I've also found that adding glow-in-the-dark yarn to the lane markings creates an amazing nighttime racing experience that kids absolutely love. For seasonal variations, I've made autumn versions with orange and brown grass sections, or winter versions with white 'snow' centers.

Common Mistakes & How to Fix Them

โœ— Missing stitches in the foundation chain which throws off the stitch count for color pattern rounds โœ— Not using stitch markers at increase points, making it difficult to maintain proper oval shaping โœ— Pulling carried yarn too tightly during color changes, causing the mat to pucker and not lay flat โœ— Forgetting to change colors on the last yarn over, resulting in incorrect color placement in subsequent rounds

Race Track Mat Crochet Pattern

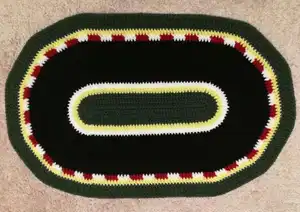
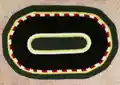
Create an exciting race track play mat that brings the thrill of racing right to your home! This oval-shaped mat features authentic racing colors with green grass center, black asphalt track, yellow lane markers, and classic red-and-white checkered border. Perfect for car enthusiasts of all ages, this versatile mat works beautifully as a play surface, nursery rug, or display piece for toy car collections.

Intermediate 6-8 Hours

Materials Needed for Race Track Mat Crochet Pattern

โ€” Main Fabric

  • 01
    Worsted/Medium weight yarn in Green for grass center section
  • 02
    Worsted/Medium weight yarn in Black for racing track surface
  • 03
    Worsted/Medium weight yarn in White for lane markers and checkered pattern
  • 04
    Worsted/Medium weight yarn in Red for checkered border pattern
  • 05
    Worsted/Medium weight yarn in Yellow for lane dividers and track edging

โ€” Tools Required

  • 01
    3.5 mm crochet hook
  • 02
    4 mm crochet hook
  • 03
    Stitch markers
  • 04
    Darning needle
  • 05
    Scissors

Progress Tracker

0% Complete

โ€” Foundation :

Starting Chain :

With GREEN yarn, chain 43

โ€” Round 1 :

Foundation Round :

dc in second chain from hook, dc in each stitch along chain until last chain. In last chain place 4 dc, then dc in each stitch along other side of chain. In end turning chain place 4 dc, join with slip stitch to first dc

โ€” Round 2 :

First Increase Round :

Chain 2, dc in same stitch as chain and in each stitch until you reach 4 end dc. Place 2 dc in each of four end stitches, dc in each stitch until other end with 4 dc, place 2 dc in each of four end stitches, slip stitch to first dc

โ€” Round 3 :

Second Increase Round :

Chain 2, dc in same stitch as chain, dc in each stitch across straight stretch, (dcINC, dc) x4, dc in each stitch across, (dcINC, dc) x4, on last yo of last dc change to YELLOW, sl st to first dc

โ€” Round 4 :

Yellow Border Round :

Chain 2, dc in same stitch as chain, dc in each stitch across straight stretch, (dcINC, 2dc) x4, dcINC, dc across straight stretch, (dcINC, 2dc) x4, dcINC, on last yo change to WHITE, sl st to first dc

โ€” Round 5 :

White Border Round :

Chain 2, dc in same stitch as chain, dc in each stitch across straight stretch, (dcINC, 3dc) x4, dcINC, dc across straight stretch, (dcINC, 3dc) x4, dcINC, dc until end of round, on last yo change to BLACK, sl st to first dc

โ€” Rounds 6-13 :

Black Track Rounds :

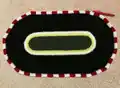
Continue pattern increasing by 1 dc between increases each round: Round 6 (dcINC, 4dc), Round 7 (dcINC, 5dc), Round 8 (dcINC, 6dc), Round 9 (dcINC, 7dc), Round 10 (dcINC, 8dc), Round 11 (dcINC, 9dc), Round 12 (dcINC, 10dc), Round 13 (dcINC, 11dc). On last yo of Round 13, change to RED or WHITE

โ€” Round 14 :

Checkered Pattern Round :

Use alternating red and white yarn every four stitches, carrying unused color along base of stitches. Chain 2, dc in same stitch as chain, continue pattern (dcINC, 12dc) x4, dcINC on each end, on last yo change to YELLOW, sl st to first dc

โ€” Round 15 :

Yellow Border Round :

Chain 2, dc in same stitch as chain, continue pattern (dcINC, 13dc) x4, dcINC on each end, on last yo change to GREEN, sl st to first dc

โ€” Rounds 16-17 :

Green Border Rounds :

Round 16: (dcINC, 14dc) x4, dcINC on each end. Round 17: (dcINC, 15dc) x4, dcINC on each end

โ€” Round 18 :

Final Edge Round :

With 4mm hook, Chain 1, sc in each st, slip stitch to first stitch in round

โ€” Finishing :

Lane Markings :

Using darning needle and 3 feet of white yarn, create lane dividing dashes using line between fourth and fifth rounds of black as guide. Weave dashes through space every two stitches from front to back, repeat until meeting start point

Weave Ends :

Use darning needle to weave in all yarn ends

Assembly Instructions

  • Work in continuous rounds, joining each round with slip stitch to first double crochet
  • Change colors on the last yarn over of the final stitch in each round for clean color transitions
  • Use stitch markers to mark increase points at each end of the oval for consistent shaping
  • When working the checkered round, carry the unused color along the base of stitches to avoid gaps
  • After completing all rounds, use darning needle to weave in all loose ends securely
  • Create lane markings by weaving white yarn through the black track section using photos as reference
  • For larger mat version, substitute bulky weight yarn and use 5mm hook for main construction, 5.5mm or 6mm for final edge

Important Notes

  • ๐Ÿ’กUse stitch markers consistently to track increase points and maintain proper oval shape
  • ๐Ÿ’กCount stitches regularly to ensure correct stitch count for color pattern rounds
  • ๐Ÿ’กWhen carrying colors, don't pull yarn too tightly as this will cause the mat to pucker
  • ๐Ÿ’กChange colors on the last yarn over of final stitch for cleanest color transitions
  • ๐Ÿ’กDouble check stitch counts before beginning checkered round to avoid pattern misalignment
  • ๐Ÿ’กKeep carried yarn strands loose on wrong side to maintain mat flexibility and flat laying

This fantastic race track mat pattern brings the excitement of racing into your home with authentic details and vibrant colors! From the realistic track layout to the classic checkered finish line border, every element captures the thrill of motorsports. Whether used for imaginative play, as a unique nursery accent, or display piece for car collections, this mat delivers both function and fun. The intermediate techniques used make it a perfect skill-building project while creating something truly special! Start your engines and happy crocheting! ๐Ÿ๐Ÿš—

You ask,

we answer.

FAQs

How do I prevent the mat from curling or not laying flat?

Make sure you're not pulling the carried yarns too tightly during color changes. The increases at each end are also crucial for maintaining the proper oval shape - use stitch markers to track these consistently.

What if I miss a stitch in the foundation chain?

Missing stitches in the foundation will throw off your stitch count for later color pattern rounds. Double-check your foundation chain count and consider using stitch markers every 10 stitches to help with accuracy.

How do I create clean color changes?

Always change colors on the last yarn over of the final stitch in each round. This ensures the new color starts cleanly at the beginning of the next round.

Can I make this mat larger?

Yes! The pattern includes instructions for a larger version using bulky weight yarn and 5mm hook for the main construction, with 5.5mm or 6mm hook for the final single crochet round.

How do I add the lane dividing lines?

Use a darning needle with white yarn to weave dashes through the space between the fourth and fifth rounds of black, going every two stitches from front to back around the track.