🧢 Beautiful ✨ Detailed πŸ’ Adorable

Ragdoll Pocket Whale Amigurumi Pattern

Ragdoll Pocket Whale Amigurumi Pattern
4.6β˜… Rating
2-3 Hours Time Needed
3.7K Made This
βœ‚οΈ

Beginner Friendly Level

Perfect for those just starting their sewing journey, with clear instructions and simple techniques

⏱️

Bite-Sized Project

Complete in under 2 hoursβ€”quick, fun, and perfect for a little creative escape.

🐾

Pocket Pal

A mini friend to carry anywhere, providing comfort and companionship in a perfectly portable size.

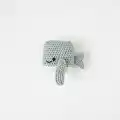
About This Ragdoll Pocket Whale Amigurumi Pattern

This adorable Ragdoll Pocket Whale pattern creates a sweet miniature sea creature that fits perfectly in your palm. Using simple rows and rounds, you'll craft a charming flat-bodied whale with a contrasting white belly, cute flippers, and a distinctive tail. The pattern uses basic single crochet techniques throughout, making it an excellent choice for practicing your tension and assembly skills while creating something truly delightful.

Ragdoll Pocket Whale Amigurumi Pattern crochet pattern - detailed view of completed project

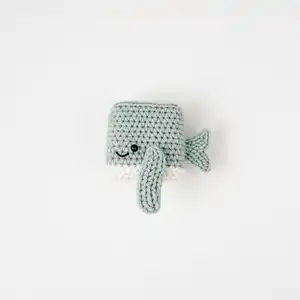
The finished whale makes a wonderful keychain accessory or bag charm that brings ocean-inspired whimsy wherever you go. With its soft ragdoll construction and embroidered facial features, this little companion is sure to bring smiles to anyone who sees it.

Why You'll Love This Ragdoll Pocket Whale Amigurumi Pattern

I absolutely love this pattern because it's so incredibly quick and satisfying to complete. There's something magical about watching this little whale take shape in just a couple of hours, and the ragdoll-style flat construction makes it perfect for beginners who might feel intimidated by fully three-dimensional amigurumi. I find the assembly process especially enjoyableβ€”attaching those sweet little flippers and tail brings so much personality to the piece. Plus, the size makes it ideal for using up yarn scraps, and you can easily make a whole pod of whales in different colors to share with friends or keep for yourself.

Ragdoll Pocket Whale Amigurumi Pattern step 1 - construction progress Ragdoll Pocket Whale Amigurumi Pattern step 2 - assembly progress Ragdoll Pocket Whale Amigurumi Pattern step 3 - details and accessories Ragdoll Pocket Whale Amigurumi Pattern step 4 - final assembly and finishing

Switch Things Up

I love experimenting with color combinations for this little whale! Instead of the traditional blue and white, try creating a pink and cream version for a magical fantasy whale, or go bold with bright rainbow colors for each flipper and tail piece. You could even make an orca-inspired version using black as the main color with white accents.

For a completely different look, consider adding small embroidered details like tiny hearts on the belly or stars along the back. I've also had success adding a small felt bow between the flippers for an extra sweet touch, or using variegated yarn for the main body to create a gradient ocean effect.

If you want to make your whale more interactive, try using different textures of yarnβ€”perhaps a fluffy yarn for the body with smooth cotton for the belly contrast. You could also scale up the pattern by using bulky yarn and a larger hook to create a cuddly pillow version, or make an entire family of whales in graduating sizes from tiny to large.

Common Mistakes & How to Fix Them

βœ— F βœ— o βœ— r βœ— g βœ— e βœ— t βœ— t βœ— i βœ— n βœ— g βœ— βœ— t βœ— o βœ— βœ— i βœ— n βœ— s βœ— e βœ— r βœ— t βœ— βœ— s βœ— a βœ— f βœ— e βœ— t βœ— y βœ— βœ— e βœ— y βœ— e βœ— s βœ— βœ— b βœ— e βœ— f βœ— o βœ— r βœ— e βœ— βœ— c βœ— l βœ— o βœ— s βœ— i βœ— n βœ— g βœ— βœ— t βœ— h βœ— e βœ— βœ— b βœ— o βœ— d βœ— y βœ— β€” βœ— a βœ— l βœ— w βœ— a βœ— y βœ— s βœ— βœ— p βœ— o βœ— s βœ— i βœ— t βœ— i βœ— o βœ— n βœ— βœ— e βœ— y βœ— e βœ— s βœ— βœ— b βœ— e βœ— t βœ— w βœ— e βœ— e βœ— n βœ— βœ— t βœ— h βœ— e βœ— βœ— t βœ— w βœ— o βœ— βœ— b βœ— o βœ— d βœ— y βœ— βœ— p βœ— i βœ— e βœ— c βœ— e βœ— s βœ— βœ— b βœ— e βœ— f βœ— o βœ— r βœ— e βœ— βœ— y βœ— o βœ— u βœ— βœ— s βœ— t βœ— a βœ— r βœ— t βœ— βœ— s βœ— i βœ— n βœ— g βœ— l βœ— e βœ— βœ— c βœ— r βœ— o βœ— c βœ— h βœ— e βœ— t βœ— i βœ— n βœ— g βœ— βœ— t βœ— h βœ— e βœ— m βœ— βœ— t βœ— o βœ— g βœ— e βœ— t βœ— h βœ— e βœ— r βœ— βœ— t βœ— o βœ— βœ— a βœ— v βœ— o βœ— i βœ— d βœ— βœ— h βœ— a βœ— v βœ— i βœ— n βœ— g βœ— βœ— t βœ— o βœ— βœ— u βœ— n βœ— p βœ— i βœ— c βœ— k βœ— βœ— y βœ— o βœ— u βœ— r βœ— βœ— w βœ— o βœ— r βœ— k βœ— . βœ— βœ— O βœ— v βœ— e βœ— r βœ— s βœ— t βœ— u βœ— f βœ— f βœ— i βœ— n βœ— g βœ— βœ— t βœ— h βœ— e βœ— βœ— b βœ— o βœ— d βœ— y βœ— βœ— w βœ— h βœ— i βœ— c βœ— h βœ— βœ— m βœ— a βœ— k βœ— e βœ— s βœ— βœ— i βœ— t βœ— βœ— b βœ— u βœ— l βœ— k βœ— y βœ— βœ— i βœ— n βœ— s βœ— t βœ— e βœ— a βœ— d βœ— βœ— o βœ— f βœ— βœ— m βœ— a βœ— i βœ— n βœ— t βœ— a βœ— i βœ— n βœ— i βœ— n βœ— g βœ— βœ— t βœ— h βœ— e βœ— βœ— f βœ— l βœ— a βœ— t βœ— βœ— r βœ— a βœ— g βœ— d βœ— o βœ— l βœ— l βœ— βœ— s βœ— t βœ— y βœ— l βœ— e βœ— β€” βœ— r βœ— e βœ— m βœ— e βœ— m βœ— b βœ— e βœ— r βœ— βœ— t βœ— h βœ— i βœ— s βœ— βœ— i βœ— s βœ— βœ— m βœ— e βœ— a βœ— n βœ— t βœ— βœ— t βœ— o βœ— βœ— b βœ— e βœ— βœ— s βœ— l βœ— i βœ— g βœ— h βœ— t βœ— l βœ— y βœ— βœ— f βœ— l βœ— a βœ— t βœ— t βœ— e βœ— n βœ— e βœ— d βœ— , βœ— βœ— s βœ— o βœ— βœ— u βœ— s βœ— e βœ— βœ— s βœ— t βœ— u βœ— f βœ— f βœ— i βœ— n βœ— g βœ— βœ— s βœ— p βœ— a βœ— r βœ— i βœ— n βœ— g βœ— l βœ— y βœ— βœ— f βœ— o βœ— r βœ— βœ— t βœ— h βœ— e βœ— βœ— p βœ— r βœ— o βœ— p βœ— e βœ— r βœ— βœ— l βœ— o βœ— o βœ— k βœ— . βœ— βœ— N βœ— o βœ— t βœ— βœ— w βœ— o βœ— r βœ— k βœ— i βœ— n βœ— g βœ— βœ— t βœ— h βœ— e βœ— βœ— f βœ— l βœ— i βœ— p βœ— p βœ— e βœ— r βœ— s βœ— βœ— a βœ— n βœ— d βœ— βœ— t βœ— a βœ— i βœ— l βœ— βœ— t βœ— i βœ— g βœ— h βœ— t βœ— l βœ— y βœ— βœ— e βœ— n βœ— o βœ— u βœ— g βœ— h βœ— βœ— w βœ— h βœ— i βœ— c βœ— h βœ— βœ— r βœ— e βœ— s βœ— u βœ— l βœ— t βœ— s βœ— βœ— i βœ— n βœ— βœ— f βœ— l βœ— o βœ— p βœ— p βœ— y βœ— βœ— a βœ— p βœ— p βœ— e βœ— n βœ— d βœ— a βœ— g βœ— e βœ— s βœ— βœ— t βœ— h βœ— a βœ— t βœ— βœ— d βœ— o βœ— n βœ— ' βœ— t βœ— βœ— h βœ— o βœ— l βœ— d βœ— βœ— t βœ— h βœ— e βœ— i βœ— r βœ— βœ— s βœ— h βœ— a βœ— p βœ— e βœ— βœ— w βœ— e βœ— l βœ— l βœ— βœ— o βœ— v βœ— e βœ— r βœ— βœ— t βœ— i βœ— m βœ— e βœ— βœ— w βœ— i βœ— t βœ— h βœ— βœ— h βœ— a βœ— n βœ— d βœ— l βœ— i βœ— n βœ— g βœ— βœ— a βœ— n βœ— d βœ— βœ— u βœ— s βœ— e βœ— . βœ— βœ— S βœ— k βœ— i βœ— p βœ— p βœ— i βœ— n βœ— g βœ— βœ— t βœ— h βœ— e βœ— βœ— s βœ— t βœ— e βœ— p βœ— βœ— t βœ— o βœ— βœ— t βœ— u βœ— c βœ— k βœ— βœ— y βœ— a βœ— r βœ— n βœ— βœ— e βœ— n βœ— d βœ— s βœ— βœ— i βœ— n βœ— s βœ— i βœ— d βœ— e βœ— βœ— b βœ— e βœ— f βœ— o βœ— r βœ— e βœ— βœ— c βœ— l βœ— o βœ— s βœ— i βœ— n βœ— g βœ— βœ— t βœ— h βœ— e βœ— βœ— b βœ— o βœ— d βœ— y βœ— , βœ— βœ— w βœ— h βœ— i βœ— c βœ— h βœ— βœ— m βœ— e βœ— a βœ— n βœ— s βœ— βœ— y βœ— o βœ— u βœ— ' βœ— l βœ— l βœ— βœ— h βœ— a βœ— v βœ— e βœ— βœ— v βœ— i βœ— s βœ— i βœ— b βœ— l βœ— e βœ— βœ— t βœ— a βœ— i βœ— l βœ— s βœ— βœ— p βœ— o βœ— k βœ— i βœ— n βœ— g βœ— βœ— o βœ— u βœ— t βœ— βœ— o βœ— r βœ— βœ— h βœ— a βœ— v βœ— e βœ— βœ— t βœ— o βœ— βœ— t βœ— r βœ— y βœ— βœ— t βœ— h βœ— r βœ— e βœ— a βœ— d βœ— i βœ— n βœ— g βœ— βœ— t βœ— h βœ— e βœ— m βœ— βœ— t βœ— h βœ— r βœ— o βœ— u βœ— g βœ— h βœ— βœ— a βœ— f βœ— t βœ— e βœ— r βœ— βœ— a βœ— s βœ— s βœ— e βœ— m βœ— b βœ— l βœ— y βœ— βœ— i βœ— s βœ— βœ— c βœ— o βœ— m βœ— p βœ— l βœ— e βœ— t βœ— e βœ— .

Ragdoll Pocket Whale Amigurumi Pattern

Create your own adorable pocket-sized whale friend with this beginner-friendly crochet pattern. This charming ragdoll-style whale features a soft body with contrasting white belly, sweet embroidered details, and delightful flippers and tail. Perfect as a keychain companion or cute handmade gift, this quick project works up in just a few hours using simple stitches and basic techniques that even newer crocheters can master with ease.

Beginner Friendly 2-3 Hours

Materials Needed for Ragdoll Pocket Whale Amigurumi Pattern

β€” Main Fabric

  • 01
    DK weight acrylic yarn in main color (blue/grey shown)
  • 02
    DK weight acrylic or cotton yarn in white for belly accent
  • 03
    Black embroidery thread for facial details

β€” Tools Required

  • 01
    3.5mm crochet hook
  • 02
    2mm safety eyes
  • 03
    Stitch markers
  • 04
    Scissors
  • 05
    Metal yarn needle
  • 06
    Polyester fibrefill or yarn scraps for stuffing
  • 07
    Keyring (optional)

Progress Tracker

0% Complete

β€” BODY (MAKE 2) :

Foundation :

Slipknot, CH 12 and turn

R1 :

SC in the 2nd CH from hook and then SC until the end of row, CH 1, turn

R2 :

SC in each ST of the row, CH 1, turn

R3 to R9 :

SC in each ST of the row, CH 1, turn

R10 :

SC in each ST of the row, at the last ST pull up a loop and join the white yarn with a SC, then CH 1 and turn

R11 :

Now working with the white yarn, SC in each ST of the row, CH 1, turn

R12 :

SC in each ST of the row, fasten and cut yarn

Assembly :

Bring the 2 sides together

Info :

Starting from the right side of your main colour, join new yarn in the same colour and start to SC along all 3 sides

Info :

At every corner ST you will need to do 2 SC

Info :

Before reaching the white part, you need to insert the safety eyes

Info :

Join the white yarn and continue to SC the last side – here you can tuck all the yarn ends inside and use some extra stuffing as well, but not much is needed

Finishing :

Fasten yarn and weave in ends

β€” FLIPPERS and TAIL (MAKE 4) :

Foundation :

Slipknot, CH 2

R1 :

SC 6 times in the 2nd CH from hook

R2 :

SC 2 times in each ST around (12 sts total)

R3 :

SC 1, INC – all around (18 sts total)

R4 :

SC 2, INC - all around (24 sts total), don't fasten

Info :

Fold circle, turn it with the rounded part to face your left hand and start to SC the sides together

Info :

Tuck inside the starting yarn tail

Finishing :

Fasten and leave length of yarn for attaching to the body

Tail Assembly :

For the tail you need to sew the bottom edges, overlapping, with rounded sides facing each other

Info :

Attach tail to the middle of the back side

Info :

Attach flippers to either side right above the white stitches

Optional :

You can either sew on a mouth or not

Info :

If you do add a mouth make sure to knot the ends, tuck in and cut remaining yarn

Assembly Instructions

  • Place the two crocheted body pieces together with wrong sides facing each other, aligning all edges carefully.
  • Starting from the right side using your main color yarn, single crochet around three sides of the body, working 2 SC in each corner stitch for proper shaping.
  • Before you reach the white belly section, pause to insert the 2mm safety eyes through both layers of fabric in the desired position.
  • Switch to white yarn and continue single crocheting the final side closed, tucking all yarn tails inside and adding light stuffing before completing the seam.
  • Create four flipper pieces by folding each crocheted circle and single crocheting the sides together to form fin shapes.
  • Sew two flippers onto the sides of the whale body just above the white belly section using the yarn tails left for attaching.
  • For the tail, overlap the bottom edges of the remaining two pieces with rounded sides facing each other, sew together, and attach to the center back of the whale body.

Important Notes

  • πŸ’‘Use stitch markers to help keep track of your rows, especially when working the body pieces to ensure both sides match perfectly
  • πŸ’‘Don't overstuff the bodyβ€”this ragdoll style should remain relatively flat with just enough stuffing to give it shape and body
  • πŸ’‘Insert safety eyes before you begin closing the body pieces together, as it's nearly impossible to add them afterward without unpicking seams
  • πŸ’‘When attaching flippers and tail, pin them in place first to ensure proper positioning and symmetry before you start sewing them permanently
  • πŸ’‘Weave in all yarn ends securely since this is a small project that will be handled frequently if used as a keychain

This sweet Ragdoll Pocket Whale pattern was designed to bring ocean magic into your everyday life in the most portable way possible. The simple construction and beginner-friendly techniques make it perfect for quick gift-making or as your introduction to amigurumi assembly. With its charming flat body style and adorable features, this little whale friend is ready to accompany you on all your adventures. πŸ‹ Happy crocheting! 🧢✨

You ask,

we answer.

FAQs

What size will my finished whale be?

The finished whale measures approximately 3-4 inches long, making it the perfect pocket-sized companion or keychain accessory that's easy to carry anywhere.

Can I use a different yarn weight for this pattern?

Yes, you can use any yarn weight, but remember to adjust your hook size accordingly. Using thicker yarn will create a larger whale, while thinner yarn will make a more delicate miniature version.

Do I need to know how to crochet in the round for this pattern?

Not for the body! The body is worked in rows, which makes it very beginner-friendly. Only the flippers and tail use the magic ring technique for starting rounds, which is clearly explained in the pattern.

Can I make this whale without safety eyes?

Absolutely! You can embroider eyes using black yarn or thread instead of using safety eyes, which also makes the whale completely safe for young children.

How do I prevent the flippers from being floppy?

Work your stitches tightly when creating the flippers, and don't add any stuffing to them. The flat, firmly crocheted structure will help them hold their shape better over time.