🧢 Beautiful ✨ Detailed πŸ’ Adorable

Rainbow Pixie Pocket Pouch Crochet Pattern

Rainbow Pixie Pocket Pouch Crochet Pattern
4.2β˜… Rating
2-3 Hours Time Needed
3.9K Made This
βœ‚οΈ

Beginner Friendly Level

Perfect for those just starting their sewing journey, with clear instructions and simple techniques

⏱️

Bite-Sized Project

Complete in under 2 hoursβ€”quick, fun, and perfect for a little creative escape.

🎁

Tiny Treasure

Small, sweet, and gift-worthy creations that fit perfectly in the palm of your hand with detailed charm.

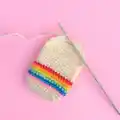
About This Rainbow Pixie Pocket Pouch Crochet Pattern

This delightful Pixie Pocket Pouch pattern creates a miniature rainbow-striped organizer that's both functional and adorable. Designed by Ola Ogunlolu, this compact pouch measures just 6.5cm in length, making it perfect for storing small crafting supplies like stitch markers, buttons, or tiny treasures. The pattern features a beautiful rainbow stripe design worked in fingering weight yarn with a secure button closure flap.

Rainbow Pixie Pocket Pouch Crochet Pattern crochet pattern - detailed view of completed project

The pouch is constructed from the bottom up using joined rounds initially, then transitioning to a continuous spiral for the body. The cover flap is worked separately in rows, creating a secure closure with a charming buttonhole detail.

Why You'll Love This Rainbow Pixie Pocket Pouch Crochet Pattern

I absolutely love this pattern because it's the perfect quick project when you need a creative break but don't want to commit to something huge. The rainbow stripes always make me smile, and there's something so satisfying about creating something both beautiful and functional in just a couple of hours. Plus, these little pouches make the most thoughtful handmade gifts for fellow crafters or anyone who appreciates tiny, colorful treasures.

Rainbow Pixie Pocket Pouch Crochet Pattern step 1 - construction progress Rainbow Pixie Pocket Pouch Crochet Pattern step 2 - assembly progress Rainbow Pixie Pocket Pouch Crochet Pattern step 3 - details and accessories Rainbow Pixie Pocket Pouch Crochet Pattern step 4 - final assembly and finishing

Switch Things Up

I love experimenting with different color combinations for this adorable pouch pattern. Instead of the traditional rainbow sequence, I've tried creating ombre effects using different shades of the same color family - think deep purple fading to light lavender, or forest green transitioning to mint. You could also make it seasonal by using autumn colors like burnt orange, deep red, and golden yellow for fall, or soft pastels for spring.

Another fun variation I enjoy is making these pouches in metallics for special occasions. Using metallic thread worked alongside your regular yarn creates a subtle shimmer that's perfect for gift-giving. I've also experimented with adding small charms or beads to the button closure for extra personality.

For a more minimalist approach, try working the entire pouch in a single color with just one contrasting stripe, or create geometric patterns using two alternating colors. The beauty of this pattern is its versatility - each version tells its own story while maintaining that signature charm.

Common Mistakes & How to Fix Them

βœ— Forgetting to work in back loops only during round 3 which creates the turning ridge for the pouch body βœ— Losing track of stitch count when transitioning from joined rounds to continuous spiral causing uneven shaping βœ— Placing the button incorrectly without testing the flap closure first leading to poor functionality βœ— Working the rainbow stripes too tightly causing the pouch to pucker and lose its proper shape

Rainbow Pixie Pocket Pouch Crochet Pattern

Create this adorable miniature rainbow pouch that's perfect for storing stitch markers, small treasures, or gifting to fellow crafters. This charming pocket-sized accessory features vibrant rainbow stripes and a secure button closure. With its compact 6.5cm size, it's ideal for organizing tiny essentials or as a sweet handmade gift. The pattern combines simple single crochet techniques with colorful design elements to create a functional and delightful accessory.

Beginner Friendly 2-3 Hours

Materials Needed for Rainbow Pixie Pocket Pouch Crochet Pattern

β€” Main Fabric

  • 01
    Approximately 23 yards (21m) of fingering weight yarn in main color (cream or grey recommended)
  • 02
    Scrap amounts of fingering weight yarn in 6 rainbow colors: red, orange, yellow, green, blue, and pink

β€” Tools Required

  • 01
    Crochet hook size 2.5mm
  • 02
    1 small button
  • 03
    Darning needle
  • 04
    Measuring tape
  • 05
    Scissors

Progress Tracker

0% Complete

β€” Base :

Round 1 :

3 sc in second chain from hook, 1 sc in next 5 chains, 5 sc in last chain. Continuing to work on the other side of the chains, sc in the next 5 chains. 2 sc in last chain. Sl st to first sc to join. (20 sc)

Round 2 :

Ch 1 (does not count as a stitch). 2 sc in each of the first 3 sts. Sc 5. 2 sc in each of the next 5 sts. Sc 5. 2 sc in each of the last 2 sts. sl st to join. (30 sc)

β€” Body :

Round 3 :

Ch 1 (does not count as a stitch). Working in the BLO, sc around. (30 sc in blo)

Round 4 :

Ch 1 (does not count as a stitch). Sc in each st around. Fasten off. (30 sc)

Round 5-10 :

Repeat round 4, using a new colour on each round. Work in the sequence - pink, blue, green, yellow, orange, red

Info :

Reattach your main colour and begin to sc around in a continuous spiral without joining, until your pouch measures 6 cm (2.4 in). End on a stitch at the CORNER of your pouch

β€” Cover Flap :

Row 1 :

Ch 1 and turn. sc in the next 15 sts. Ch 1 and turn (15 sc)

Row 2-3 :

Repeat Row 1

Row 4 :

Sc dec, 11 sc, sc dec. Ch 1 and turn (13 sts)

Row 5 :

Sc dec, 9 sc, sc dec, Ch 1 and turn (11 sts)

Row 6 :

Sc dec, 1 sc, chain 4, sk the next 5 sts, 1 sc, sc dec. Ch 1 and turn (4 sts and 4 chs)

Row 7 :

1 sc in each of the 1st 2 sts. 3 sc around chain. 1 sc in each of the last 2 sts. Ch 1 and turn (7 sts)

Row 8 :

Sc dec, 3 sc, sc dec. Ch 1 and turn (5 sts)

Row 9 :

Sc dec, 1 sc, sc dec. Ch 1 and turn (3 sts)

Row 10 :

3 sc. Fasten off

Assembly Instructions

  • Sew on the button on the front of the pouch approximately 1.5 cm (0.6 in) from the top and 3 cm (1.1 in) from the side
  • Test the button placement by holding or pinning it in place first to ensure it fits properly in the buttonhole
  • Make any positioning adjustments needed before permanently sewing the button
  • Weave in all yarn ends securely to finish the pouch

Important Notes

  • πŸ’‘Work the pattern in US crochet terms throughout
  • πŸ’‘The chain 1 at the beginning of each row/round does not count as a stitch
  • πŸ’‘Work in back loops only for round 3 to create the turning ridge
  • πŸ’‘End the spiral section at a corner stitch for proper flap placement
  • πŸ’‘Test button placement before sewing to ensure proper closure function

This charming Rainbow Pixie Pocket Pouch brings a burst of color and functionality to your crafting toolkit. Perfect for organizing small treasures or gifting to fellow fiber artists, this delightful pattern combines beginner-friendly techniques with eye-catching rainbow stripes. The compact size makes it ideal for travel or desktop organization. Happy crocheting and enjoy your colorful creation! 🌈✨

You ask,

we answer.

FAQs

Can I use different yarn weights for this pattern?

While the pattern is designed for fingering weight yarn, you could use DK weight with a larger hook, but the finished size will be bigger than specified.

How do I know where to place the button correctly?

The pattern recommends pinning or holding the button in place first and testing the flap closure before sewing permanently.

Can I change the rainbow color sequence?

Absolutely! The pattern encourages creativity with colors - use any sequence you prefer for your rainbow stripes.

What if I can't find fingering weight yarn?

You can substitute with sport weight yarn and use a 3.5mm hook, but adjust your stitch count accordingly for the proper fit.